-
Hi all and welcome to TheWoodHaven2 brought into the 21st Century, kicking and screaming! We all have Alasdair to thank for the vast bulk of the heavy lifting to get us here, no more so than me because he's taken away a huge burden of responsibility from my shoulders and brought us to this new shiny home, with all your previous content (hopefully) still intact! Please peruse and feed back. There is still plenty to do, like changing the colour scheme, adding the banner graphic, tweaking the odd setting here and there so I have added a new thread in the 'Technical Issues, Bugs and Feature Requests' forum for you to add any issues you find, any missing settings or just anything you'd like to see added/removed from the feature set that Xenforo offers. We will get to everything over the coming weeks so please be patient, but add anything at all to the thread I mention above and we promise to get to them over the next few days/weeks/months. In the meantime, please enjoy!
You are using an out of date browser. It may not display this or other websites correctly.
You should upgrade or use an alternative browser.
You should upgrade or use an alternative browser.
Post a photo of the last thing you made...
- Thread starter TrimTheKing
- Start date
Very neat. And a very neat tool wall too.
No I didn't glue them in Andy. I took good advice from others on here, and fitted them into a rebate, held in with beading that was screwed in place.That's a very smart bit of work. Did you glue the mirrors on in the end?
GaryR
Nordic Pine
We have an in-ground irrigation system that needed some upgrades, including eight ugly 2ft tall plastic pipes and valves to prevent backflow. In an awkward corner right near the street, three feet from the sidewalk, between our driveway and the neighbor's driveway. I asked the installer about screening them and he suggested buying a plastic rock cover. Yes it is a thing. Not cheap and fake and only a little less ugly. I decided to use up some scraps from various projects instead. Western red cedar pickets from a defunct gate, Port Orford cedar posts and cap boards, and copper flashing. The design matches fences in the neighbourhood which are almost entirely made of WRC pickets. No joinery was harmed in the execution of this work. Exterior grade screws only. But I did hand plane the posts and bevel the cap boards to shed water. It should age nicely and be hidden more by the shrubs and be less obvious over time. I was particularly pleased that I had a use for those cedar pickets. That was one of those "to-good-to-toss-maybe-I'll-use-them-someday" decisions that actually paid off.


Last edited:
Alasdair
Sapling
That sounds a bit like my workshop however my water issue is ground water as the shop is set into a hill (I found a newt wandering casually across the floor one day after particularly heavy rain). The box though is lovely.There are glimpses of it in my last few YTs. I have more space than before, but it is fragmented and not such good quality space. The roof leask in multiple places. I was paddling, quite literally, a couple of weeks ago. I have to be careful about whre I put stuff lest it gets wet. Several of my jigs, which used to slide sweetly, now stick and are a pain to use, because they have got damp. Some are going mouldy. We have had a few glorious days recently, but more generally it's been raining, pretty much non-stop, since the end of September. So everything is on the damp side.
Alasdair
Sapling
That is a lovely cabinetI had good advice on here re a bathroom cabinet I was making. Just got around to finishing it.
Geoff
View attachment 26663View attachment 26664
MattS
Nordic Pine
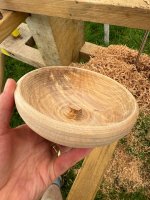
Turned my first bowl on a bowl/ pole lathe on a course last week. It’s a bit rough but i’m happy with it. Included a couple of pics of the tools which may be of interest if you’ve not seen them before.
Attachments


Alasdair
Sapling
Thats excellent, I have never tried a pole lathe but always thought it looked a lot harder than a electrickey driven oneTurned my first bowl on a bowl/ pole lathe on a course last week. It’s a bit rough but i’m happy with it. Included a couple of pics of the tools which may be of interest if you’ve not seen them before.
The extra coordination required between hands and feet must be a challenge. Some lovely grain pattens in that bowl.
MattS
Nordic Pine
Having turned spindles before the hand eye coordination wasn't too bad but the angles and ways you hold the tools for a bowl took a bit of getting used to. Good fun, and I plan to build myself a lathe.
duke
Old Oak
Smart looking cabinet! Your hand tools are arranged neatly.I had good advice on here re a bathroom cabinet I was making. Just got around to finishing it.
Geoff
View attachment 26663View attachment 26664
Pete Maddex
Old Oak

duke
Old Oak
What type of finish are you going to use or leave it bare?
Pete Maddex
Old Oak
I usually leave the bare, they get chucked in the dishwasher so I font think a finish would last long.What type of finish are you going to use or leave it bare?
I regard them as disposable but the last few I made out of some 6mm thick beech have lasted years.
It only took me an hour to carve it from a piece of split beech log.
Pete
duke
Old Oak
I agree Pete, have made a few and coated them with food safe waxes etc., and like you say it doesn't last long.I usually leave the bare, they get chucked in the dishwasher so I font think a finish would last long.
I regard them as disposable but the last few I made out of some 6mm thick beech have lasted years.
It only took me an hour to carve it from a piece of split beech log.
Pete
Blackswanwood
Old Oak
Cherry and Masur Birch jewellery box. 
Lined with aubergine pig suede.

Smarthinges and Smartlock hardware

Coloured splines for the tray

Blackwood escutcheon
Finished with Antique Amber Peacock Oil and Alfie Shine Hardwax


Lined with aubergine pig suede.
Smarthinges and Smartlock hardware
Coloured splines for the tray
Blackwood escutcheon
Finished with Antique Amber Peacock Oil and Alfie Shine Hardwax
Pete Maddex
Old Oak
Very nice.
Pete
Pete
AJB Temple
Sequoia
- Joined
- Apr 15, 2019
- Messages
- 7,722
- Reaction score
- 1,201
That box looks a lovely job.
very classy.
Blackswanwood
Old Oak
Thanks.Beautiful box. Where did you get the pig suede? It's been a while since i bought some, last lot i got was from ebay.
I have used Identity Leathercraft in the past (based in Matlock) but have switched to GH Leathers who were recommended by Andrew Crawford and are a fair bit cheaper with a much bigger choice. They also do goat suede.
Website is https://www.leathermerchants.com/
GH do a free swatch service and unlike Identity also will send out a free colour chart.
Cheers
Robert
Paisawood
Seedling
A very tall (1950mm) bookcase in ash for a granddaughter's new apartment, It stands on a sloping floor in an alcove which is nowhere near square. Because of the size and the narrow access staircase I decided on a self assembly construction and used Lamello Clamex connectors to join it all together. Inset Tonk strips were used for the shelf supports.
 strips


stripsWeekend_Woodworker
Sapling
- Joined
- Apr 3, 2021
- Messages
- 298
- Reaction score
- 54
Very neat, especially being able to dismantle it for transportation.
If that alcove is not square did you make the case equally off square? The gaps all look very even to me.
Thosse KD fittings look a cut above the Ikea ones.
Thosse KD fittings look a cut above the Ikea ones.
Cabinetman
Sequoia
- Joined
- Oct 11, 2020
- Messages
- 5,528
- Reaction score
- 1,231
- Location
- Lincolnshire Wolds + Massachusetts
- Name
- Ian
Yes very smart, I like those clamp things, I hadn’t seen those before.
I suppose you could cover the gaps with a matching archive if you wanted
I suppose you could cover the gaps with a matching archive if you wanted
Pete Maddex
Old Oak
I bought a offcut of cow skin from Blenheim palace flower show which I thought might look good as the top of a box.
The underside of the top and base are made from 6mm ply veneered with ripple maple, the top frame is Wenge.
 Brown oak and cow skin box by Pete Maddex, on Flickr
I did a simple lift off lid by cutting rebate and them sawing the lid off and fitting thin mitered strips.
 Brown oak and cow skin box by Pete Maddex, on Flickr
Pete
The underside of the top and base are made from 6mm ply veneered with ripple maple, the top frame is Wenge.
Brown oak and cow skin box by Pete Maddex, on FlickrI did a simple lift off lid by cutting rebate and them sawing the lid off and fitting thin mitered strips.
Brown oak and cow skin box by Pete Maddex, on FlickrPete
RafeZetter
Seedling
- Joined
- Jan 10, 2023
- Messages
- 28
- Reaction score
- 11
My literal first humble arthouse piece on an actual lathe, as opposed to my previous things knocked up using a drill and a bolt.
Epoxy grooves go in opposite directions - a real test of my technical skill.
It's a butt plug - for broom handle and head, just in case it wasn't obvious.

Epoxy grooves go in opposite directions - a real test of my technical skill.
It's a butt plug - for broom handle and head, just in case it wasn't obvious.
RafeZetter
Seedling
- Joined
- Jan 10, 2023
- Messages
- 28
- Reaction score
- 11
I also made this quite recently - an almost bomb proof ledge and brace side gate - with top end grain weather protection using an aluminininum strip. Made from 25mm thick reclaimed pitch pine boards which has quite a lot of aluminininum paint and about 5 coats of weathershield flexible paint on top of that - T&G joints sealed with hybrid mastic to allow it to move, but not open up and allow water in, even if the paint splits, which it shouldn't.
Breadboard ends "just because" I wanted to practise them again, having not done any for years. Yes redundant with ledge and brace I guess but wth.
I was given free reign on the design and she wanted a door "that would see her out and better than the cheap stapled together trash", oh and it has stainless steel base kickplates front and back as she has a rather tenacious dog that clawed through the old one - good luck with this one lol.
"Olde worlde" hardware, which is reflected with reclaimed blacksmith made strap hinges on the reverse (which oddly I can't find a picture of) and metal studs were my idea.
Aluminininium and Stainless steel were sprayed with smooth hammerite to match the hardware.
Whole frame had to be remade as well as was rotten, it's not obvious but the frame sides don't actually touch the ground, about 10mm off to stop endgrain soaking from below
Has garnered quite a few comments from the locals nearby, customer is pleased as can be")
Not bad for my first scratchbuilt door, just don't tell her that

.jpg")
.jpg")
Breadboard ends "just because" I wanted to practise them again, having not done any for years. Yes redundant with ledge and brace I guess but wth.
I was given free reign on the design and she wanted a door "that would see her out and better than the cheap stapled together trash", oh and it has stainless steel base kickplates front and back as she has a rather tenacious dog that clawed through the old one - good luck with this one lol.
"Olde worlde" hardware, which is reflected with reclaimed blacksmith made strap hinges on the reverse (which oddly I can't find a picture of) and metal studs were my idea.
Aluminininium and Stainless steel were sprayed with smooth hammerite to match the hardware.
Whole frame had to be remade as well as was rotten, it's not obvious but the frame sides don't actually touch the ground, about 10mm off to stop endgrain soaking from below
Has garnered quite a few comments from the locals nearby, customer is pleased as can be
Not bad for my first scratchbuilt door, just don't tell her that
Last edited:
Very smart.
Woodbloke
Sequoia
Here's a thing wot's half made.

Bog Oak and some of Cabinetman's mahogany. Two of the drawers fitted, yet to be detail sanded, plinths on the lhs - Rob
Bog Oak and some of Cabinetman's mahogany. Two of the drawers fitted, yet to be detail sanded, plinths on the lhs - Rob
Cabinetman
Sequoia
- Joined
- Oct 11, 2020
- Messages
- 5,528
- Reaction score
- 1,231
- Location
- Lincolnshire Wolds + Massachusetts
- Name
- Ian
Be interested to see just wot wot is when it’s finished!
Starburst walnut coffee table using bandsawn veneers with tapered curved laminated legs. Inlay lines are ash Finished with Danish oil
Attachments


Weekend_Woodworker
Sapling
- Joined
- Apr 3, 2021
- Messages
- 298
- Reaction score
- 54
Made an insert for my wife to sort tools in a storage box. Made out of 3.3mm ply to keep it light with some stiffers.


Woodbloke
Sequoia
The inspiration for this little job is, as of last Sat, no longer in the BM - RobBe interested to see just wot wot is when it’s finished!
SamQ aka Ah! Q!
Old Oak
Rob, colour me dense, slow on the uptake...what's a BM?The inspiration for this little job is, as of last Sat, no longer in the BM - Rob
duke
Old Oak
Book Mark ? I am also dense or as the wife says " thick as a plank"Rob, colour me dense, slow on the uptake...what's a BM?