• Hi all and welcome to TheWoodHaven2 brought into the 21st Century, kicking and screaming! We all have Alasdair to thank for the vast bulk of the heavy lifting to get us here, no more so than me because he's taken away a huge burden of responsibility from my shoulders and brought us to this new shiny home, with all your previous content (hopefully) still intact! Please peruse and feed back. There is still plenty to do, like changing the colour scheme, adding the banner graphic, tweaking the odd setting here and there so I have added a new thread in the 'Technical Issues, Bugs and Feature Requests' forum for you to add any issues you find, any missing settings or just anything you'd like to see added/removed from the feature set that Xenforo offers. We will get to everything over the coming weeks so please be patient, but add anything at all to the thread I mention above and we promise to get to them over the next few days/weeks/months. In the meantime, please enjoy!

I've fettled my drum sander...

Steve Maskery

Old Oak
Joined
Jul 27, 2014
Messages
2,372
Reaction score
1,327
Location
87290 Laplagne, France
As per title. I have a Love/Hate relationship with my drum sander. I had a box full of new loadings for it which appear to have gone AWOL in the move, so I have used this very little in the last two years. But I now have a need for it, so with a very heavy heart I set about sorting it out. I forked out over a hundred Euros-worth of top-quality 80 and 120 grit cloth abrasive and got my machine working better than it has ever been in its 20-year life.
I'm happy with it. Enjoy.
S

 
Thanks for doing this Steve. It's very helpful.

The tracking on the belt is the biggest problem I have. I suspect it's because the floor of my workshop isn't at all flat so it adds some twist.

When I did the laminations for my table legs, I ran them through both ways around (as well as on both sides) to try to iron out any slight differences in the cylinder alignment (although I did realign that as well). They were quite narrow so it probably wasn't necessary, but it made me happy!
 
Thank you both. It is ages since I've had a good go at fettling it, usually it just gathers dust. But I've relly very pleased at how it has turned out. It really is that accurat now, I didn't have to fake anything*.
S
*Not quite true. I forgot to film setting up the drum for the first cut, so I had to go back to Bob to ask him if he had a piece of the same wood. So the piece of board used for that scene is a different piece for the actual sanding!
 
As per title. I have a Love/Hate relationship with my drum sander. I had a box full of new loadings for it which appear to have gone AWOL in the move, so I have used this very little in the last two years. But I now have a need for it, so with a very heavy heart I set about sorting it out. I forked out over a hundred Euros-worth of top-quality 80 and 120 grit cloth abrasive and got my machine working better than it has ever been in its 20-year life.
I'm happy with it. Enjoy.
S

Rude words, Steve? Surely not. :) You've got it easy with yours for changing the drum belt. The top doesn't come off on the 10/20. The front opens up, and you need three hands and children's fingers to feed the tapered ends and pull the catches at the same time.

On my luthier course some time ago, we always turned the work pieces round in case the drum wasn't quite level with the table. At to 2mm thickness for soundboards, backs and sides, unequal thickness is quite undesirable. So I always turn the work round if it's wider than about 100mm, even if I think the drum and table are parallel.
 
Nice video, Steve. I almost bought the Jet drum sander, but decided to buy the Laguna SuperMax 16-32 instead (on sale and free shipping from the Czech Republic). The Laguna shares some of the features of the Jet, but the alignment is done by changing the height of one end of the feed belt assembly instead of the drum assembly. The pivot point is the other end of the feed belt assembly, so it is easy to fine tune the adjustment.
 
Nice video, Steve. I almost bought the Jet drum sander, but decided to buy the Laguna SuperMax 16-32 instead (on sale and free shipping from the Czech Republic). The Laguna shares some of the features of the Jet, but the alignment is done by changing the height of one end of the feed belt assembly instead of the drum assembly. The pivot point is the other end of the feed belt assembly, so it is easy to fine tune the adjustment.
That sounds like it would obviate a lot of the alignment problems.
 
Hi Steve
Many thanks for that I thoroughly enjoyed the video and as usual you have a nice relaxed gentle style of presentation though you might need to train your helper better so you don't have to tell him to "shut up". :ROFLMAO:

I have the same hate relationship with mine which means it gets little use. I bought it s/h from a UKW member and there's nothing wrong with it apart from being a faff but you've inspired me to look at it with fresh eyes and do some maintenance. (y)

Bob
 
Good video Steve! I've had my 16-32 for at least a decade now and it's behaved faultlessly but agreed, getting the drum parallel to the table is a veritable pita. I've also done the mod as you suggest to the adjustment bolts either side which makes a huge difference; I keep a pair of spanners handy for tracking adjustment as and when required. For the abrasive, I now use an 80g Abranet belt from Axminster which rarely clogs up; the worst timber is resinous knotty pine which almost instantly fouls the loading. However, all I do is to take it off, dunk it in some hot soapy water and give it a good going over with a brass brush which removes 95% of the ingrained crud. It then gets pegged out to dry on the washing line before being reinstalled on the machine. As much of my work is veneered, it's an essential bit of kit in my shop; I recollect that the late Bob9F came over to my place for a demo and was so impressed that within a couple of weeks he'd purchased one from the 'bay of fleas':D - Rob

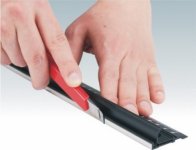
Edit- using a Stanley knife as shown with a 300mm ruler 'ordinaires' is somat I now never, ever do. On two occasions cutting veneer the knife blade jumped the rule edge straight into my thumb; I still have the white scars as a gentle reminder. Both cuts were so deep I needed hospital treatment! I now use the thick side of a Maun straight edge.
 
Last edited:
Forgot to mention, I keep a pair of heavy duty kitchen scissors with my abrasives, just for cutting them and nothing else. If I also remember correctly, the length of the taper, along one side is 15 1/2", to a point, so the point needs to be cut off, just if ever you don't have an old belt as the template.
 
Yes it did make me wince, a man with one eye and a sharp blade near his hand, I had to hide behing the settee for that part.

Maun Safety Ruler


Pete
 
Yes it did make me wince, a man with one eye and a sharp blade near his hand, I had to hide behing the settee for that part.

Maun Safety Ruler


Pete
I used to use those in school Pete donkey's years ago; trouble is they're not straight! - Rob
 
Yeah, that part was a bit cringe...

I really like to use Tajima cutting rulers to keep my fingers safe when cutting whichever material.

Something like this:

TJCTGSL300_4.jpg
 
Did that board do a quick change from pine to oak?

I've no interest in sanding machines, Steve, but I can help you with your Stanley knife. If you cut the sanding sheet from the other side (ie the cloth backing side), you don't need to cut into the abrasive. You essentially score the line in the cloth (or paper), and then snap the abrasive by folding.
 
I forgot to film setting the drum height and by the time I realised, Bob had oiled and hung the door. So I had to ask if he had another piece. It was a bit bigger and thicker and was finished. But they were both oak staved kitchen worktop.
 
I too had trouble in getting the drum parallel to the table. I would get right by a similar method but when i tightened the fixing screws it moved out of true. I got so frustrated with it in the end I resorted to shimming the table instead. It seems Laguna have gone down this route.
I improved the drive belt adhesion by coating the drive roller with heat shrink rubber tubing.
A tip for evening out wear and burning of the abrasive - run narrow pieces through at an angle so that the whole drum is used.
The cutting angle on the loading ends is easy to work out - the length of the diagonal cut is equal to the drum circumference.
Sadly mine had to go in my recent downsizing but I'm thinking of setting up a jig on my pillar drill or even a drum on my lathe to sand small items.
Brian
 
A tip for evening out wear and burning of the abrasive - run narrow pieces through at an angle so that the whole drum is used.
The cutting angle on the loading ends is easy to work out - the length of the diagonal cut is equal to the drum circumference.
I do that as well and same with my thicknesser.
 
I guess you did this for the camera but I would never hold the ruler on the waste side of the line any slip will ruin the good piece and not the waste.
 
Mike, cutting the cloth side did occur to me whilst I was actually doing it.
Andy, you are right, but I am constantly having to remember that I mustn't block the line of sight of the camera.
So many things to consider!
 
Back
Top