• Hi all and welcome to TheWoodHaven2 brought into the 21st Century, kicking and screaming! We all have Alasdair to thank for the vast bulk of the heavy lifting to get us here, no more so than me because he's taken away a huge burden of responsibility from my shoulders and brought us to this new shiny home, with all your previous content (hopefully) still intact! Please peruse and feed back. There is still plenty to do, like changing the colour scheme, adding the banner graphic, tweaking the odd setting here and there so I have added a new thread in the 'Technical Issues, Bugs and Feature Requests' forum for you to add any issues you find, any missing settings or just anything you'd like to see added/removed from the feature set that Xenforo offers. We will get to everything over the coming weeks so please be patient, but add anything at all to the thread I mention above and we promise to get to them over the next few days/weeks/months. In the meantime, please enjoy!

Garden room restoration

Doug

Old Oak
Joined
Jul 21, 2014
Messages
2,408
Reaction score
397
Location
@dougsworkshop
A dear old friend has this style of garden room
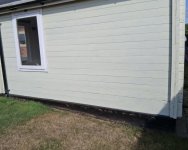
20250626_171453.jpeg

The problem is where the interlocking timber meet on the corners
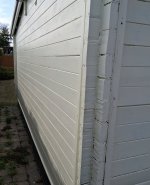
20250626_171430.jpeg

These are rotting & prior to painting a few years ago he screwed 3x2’s to the corners to try & reinforce them, this hasn’t really worked.
His thoughts are to clad the outside & whilst I have some ideas on this I was wondering if anyone had had similar problems with this type of building & what they did to overcome it, or anyone could offer ideas that might help restore it rather than just pull it down.TIA.
 
I don't know how these buildings work, Doug. Is that timber all structural, or is it just a cladding?
 
I don't know how these buildings work, Doug. Is that timber all structural, or is it just a cladding?
The corners are structural, something like as in the image below. As to a fix I don't have any great ideas. If it's rotting perhaps the only vain (probably failed) attempt at rescue would be to slosh fungicide all over the place. Or maybe the corner could be boxed out externally somehow to prevent more water getting in: reduced water levels equal reduced fungal activity.

Possibly the best move is to do the minimum cosmetic improvement that can be got away with and then just leave it alone until it rots too much to live with ... and then replace. Slainte.

InnovativeSelfAssembly.png
 
My workshop is constructed in the same fashion.
It’s essential that the various “ layers “ are not screwed together otherwise they can’t expand and contract independently.
All of the tool boards inside mine are on French cleats so that no two layers are permanently fixed to another.
Those additional strips (in your photo) that are screwed with prevent natural movement. The whole thing will warp and twist, create gaps for water ingress.
You can clearly see where some don’t interlock as intended.
 
That looks awkward Doug.

I agree with Lurker that the attempted fix has probably made things worse. Traditional log cabins rely on the weight of the roof to compress the joint as the timber contracts and expands preventing water ingress. Stabilising any rot and then some form of cladding to keep it dry is the only potential solution that I can think of.
 
Definitely his initial fix has not allowed for expansion which is key & why it has failed.

My initial thoughts at the moment are to stand a piece of 3” (75mm) angle iron in each internal corner which will have 1” vertical slots milled in it to correspond with the centre of each horizontal wooden board.
Then bolt through these slots & the boards using large washers inside and out to allow for movement.
Alternatively I cut 1” vertical slots in the centre of each horizontal timber & bolt through them into a piece of angle iron again in the internal corners.

What I’m wondering is if either option will allow for enough movement or would I be better slotting both timber & angle iron.

With all options the external rotting board ends will be removed flush, treated, then clad to look like an upright beam so as to give protection to those end grain timbers.
 
Last edited:
I was wondering if after removing the screwed on wood that made things worse, whether, after making good with wood hardener and filler, a continuous lead cap formed over the ends would deal with the issue. There is give in lead and it is very effective at keeping moisture out.
 
I was wondering if after removing the screwed on wood that made things worse, whether, after making good with wood hardener and filler, a continuous lead cap formed over the ends would deal with the issue. There is give in lead and it is very effective at keeping moisture out.
It would have to be very carefully detailed, because lead can also keep water in. If water could track in behind it it could make the situation worse.
 
It would have to be very carefully detailed, because lead can also keep water in. If water could track in behind it it could make the situation worse.
Completely agree.

I - and others! - have just removed a metal 'end' piece (very similar to the proposed 'fix' above) from an exposed item on a railway brake wagon we are partially restoring. The water ingress ran to 40cm plus from the metal 'cap' (over end grain) but we stopped there as the blackening of wet rot had disappeared from the cuts. That said, there was still a "punkiness" in the wood on the cut face - which we stabilised(?) with wood hardener, more in hope than expectation.

We have noted over the years, that metal braces, stiffening plates, identification plates, grab bars and the like have all - without exception - permitted ingress of water behind them and then sequestered it to enhance the rot. The only circumstance where this did not happen was when the fixture was mounted over tar or a derivitive of same.

Modern silly cone is just that. Silly. Our experimentation with it suggests most versions are liable to U.V. deterioration, or the bally stuff just shrinks and falls out.

Sam, the fat carpenter.
 
Back
Top