
meccarroll
Nordic Pine
- Joined
- May 12, 2016
- Messages
- 815
- Reaction score
- 180
Hi all this is a little project of mine over christmas, it is not a project worth posting in the main project section as there is not enough pictures or other detaile of the process but might be of interest to some so putting it up here.
I had a play with a new feature of Vetric V carve, the new feature is called: V carve inlay, in which you produce an inlay but with v edges.
You use different bits to router out the shape you want V Bit for the edges of the shape and more conventional cylindrical bits to router out the bulk of the inlay.
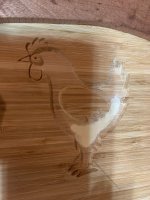
The below picture shows the inlay, the wing, eye, beak were left raised and untouched but the outline and body of the chicken were taken out to an approximate depth of about 4mm.
Once I had routerd the inlay I routered the counter profile which has to fit exactly into the inlay, see below:
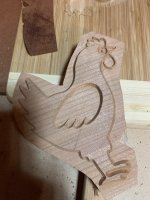
To produce the above I imported a picture of a chicken into Vertic and used a feature called trace, which traces around the picture. You can then use the outline trace lines to machine from.
The V Inlay feature does all the work of producing both the inlay and counter profile but you still select the tooling and toolpath parameters for the CNC toolpath.
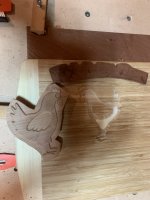
The below picture shows both Inlay and Counter profile side by side. The shape above the chicken is some counter profile lettering which I had already glued to the cutting board and just needed the excess machining down with the CNC to the boards surface:
Once you have produced both inlay and counter profile you glue them together and leave to dry then machine off the excess counter profile, give it a sand over and below is the finished item:
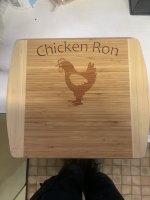
The lettering was inlayed in the same way as the chicken.
I have done V carving before on cutting boards and used the pocket feature in Vetric to make letters stand out in a reduced pocket but not used the V carve inlay feature.
Next time I do the above again I'll try to document the entire process and take more pictures to better explain the process.
Mark
I had a play with a new feature of Vetric V carve, the new feature is called: V carve inlay, in which you produce an inlay but with v edges.
You use different bits to router out the shape you want V Bit for the edges of the shape and more conventional cylindrical bits to router out the bulk of the inlay.
The below picture shows the inlay, the wing, eye, beak were left raised and untouched but the outline and body of the chicken were taken out to an approximate depth of about 4mm.
Once I had routerd the inlay I routered the counter profile which has to fit exactly into the inlay, see below:
To produce the above I imported a picture of a chicken into Vertic and used a feature called trace, which traces around the picture. You can then use the outline trace lines to machine from.
The V Inlay feature does all the work of producing both the inlay and counter profile but you still select the tooling and toolpath parameters for the CNC toolpath.
The below picture shows both Inlay and Counter profile side by side. The shape above the chicken is some counter profile lettering which I had already glued to the cutting board and just needed the excess machining down with the CNC to the boards surface:
Once you have produced both inlay and counter profile you glue them together and leave to dry then machine off the excess counter profile, give it a sand over and below is the finished item:
The lettering was inlayed in the same way as the chicken.
I have done V carving before on cutting boards and used the pocket feature in Vetric to make letters stand out in a reduced pocket but not used the V carve inlay feature.
Next time I do the above again I'll try to document the entire process and take more pictures to better explain the process.
Mark
Last edited:


