• Hi all and welcome to TheWoodHaven2 brought into the 21st Century, kicking and screaming! We all have Alasdair to thank for the vast bulk of the heavy lifting to get us here, no more so than me because he's taken away a huge burden of responsibility from my shoulders and brought us to this new shiny home, with all your previous content (hopefully) still intact! Please peruse and feed back. There is still plenty to do, like changing the colour scheme, adding the banner graphic, tweaking the odd setting here and there so I have added a new thread in the 'Technical Issues, Bugs and Feature Requests' forum for you to add any issues you find, any missing settings or just anything you'd like to see added/removed from the feature set that Xenforo offers. We will get to everything over the coming weeks so please be patient, but add anything at all to the thread I mention above and we promise to get to them over the next few days/weeks/months. In the meantime, please enjoy!

Mike G's How to Build a Shed

AndyP

Moderator
Staff member
Joined
Jul 22, 2014
Messages
14,342
Reaction score
1,903
Location
14860 Normandy, France
First published in 2010


Note that this only applies if your building does not require Building Regulations approval. If it needs to meet the regs, the base will need to be properly designed according to the local soil conditions and tree locations etc.


4bc09eb0d78a2f8e56875630c2a4e602.jpg


The concrete should be laid on:
-clean compacted hardcore, from 75 to max. 150 thick
-sand blinding (for the protection of the DPM)
-1200 gauge DPM

Note the golden rule of walls: The Vapour Barrier goes on the warm side of the insulation!!!!. The vapour barrier in this drawing is the OSB, which is full of glue and therefore highly resistant to the passage of moisture.

Key features of this design are the brick plinth and the 25mm air gap between the frame and the back of the cladding. In the roof, it is essential that there is a 50mm clear ventilated void above the insulation, and that there is a continuous 25mm gap at the eaves (with insect mesh) to provide air movement. These features are essential to prolong the life of the building, and to keep everything inside dry.

You can omit the floating floor if you wish. My own workshop simply has the concrete slab as the floor.

I imply no structural calculations for the roof! Each roof should be designed individually, and I am always happy to help with that. I would suggest min. 150mm rafters so that you can fit 100mm of insulation in without restricting the airflow, but with some roofs the rafters will need to be much deeper for structural reasons.

The boarding can easily be replaced with render, so long as the airflow behind is maintained, and this is made easier by using a backing of building paper behind the EML (mesh) so that the render doesn't get pushed through too far into the cavity. Note that with boarding there should only be one nail per board per stud position, and that that nail should be situated about 30mm up from the bottom edge of the board.

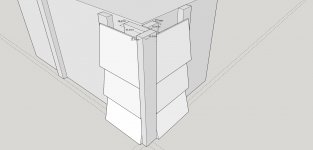
Corner detail
3D76F88D-281D-430C-91BA-1B50AF135127.jpeg


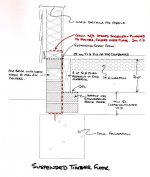
And now a variation: with Timber Suspended Floor
Shedscan21600x1886.jpg

Mod Note: Thanks to Rod having an archive of the main drawing we have been able to re-instate this. Also thanks due to Deejay who has provided a copy of the Timber Suspended Floor sketch to reinstate Mikes original diagrams. Bob

I like this less, particularly because of the large step up and the resulting taller building (or reduced headroom). This isn't the only way to do this, but the principle is to have the insulation hard up under the flooring, with a continuous ventilated void below the joist.

The surface of the reduced ground level below the floor should either have a geotextile membrane or a layer of lime laid on it, or it should be treated with a weed-killer. Avoid using this design in wet/ boggy areas because of the reduced ground level below the floor.

I hope this helps.

Mike
 
  • Like
Reactions: Col
The above was first posted on UKW in 2010 I propose to make it a sticky in due course but have left it open for the moment in case Mike wants to add anything to what are now 6 year old drawings.
 
It's good to see this back. Thanks for fixing it up.

I'm curious about the roof. Andy, what did you use for roofing on your shed? It seems to be a common thing to have little to no overhang on the roofs of houses and sheds over there. I can understand that with a heavy tile or slate roof but if you use asphalt shingles or metal the weight wouldn't be a big problem. Having a wider overhang would provide some protection from rain and help to keep the sun out a bit in the summer months.
 
There is more than just the structure to consider when designing a building. There is also local tradition and aesthetics. Large roof overhangs just aren't something we do over here.......but as soon as Brits went to the tropics centuries ago, for instance, we developed huge roof overhangs. I don't see there is anything much to be gained by large overhangs here in the UK, but if people want to do it, then fine. Saying that, I have about a 3 foot overhang on the rear of my workshop, to create a dry wood storage area, but when it is finished it will have support posts to make it look less odd.
 
Yeah. I understand the tradition part of it. We do have the tradition of wider overhangs. Not like you might in the tropics. On our house the soffits are 2 feet wide. They protect the windows and doors from the rain except when it is blowing a gale. In many cases we can even have the windows open when it rains. Still, it was just a question. No intent to make anyone change their ways.
 
Ah, right. Well you have an altogether different aesthetic, and you get snow and ice. Big roof overhangs would be a necessity rather than a bonus, I reckon.
 
Well, in a lot of respects they are very helpful. One downside of the longer overhangs with the snow on the roof of a heated building like a house is the formation of ice dams. If the attic space isn't well insulated, you can get snow melting and running down toward the eaves where it freezes because the overhang isn't heated. This forms a raised ridge of ice which allows water to back up under the shingles. There's a rubber membrane that gets glued down before the shingles go on to prevent water from seeping in.
 
Dave R":32khf3eg said:
It's good to see this back. Thanks for fixing it up.

I'm curious about the roof. Andy, what did you use for roofing on your shed?

I can see why you thought the thread was mine Dave but I have never built a shed in my life. I just edited Mike's post. :)
 
Looking at the corner detail for the cladding. My counterbattens are all 25mm (I just went and measured them), but I can't seem to find any sawn, treated or untreated 25mm by more than 50mm to use for the other pieces. Everything over 50mm I find is 22mm. Anyone have any leads for 25mm sawn near me?
 
Would it be possible for you to rip 50x25 to the additional width required and screw them to the 50x25s to make them your dimension?

Or could somebody rip them for you?

I ripped mine out of 95x45s. If you have access to a table saw, could you do that?
 
I have an Elektra Beckum KGT500 flip saw, will have to check the depth of cut, I'm not sure it it will cope with 90mm, but maybe. A quick Google gives various answers re. depth of cut, but looks like 80mm may be it.
Alternatively, I suppose I could try my Inca bandsaw. The only problem is, I have nowhere to set it up. That's one of the things that will go in the shed, when it's built...
 
John Brown":2ofyjhah said:
I have an Elektra Beckum KGT500 flip saw, will have to check the depth of cut, I'm not sure it it will cope with 90mm, but maybe. A quick Google gives various answers re. depth of cut, but looks like 80mm may be it.
Alternatively, I suppose I could try my Inca bandsaw. The only problem is, I have nowhere to set it up. That's one of the things that will go in the shed, when it's built...


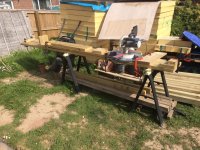
While I was building my 'shop, I had to set up my CSM saw in the garden and wrap it tarpaulin each night.
IMG_1010.JPG
 
You can't buy 3x1 or 4x1 or 6x1 sawn? I mean, that's absolutely standard building site stuff that every builders merchant around here sells. Whereabouts in the country are you?
 
I'm in Gloucestershire. Everything above 50mm wide is 22mm rather than 25mm. It may be "nominally" 6 x 1, but it's actually 22mm. Except for the batttens I've already nailed on, which are decidedly 25mm.

I can see I'll be wheelbarrowing my Inca bandsaw out into the paddock...
 
Malc2098":ofnen1bb said:
John Brown":ofnen1bb said:
I have an Elektra Beckum KGT500 flip saw, will have to check the depth of cut, I'm not sure it it will cope with 90mm, but maybe. A quick Google gives various answers re. depth of cut, but looks like 80mm may be it.
Alternatively, I suppose I could try my Inca bandsaw. The only problem is, I have nowhere to set it up. That's one of the things that will go in the shed, when it's built...


While I was building my 'shop, I had to set up my CSM saw in the garden and wrap it tarpaulin each night.
Yes! My Elektra Beckum flip saw has been living under a tarp for some months now.Sadly, I think it only manages 80mm depth of cut.
 
If it's sawn timber (ie not planed) then there is no reason not to use 22mm.
 
When I needed to make some adjustments, Not because of a mistake or anything like that :lol: I needed 25mm x 50mm battens. I asked my timber merchant if he could cut them he suggested I use roofing batterns which are 25mm x 50mm so that is what I used.
 
John Brown":1wfhvdbz said:
OK, but I won't be able to nail the cladding to a 22mm piece if the rest of the battens are 25mm, will I?


That's the problem I had to solve. The only 1" stuff I could get locally was roofing battens.

So, either... rip one roofing batten and screw it to another to make up the the X x 25mm,

or...

....use whatever machines you have to mill your size from a pice of 95 x 45.

If your table saw had a MDC of 80mm, then after a first slow pass ( slow because the sawdust cannot come out of the top and needs time to exit the bottom of the kerf), turn the length over keeping the same side against the fence and pass the remaining uncut through.

It will only be for the four corners so it will not be a lot of cutting. Take your time and let the machine and blade rest between cuts.
 
Malc2098":2835j1r1 said:
....use whatever machines you have to mill your size from a pice of 95 x 45.

If your table saw had a MDC of 80mm, then after a first slow pass ( slow because the sawdust cannot come out of the top and needs time to exit the bottom of the kerf), turn the length over keeping the same side against the fence and pass the remaining uncut through.

It will only be for the four corners so it will not be a lot of cutting. Take your time and let the machine and blade rest between cuts.

As Malc has said, take your time over this sort of cut; it's not generally recommended as the sawdust can build up very rapidly inside the timber. When I've done this type of thing, I found it's better to do the cut in a number of small 'nibbles' from each side; the amount of sawdust produced from each cut is much less.

A bandsaw will do this type of re-sawing with ease which is one reason why my table saw(s) were kicked into touch a long time ago - Rob
 
Turns out it didn't really matter - 22mm 25mm, doesn't make that much difference when nailing on waney edged larch boards. Especially not when working at my level of accuracy...
However, I am curious about the gable ends. Do I stop the cladding short of the roof to enable airflow behind the cladding? Or isn't it important? I am just about up to top of the end wall, before the pitch starts, and need to make a decision.
 
9fingers":2pz4ac4e said:
I did not bother to vent my gable ends as there is crossflow ventilation at soffit level behind the gutter/fascia.

Bob
Soffits at the eaves, or at the verges?
Sorry, I'm having trouble visualizing this...
 
So long as it is vented at the bottom, that's enough. There are enough gaps around the boards to provide a little additional air movement. If you render, or use a sheet material, aluminium cladding panels, or a cementitious board or similar, then you'll need to build in ventilation at the top, too, but with timber boards it isn't necessary. If you create dead areas, particularly above windows and doors for instance, where there is no vent at the base, then ideally you'd build in some ventilation somewhere in the panel.
 
While I'm searching in vain for cheap PIR for my roof, I wondered what the downside might be to using the surplus batts of rockwool I have left over - apart from the obvious problem of keeping it im place and getting fibres in my hair and eyes...
 
John Brown":g7g6h20t said:
While I'm searching in vain for cheap PIR for my roof, I wondered what the downside might be to using the surplus batts of rockwool I have left over - apart from the obvious problem of keeping it im place and getting fibres in my hair and eyes...
Are Seconds and Co still going ?
 
RogerS":3eqw2hxi said:
John Brown":3eqw2hxi said:
While I'm searching in vain for cheap PIR for my roof, I wondered what the downside might be to using the surplus batts of rockwool I have left over - apart from the obvious problem of keeping it im place and getting fibres in my hair and eyes...
Are Seconds and Co still going ?


Yes.

https://www.secondsandco.co.uk/
 
I visited a local supplier I asked if they had any seconds I could buy, the foreman asked what it was for. I told him I was building a workshop. He took me to a stack of pallets outside and told me to take what I wanted.
I was still loading when they knoced off so he left it all outside for me. They were not allowed to sell it and could not take cash or beer, so I cleared a shelf at M&S of biscuits and dropped them off the next day.
There was enough in sheets and rolls to do my whole workshop. There was some high tech foil stuff that I am keeping for my utility conversion.
 
John Brown":ctq0y0vf said:
Well that's you sorted then...
Not much help to me. I suppose I could buy a few lottery tickets, see if I can get lucky too.
Oh I am sorry I was merely trying to suggest you could visit local suppliers of insulation and ask the same question.
 
Well, yes, I suppose I could, except that apart from Travis Perkins, I'd probably have to drive to Bristol on the offchance, in lockdown.
However, please don't take offence, I didn't mean to give any, but I think you were extraordinarily fortunate.
 
While wrestling with the first piece of 100mm PIR insulation, it occurred to me that the air"flow" between the insulation and the OSB roof, will be fairly mimimal, as although the 50mm void is open at the bottom, it is closed at the top. I am assuming this minimal airflow is sufficient.
 
Ideally it would be up and over the ridge and thus continuous. However, partial ventilation is much better than none at all, and you will be fine.
 
Back
Top