• Hi all and welcome to TheWoodHaven2 brought into the 21st Century, kicking and screaming! We all have Alasdair to thank for the vast bulk of the heavy lifting to get us here, no more so than me because he's taken away a huge burden of responsibility from my shoulders and brought us to this new shiny home, with all your previous content (hopefully) still intact! Please peruse and feed back. There is still plenty to do, like changing the colour scheme, adding the banner graphic, tweaking the odd setting here and there so I have added a new thread in the 'Technical Issues, Bugs and Feature Requests' forum for you to add any issues you find, any missing settings or just anything you'd like to see added/removed from the feature set that Xenforo offers. We will get to everything over the coming weeks so please be patient, but add anything at all to the thread I mention above and we promise to get to them over the next few days/weeks/months. In the meantime, please enjoy!

A Bakery Bench for a Mixer

Wood Pigeon

Seedling
Joined
Aug 23, 2026
Messages
39
Reaction score
33
Name
Charles
LOCATION
Schleswig — Holstein, in Germany
I have a KitchenAid K5 series mixer which has a lot of sideways torque, when mixing a kilogram of bread dough. It is a problem that various tables wanted to 'dance about' as the dough-hook spins around, slapping the dough against the side of the bowl with the sound of 'Irish tap-dancing ladies.'

So I built this solid little bench for it 80 x 59 cm, and 82 cm high, with carriage bolted L-profile legs, and reinforcement framework underneath for a shelf.
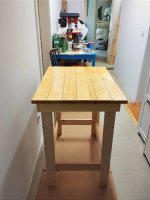
Mixer Bench — 2. Varnish Coat.jpg

I used 7.4 cm x 19 mm fir boards for the frame, legs, and cross-members, put together with various length of SPAX screws, their holes all pre-drilled, and countersunk.

Mixer- & Tea Table — 20. Aug. 2026.jpg

It would have been easier to buy a laminated fir top 80 x 60 cm, 28 mm thick, but it was easier for transport (without an auto, and only my homemade utility-wagon), and also cheaper, to buy 9.4 x 24 mm fir boards, and piece the top together myself.

The only problem is that, all dried and planed German lumber has a rolled edge, the so called 'Glattkant'. Being that I lack a planing machine to get rid of them, I hade to putty up the resulting grooves with wood dough.

It took my wife and I a whole hour at 'OBI' to select the nicest boards, but some otherwise perfect ones, indeed had missing knots on one edge. 🤦🏻

There are four cross-braces under the table-top, which hold the top boards down with a total of 64 SPAX screws 35 x 4.5 mm, their holes being pre-drilled and countersunk. These 24 mm fir boards were so tough, I could hardly get some of the screws in.

Wood does indeed sometimes have a 'mind of its own', and many clamps were need to hold each board into place, which was laminated with 'UHU Wood Glue' and then secured with screws from underneath.

Mixer Bench — Top Construction.jpg

I built the top as such, board by board, laminating, clamping, and screwing them, one by one.

The result is very nice. I shall give it three coats of the 'Bondex' clear, high-gloss, marine varnish, which I used on all of my other counter-tops. It is indeed gasoline, diesel, oil, sun, and salt resistant (which never comes about during my cooking. Haha!🤣)

And I have never had any problems with this varnish chipping, scratching, or knife marks either, but we do use cutting boards.

It received its second coat of marine varnish today, as seen in my photos

Mixer Bench — 2. Varnish.jpg

The legs and frame shall get two coats of 'Alpina Furniture Paint', in gloss white.

Charles
 
Last edited:
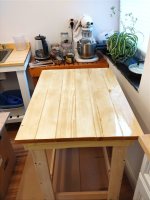
Now it is three days later and the bench has just received its third coat of 'Bondex', high-gloss, boat varnish.

It really looks nice, but will most likely takes a few days to fully harden. Otherwise the rubber feet under the mixer, may leave permanent black rings in the finish. (That happened to me once with a workbench vs. a heavy 'Diamond Pacific' gem & rock grinder).

The perspective of this photo makes the bench look very long, and the mixer small, but it actually fits into this space, perfectly, with its 80 cm, between the sink-table and the window sill.

Mixer Bench — Final Coat — 26.Aug.2026 .jpg

The mixer is a 5 quart K5 series, with a crank on the side to raise and lower the bowl. It is very stable for needing bread dough.

But if I were to do it again, I would have bought the larger 6.9 quart model. The sales people told me the K5 could handle 2 kg of dough — Ha! That means 2 kg of pancake or cake batter! Oh, well!

My papa — bless him — was a baker, so I bake most of our bread, and I had our electrician up our mains-service to install a larger, second oven. But my smaller Bistro oven does most of our meals.
 
Get two bowls. I have pro with bigger bowls and artisan for smaller quantities. Several bowls (as I often need a clean one for meringue as well as main mix). Older models have heavier bases and don't jump around.
 
Get two bowls. I have pro with bigger bowls and artisan for smaller quantities. Several bowls (as I often need a clean one for meringue as well as main mix). Older models have heavier bases and don't jump around.
This one's bowl is round on the bottom with two 'ears' with holes which stick out. I have two, and they cost 120 € each. Anyway, they look like mini-replicas of the big 80 litre 'Hobart' bakery mixer bowls — one of those big bowls is over 7500 $!

This mixer raises and lowers it bowl with a crank, but on the big old 'Hobarts' I had to crank many times for that, unless they had electric lifts.

But my batches of bread dough are normally 1kg, and not much more.
After two years of daily service, now the gearing has gotten a bit sloppy, so I need to replace a few.
 
Yes. I have one of those. Surprised it cant handle a kilo of dough. I bake most days using a 3:2:1 ratio, and a typical mix for 2 sourdough loaves is 900g flour, 600g water or whey, 300g of active ferment, plus 22g salt and sometimes other things. So that is over 1.8kg per mix and either this Pro or the more domestic Artisan will cope fine with that without jiggling about. The Pro has done double that before now, but I get a better mix at under 2kg. Mine are used on a quartz counter on a very heavy 5.5metre long island, so very solid. If your bakery bench is still being moved by the mixers, could you bolt it to the wall?

PS: numerous second hand Hobarts and clones are around. S/H bowls and paddles too. Often come up on the bay. Eg: There is a N-50G planetary on there now for £300 including bowl and paddle / whisk that won't struggle at all. Their smallest counter top mixer but classic series G. I think KitchenAid basically copied this.
 
When my girls, and the older one's husband, still lived here, I had a lot of baking to do. They always wanted fresh sour-dough bagels, which were a lot of work. Then I also baked bread later.

So my K5 has a bit of slop in the gearing. She was very tight when new. But now I can feel it while changing the paddle of dough hook.
Hopefully I do oder the correct gear set. I also need the non-toxic grease.

My dad was a baker, and I remember when they had to close the bakery for two days, so that the owner and my dad could re-gear the main Hobart. What a mess with the grease!

That was all night-shift work, and my dad slept days. So if I wanted to see him, I had to go down to the bakery, in the early mornings, before his shift ended. So, I hung around bakeries a lot, and ate in their coffee shop.

My career as a baker only lasted a short time, as then I studied to be a Radio Broadcast Engineer instead.

But when my dad retired he wanted a mini-Hobart straight away. So, when I retired, I also bought this K5. But of course Hobart had spun their small mixers off too KitchenAid, which is now owned by the Whirlpool Corporation.

My wife likes my white bread the most, so here is my usual formula:
550 - 600 gram bread flour, 12 g. salt, 30 g. sugar, 225 ml water, 75 g. oil, and 40 g. fresh, refrigerated yeast.

It is a good dough, and usefull for a lot of things, bread, pizza, pasties, etc.

Charles
 
Here my mixer bench from underneath, showing the 64 SPAX screws, securing the top, while the glue dried.

Mixer Bench Underneath.jpg

SPAX Screws for Mixer Bench Top.jpg


And also a view of the inside corner of my L-Profile Legs, bolted with two 50 x 6 mm carriage bolts, nuts, and flat washers. I usually mark each leg and corner 'A, B, C, and D', so incase it needs to be disassembled for transport, the holes line up for reassembly afterwards.

L-Profile Leg — Inside Corner.jpg

This carriage bolt system also allows some adjustment, in case the floor is not exactly plumb.

If the table 'dances' as the mixer works dough, maybe I could bolt it to the floor, like aboard ship! Haha! 🤣

But I think it is indeed heavy enough.

I now shall paint the frame with 'Alpina', gloss white, furniture paint.
Maybe I shant paint the underside, as to let the wood breath, I do not know.

Anyway, I sign, and date everything I build.

Charles
 
So, I just tipped the bench over on one side, and gave the underside, and some of the legs and frame, their first coat of paint on bare wood. No photo this times, as at present, it looks like it was built in the 1960's. But some light sanding (240?), plus the next couple of coats will make it look nice.

This 'Aplina Furniture Paint' cost me 49,95 € for the larger can. I had bought two, and now the first one is empty, due to various kitchen furniture projects:

1.) A good portion of the mixer bench

2.) A 140 cm high x 70 cm wide, open-framed, oven cabinet

3.) My sink-table

4.) A new bench for our double induction cook top, plus my wife's espresso machine
(By the way, I only drink tea.)

The varnished top is now shiny, and as smooth as glass. Good results!

Charles
 
Back
Top