

AJB Temple
Sequoia
- Joined
- Apr 15, 2019
- Messages
- 7,721
- Reaction score
- 1,201
Mentioned briefly before. Job was put at top of my priority list by the wench. 
We have some stairs in the middle of the house that lead to a titchy galleried landing. Originally carpeted with super dangerous slippery carpet that I fell down a few times. So carpet ripped up and the stairs were painted with mylands as temp job. Entire upstairs is solid oak boarding which I did a couple of years ago. I had planned to move the stairs and make them out of oak, but this was not allowed. Then I intended to re-clad them in oak board but the boards I bought for that were used for something else.
The stairs have an annoying wind, and they creaked like mad. All softwood, probably put in around 1980. No MDF etc but no access to the back either. We got a quote to fit nice stair carpet a while ago. Over £2k plus VAT plus rods & fitting rods plus painting the edges. £3k ish. Mad.
Did the job this week. Took me all of one day to re-inforce every step front and back with a lot of drilled countersunk screws and liquid glue run into every gap. Based on a YT vid. It worked very well.
By pure fluke I found a suitable stair runner on the bay for £40 so took a punt on that as I thought I would use it for a practice, as I new the curved steps would involve "making a wider carpet". Decided to do the whole thing for a shoestring if poss.
Took a solid day to fit the carpet, most of which was making and fitting the pieces on the wind. This involves a hot glue gun and plasterboard reinforcing tape to glue very carefully cut pieces together. The carpet has bound wool edges so there is a fair bit of waste.
Cost
Carpet runner 46 inc delivery
Underlay (treads only) 18
Tape 12 (didn't really need that)
Staples 12 (made a mistake with length so had to buy twice)
Glue gun cheapie from river shop 11 inc 2 bags of sticks
Rods 80 inc brackets and screws and 3 extra long rods for the wind (these were cheap end of line).
Excel narrow Staple gun 38 (brilliant too, well worth the money)
Paint 12
Carpet stretcher tool 25
Total spend £254
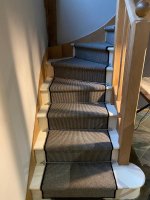
For the money it as worked out OK. I was originally under the impression that star rods hold the carpet in place. They don't. Lots of staples do. It stops an inch from the floor (needs painting) as this floor gets mopped a lot. Just shows that DIY can save quite a lot of cash. I expect a pro would be much quicker and do a better job, but not worth an extra £2,500 ish.
We have some stairs in the middle of the house that lead to a titchy galleried landing. Originally carpeted with super dangerous slippery carpet that I fell down a few times. So carpet ripped up and the stairs were painted with mylands as temp job. Entire upstairs is solid oak boarding which I did a couple of years ago. I had planned to move the stairs and make them out of oak, but this was not allowed. Then I intended to re-clad them in oak board but the boards I bought for that were used for something else.
The stairs have an annoying wind, and they creaked like mad. All softwood, probably put in around 1980. No MDF etc but no access to the back either. We got a quote to fit nice stair carpet a while ago. Over £2k plus VAT plus rods & fitting rods plus painting the edges. £3k ish. Mad.
Did the job this week. Took me all of one day to re-inforce every step front and back with a lot of drilled countersunk screws and liquid glue run into every gap. Based on a YT vid. It worked very well.
By pure fluke I found a suitable stair runner on the bay for £40 so took a punt on that as I thought I would use it for a practice, as I new the curved steps would involve "making a wider carpet". Decided to do the whole thing for a shoestring if poss.
Took a solid day to fit the carpet, most of which was making and fitting the pieces on the wind. This involves a hot glue gun and plasterboard reinforcing tape to glue very carefully cut pieces together. The carpet has bound wool edges so there is a fair bit of waste.
Cost
Carpet runner 46 inc delivery
Underlay (treads only) 18
Tape 12 (didn't really need that)
Staples 12 (made a mistake with length so had to buy twice)
Glue gun cheapie from river shop 11 inc 2 bags of sticks
Rods 80 inc brackets and screws and 3 extra long rods for the wind (these were cheap end of line).
Excel narrow Staple gun 38 (brilliant too, well worth the money)
Paint 12
Carpet stretcher tool 25
Total spend £254
For the money it as worked out OK. I was originally under the impression that star rods hold the carpet in place. They don't. Lots of staples do. It stops an inch from the floor (needs painting) as this floor gets mopped a lot. Just shows that DIY can save quite a lot of cash. I expect a pro would be much quicker and do a better job, but not worth an extra £2,500 ish.

 The carpet stretcher thing is essential to get a professional looking outcome. I was surprised. It helps such a lot. A proper staple gun is essential. You can borrow both from me. You will also need a wide chisel. I used a brick bolster that is well used so blunt, and it was fine - you cab borrow that too if you don't have one. Mallet obvs to clout it.