• Hi all and welcome to TheWoodHaven2 brought into the 21st Century, kicking and screaming! We all have Alasdair to thank for the vast bulk of the heavy lifting to get us here, no more so than me because he's taken away a huge burden of responsibility from my shoulders and brought us to this new shiny home, with all your previous content (hopefully) still intact! Please peruse and feed back. There is still plenty to do, like changing the colour scheme, adding the banner graphic, tweaking the odd setting here and there so I have added a new thread in the 'Technical Issues, Bugs and Feature Requests' forum for you to add any issues you find, any missing settings or just anything you'd like to see added/removed from the feature set that Xenforo offers. We will get to everything over the coming weeks so please be patient, but add anything at all to the thread I mention above and we promise to get to them over the next few days/weeks/months. In the meantime, please enjoy!

drummond b restoration

wallace

Old Oak
Joined
Aug 17, 2014
Messages
1,378
Reaction score
548
I picked this little lathe up recently for not a lot of money. It was described as a little lathe which is probably why I got it cheap. I know nothing about metal lathes so this is a new experience. By all accounts drummond lathes have quite the following and can be quite useful things. It came with a full set of change gears and an extra 7OT

They were produced until 192O so its doing well to be at least 1OO years old.



8EGHbga.png


For some reason the change gears start on the back gear and not the main spindle



rQGaPHP.png


Its had one side of the bearings replaced with 3 sealed bearings in a row.



Kk6l6qA.png


Not sure why it has a drip oiler


tf7YC5T.png


The tail stock quill is stuck solid, I tried a bit heat but no go.



Tnwwqer.png


One owner has modified the apron to use a handwheel



LhxCUgi.png


UPOa4pF.png


ft7AUzN.png


ue27UsX.png


Pretty much stripped in a couple of hrs



ukzXwst.png


I'm amazed how light the main casting is



M1zUsSa.png
 
Trevanion":5w4oq5f6 said:
You decided to give it the Wallace treatment in the end? :D

Yeah, I've got a couple of weeks spare so thought I'd crack this little thing out.
 
Wallace , I also know little about metal-turning lathes although I always wanted one . Looks complicated . I assume you will take lots of photos as you dismantle , for posterity . Re the first pic , would those cogwheels have had covers over them ? , looks a bit lethal . Looking forward to this .
Steve
 
tracerman":3nyi8rj1 said:
Re the first pic , would those cogwheels have had covers over them ? , looks a bit lethal . Looking forward to this .
Steve

'Elf 'n Safety? What's that? :eusa-think:

I don't think the early twentieth century smaller lathes like these Drummonds were ever supplied with any kind of guarding, wouldn't hurt to have a mesh casing over them though, just in case!

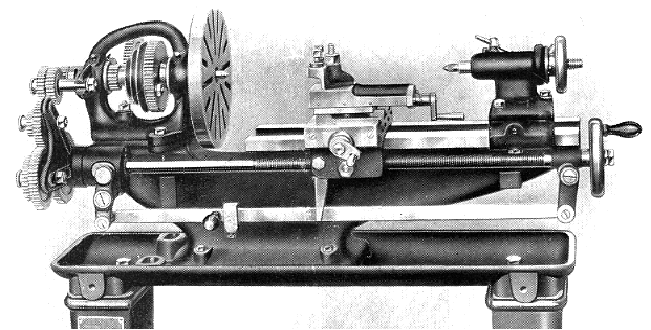
Here's an early sales illustration of a Drummond B from Lathes.co.uk, with no guarding:

img2.gif

http://www.lathes.co.uk/drummond/
 
Excellent! We all love a Wallacian restoration.
 
This will be fun to watch! I can’t quite believe that those drive wheels weren’t covered?! I’m not a H&S fanatic but why was it not thought of to cover them back then?
 
I’m guessing the drip oiler is there because it originally had a plain bearing. Plain bearings were often considered to be more accurate. The bearing race pictured doesn’t look right to me either. The guy that runs this site can tell you the correct type of bearings to fit. If you don’t fit the correct type you could get excessive end play.



http://www.lathes.co.uk/drummond/page5.html

Edit: These are likely the original bearing type with pull in washers. Oiling holes clearly seen.

E733D94E-4C88-4BFD-A12D-7BA759642EE2.jpeg

Good luck with the restoration. I particularly like the colour of that lathe.
 
A bit more progress. Their is a paper shim under the head stock.


ISLY2As.png


The number on the bed means it was built in 1914


xWrTXIp.png


This is the worst part of the bed


nrOfShN.png


As you would expect the casting quality is lovely


7yJyPeA.png


v7IIzVB.png
 
Following with interest as always :)

Are all those drill holes in the casting side from someone repositioning something over the years or are they all used?
 
Robert":3waqttbx said:
Following with interest as always :)

Are all those drill holes in the casting side from someone repositioning something over the years or are they all used?

Yes, a bit odd isn’t it. Surely only about half a dozen are needed for the rack?
 
Woodster":3psep4ig said:
Robert":3psep4ig said:
Following with interest as always :)

Are all those drill holes in the casting side from someone repositioning something over the years or are they all used?

Yes, a bit odd isn’t it. Surely only about half a dozen are needed for the rack?

Apparently a previous owner was a genious or mad man, these little lathes are not meant to have a hand feed on the apron. Some of the work looks quite nice but some of it is pretty crude.
 
A bit of aluminium bodge to level things up a bit


IMphqEw.png


k027j0y.png


The head stock and back gear shaft


AWlzUAa.png


One thing that has really impressed me is the quality of the castings, straight out of mould with no fettling


2F2Q6IM.png


A previous owner has put a row of 3 sealed bearings in one side of the head stock, they are japanese so might be good quality


FjUMcfU.png


One thing I'm undecided is what colour to do this. Should I stay original and paint it black or my usual grey with red innards. I should I get a bit crazy, I've always liked the colour of coronet lathes.

I always had an itch to line a machine, like what was done on big stationary engines like crosleys.
 
This is the back of the apron, I dont have a clue what its supposed to look like but theirs been some tinkering


MNVOMnW.png


I took the motor and switch off, its quite a nice thing. I have a nice little 3 phase brooks motor that will be perfect for this. I'm going to rig it up through a vfd


xeOzCMq.png


DLiu48v.png


Did a bit aluminium filler


DSj49WN.png


And made some bits nice and clean


2juwxCS.png


I stuck the chuck in some evaporust and then wire wheeled it


zgwMtvY.png


yd6OQmR.png


For the life of me I couldnt get the lead screw to bits, I thought it would either unscrew or just slip off. But I could not get it to move. It spins freely


o0vYvMX.png


Why would a head stock need to moved out of line


pT5Gy9Z.png


I ordered some paint and I think there must of been a failure to communicate, I asked for RAL 3O32 which is a dark ruby red, but what I got was 3O22 which is salmon pink. It look like orange to me


XKLwPbW.png
 
wallace":3rkv1zo1 said:
Why would a head stock need to moved out of line
pT5Gy9Z.png

I'm curious about the scale. Nought to five. Five what?
 
Mike G":1lh5n6t8 said:
I'm curious about the scale. Nought to five. Five what?

I would assume it's 5-degrees off centre, you'd use it for turning long and shallow tapers using the feed, for more pronounced tapers you would use the top-slide on the carriage as they won't be quite as long.
 
Mike G":lu4btilc said:
So it rotates, rather than slides?

Yes it rotates on a bolt. I bet its a pita to get back true with the tail stock
 
wallace":1nhxg9ui said:
Yes it rotates on a bolt. I bet its a pita to get back true with the tail stock

You’d have a ground certified test bar for re-aligning the headstock (and maybe even the tailstock if that ever goes out of whack) with the travel of the carriage along the bed, using a dial indicator attached to the carriage reading off the bar.
 
wallace":x7o6ok67 said:
Mike G":x7o6ok67 said:
So it rotates, rather than slides?

Yes it rotates on a bolt. I bet its a pita to get back true with the tail stock

No, not really. You can buy a double ended Morse taper for quick and dirty alignment.

https://www.axminstertools.com/axminste ... 2mt-102427

Although I hasten to add that method is really just for wood turners. :eusa-whistle: For accuracy you should mount a test bar and clock it.

https://www.warco.co.uk/metal-lathe-too ... -bars.html
 
I wasn't expecting for this little lump to take so long. I thought I'd do some bits in black oxide, luckily the old bottle of solution is still working.


JLawe8I.png


fWfN7Hh.png


I have so little space I'm spraying on top of a machine that has been waiting to be collected for a few months.


CZq1MrU.png


HxaMETd.png


I found this nice little motor in my stash.


ca8TecE.png


9Ilblbf.png


NGZjo3J.png


I want to use a vfd for speed control so got my motor guy to dig out the star point and make it 2OOv


aZcKVsG.png
 
Looks like it's coming along nicely!

I'd wonder if a 1/2hp would be enough, probably just enough for the size of it since you're not going to be taking massive amounts of material off. They certainly made those old motors very pretty to look at, not sure if that was what they were aiming for or if I'm just some kind of machine nerd :lol:
 
I wonder how an old motor compares to a modern one of the same hp. Is the old saying true the horses were bigger back then. They were obviously built to last.
 
wallace":36e7sqtk said:
I wonder how an old motor compares to a modern one of the same hp. Is the old saying true the horses were bigger back then. They were obviously built to last.

I've definitely seen a difference between an older high-quality British motor like a Crompton Parkinson to a Modern Chinese-Made like a Clarke like for like specs when a machine had a motor swap when the old one died (the burst into flames kind of death). The newer motor seemed a lot less powerful and quick to put in the quit.

Obviously, Chinese Horses are more malnourished and feeble compared to a good ol' British Shire 8-) :lol:
 
Back
Top