Alright! It's high time you lot start sharing your drawings, too. I'm interested in seeing what you're doing. Besides, I can feel all of the eye rolling going on every time I post another drawing. "There he goes again. Won't he ever quit?"

-
Hi all and welcome to TheWoodHaven2 brought into the 21st Century, kicking and screaming! We all have Alasdair to thank for the vast bulk of the heavy lifting to get us here, no more so than me because he's taken away a huge burden of responsibility from my shoulders and brought us to this new shiny home, with all your previous content (hopefully) still intact! Please peruse and feed back. There is still plenty to do, like changing the colour scheme, adding the banner graphic, tweaking the odd setting here and there so I have added a new thread in the 'Technical Issues, Bugs and Feature Requests' forum for you to add any issues you find, any missing settings or just anything you'd like to see added/removed from the feature set that Xenforo offers. We will get to everything over the coming weeks so please be patient, but add anything at all to the thread I mention above and we promise to get to them over the next few days/weeks/months. In the meantime, please enjoy!
You are using an out of date browser. It may not display this or other websites correctly.
You should upgrade or use an alternative browser.
You should upgrade or use an alternative browser.
Let's Pick It Up Here
- Thread starter Dave R
- Start date

I hope you don't ever quit. I am not really a sketchup user but looking at your "sketches" is as good as seeing a real piece of furniture.
No rolling eyes from me.
No rolling eyes from me.



DaveL
Old Oak
Well not to the same standard as Mikes but this is what I have been working on.

I guess it's a bit difficult to tell exactly what it is so here are some finished.

And with the electricity turned on

The next one will have multi coloured light's.
I guess it's a bit difficult to tell exactly what it is so here are some finished.
And with the electricity turned on
The next one will have multi coloured light's.

Rod
Old Oak
I've dabbled with CAD in various forms (MOSS, Autocad etc) most of my working life but I'm a pencil and ink on paper designer.
I follow your stuff with great interest and am never bored - keep them coming.
Rod
I follow your stuff with great interest and am never bored - keep them coming.
Rod
Thank you for the kind words.
Mike, that's an interesting hovel you've drawn there. Has it been built?
Dave, nice work on the lighted trees. A pencil sketch is just as good as a SketchUp drawing in my book.
Rod, pencil and ink on paper is a good thing.
Mike, that's an interesting hovel you've drawn there.
Has it been built?Dave, nice work on the lighted trees. A pencil sketch is just as good as a SketchUp drawing in my book.
Rod, pencil and ink on paper is a good thing.

- Joined
- Jul 21, 2014
- Messages
- 10,414
- Reaction score
- 164
Well here is my early faltering steps using SU for a project. Almost ashamed to show this to you DaveR!

It was adequate to show to a friend who wanted this simple table making.
The finished article is away at a mates place to be sprayed white and I should be able to post a photo later this week.
It threw up a couple of things I wanted to draw and did not know how to.
1) to radius the corners (not edges) of the top to a specific radius (30mm) and a related operation
2) to draw the parallel sided leg with three square corners and the outer ones with a specific radius - (19mm)
some insight into the best methods for those would be of interest.
Bob

It was adequate to show to a friend who wanted this simple table making.
The finished article is away at a mates place to be sprayed white and I should be able to post a photo later this week.
It threw up a couple of things I wanted to draw and did not know how to.
1) to radius the corners (not edges) of the top to a specific radius (30mm) and a related operation
2) to draw the parallel sided leg with three square corners and the outer ones with a specific radius - (19mm)
some insight into the best methods for those would be of interest.
Bob
Hi Bob,
No need to be ashamed of anything. It sounds like you drew enough to get the point across. That's plenty.
As for radiusing the corners of the top and the leg, you can use the same method for both. You can draw an arc on the corner much like you might draw it with a pencil on the real top. Then use Push/Pull to push away the waste. Hang tight and I'll make up something to show you.
No need to be ashamed of anything. It sounds like you drew enough to get the point across. That's plenty.
As for radiusing the corners of the top and the leg, you can use the same method for both. You can draw an arc on the corner much like you might draw it with a pencil on the real top. Then use Push/Pull to push away the waste. Hang tight and I'll make up something to show you.
Let's see if this helps.
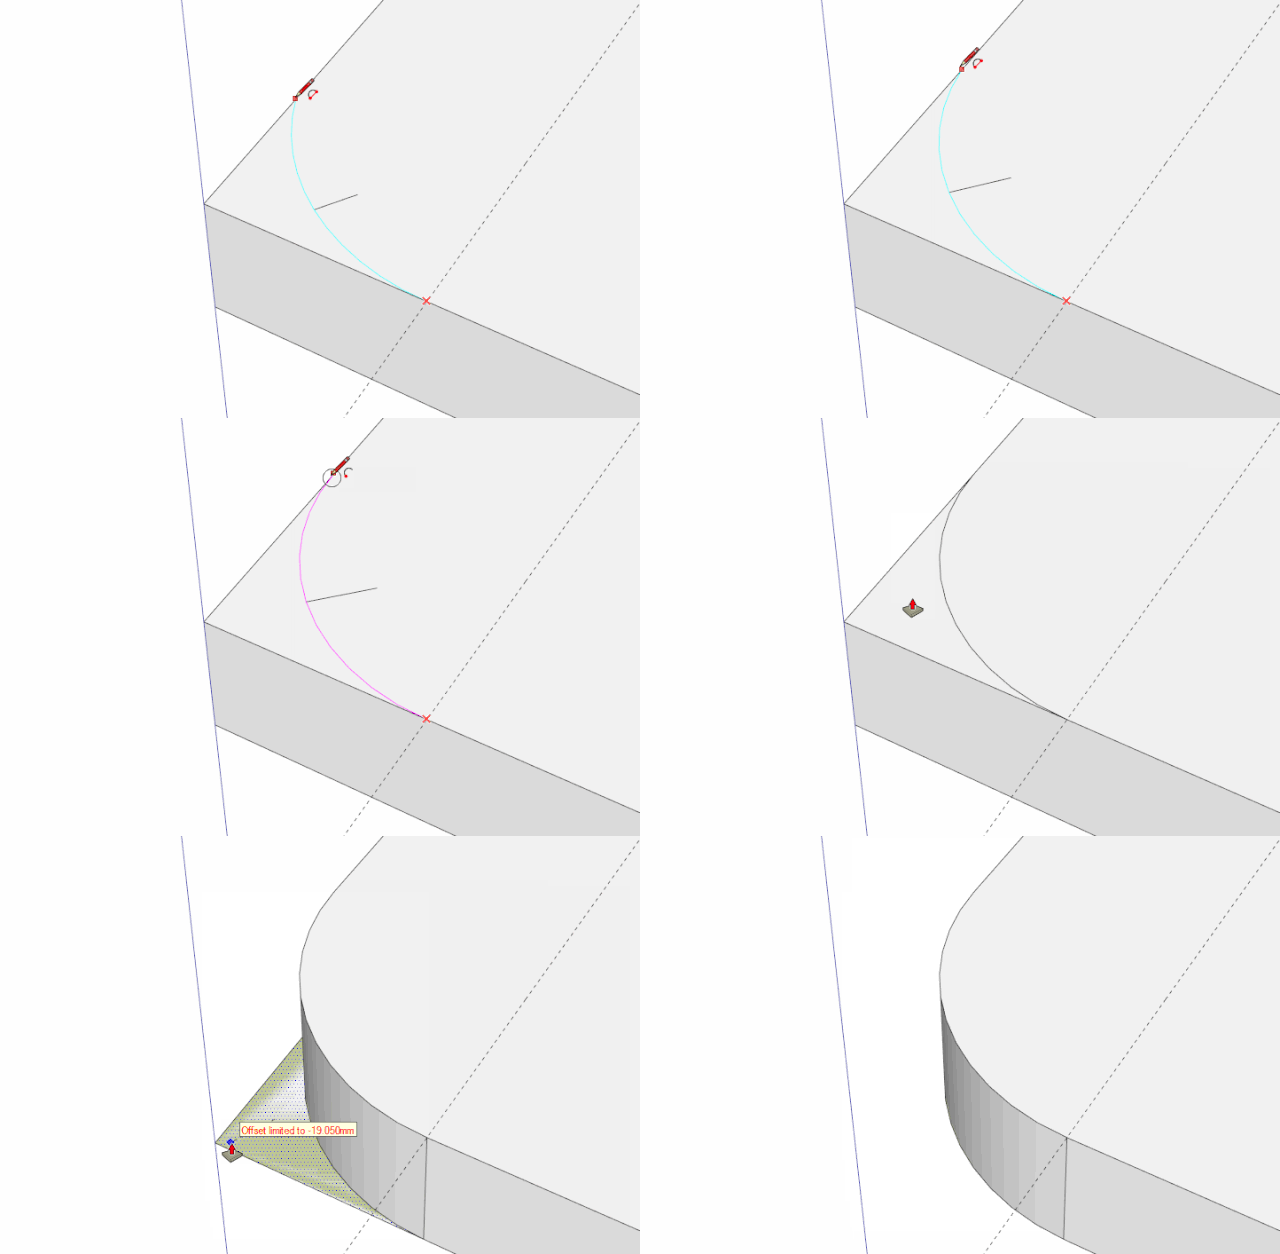
I placed a guideline 30mm from the edge at the end of the top. Then used the 2-Point Arc tool to draw the arc. Note, when the arc turns magenta, it is tangent to both edges. That's when you click to set the second point. Double click to set the arc. Then Push/Pull on the waste side of the arc.
I placed a guideline 30mm from the edge at the end of the top. Then used the 2-Point Arc tool to draw the arc. Note, when the arc turns magenta, it is tangent to both edges. That's when you click to set the second point. Double click to set the arc. Then Push/Pull on the waste side of the arc.
- Joined
- Jul 21, 2014
- Messages
- 10,414
- Reaction score
- 164
Thanks Dave.
Yes I've been able to emulate that.
It does leave a couple of lines where the radius end and the straight edges meet. If I select those and try to delete them it does go horrible. Is there a solution to that?
Cheers
Bob
Yes I've been able to emulate that.
It does leave a couple of lines where the radius end and the straight edges meet. If I select those and try to delete them it does go horrible. Is there a solution to that?
Cheers
Bob
9fingers":2g7d3i4d said:Thanks Dave.
Yes I've been able to emulate that.
It does leave a couple of lines where the radius end and the straight edges meet. If I select those and try to delete them it does go horrible. Is there a solution to that?
Cheers
Bob
Indeed there is, Bob. On the PC get the Eraser tool and hold Ctrl while clicking on those edges. It would be Option on the Mac. That will soften the edges instead of erasing them. Of course, when you erase those lines, the faces on either side that are depending on the lines for their existence also get erased.
- Joined
- Jul 21, 2014
- Messages
- 10,414
- Reaction score
- 164
Thanks again Dave - great to have a personal tutor!!
So I guess the general method is to leave those unwanted lines showing until the end of the drawing stage and tidy up later.
I think at least half my "problems" with SU are about the overall approach to the drawing rather than the object itself. It's going to take practice I guess.
Bob
So I guess the general method is to leave those unwanted lines showing until the end of the drawing stage and tidy up later.
I think at least half my "problems" with SU are about the overall approach to the drawing rather than the object itself. It's going to take practice I guess.
Bob
I would generally clean up lines like that as I go. An alternative when there are a lot of them is to select all of the geometry, right click on it and choose Soften/Smooth.
As for the overall approach to drawing goes, the best thing I've found is to draw the parts you'd make in the shop. Make each one a component as you go so they don't stick to each other and plug away. I like to get the outside established first and add detail as I go.
On your table, for example, I would have drawn the front left leg and made it a component. Then I would have used Move/Copy to make copies for the other corners and gotten them into place. Then the skirting boards only need to be drawn to fit.
Take a look at the video here for some ideas on that sort of work flow. Also this one here.
As for the overall approach to drawing goes, the best thing I've found is to draw the parts you'd make in the shop. Make each one a component as you go so they don't stick to each other and plug away. I like to get the outside established first and add detail as I go.
On your table, for example, I would have drawn the front left leg and made it a component. Then I would have used Move/Copy to make copies for the other corners and gotten them into place. Then the skirting boards only need to be drawn to fit.
Take a look at the video here for some ideas on that sort of work flow. Also this one here.
Stargazer
New Shoots
- Joined
- Sep 4, 2014
- Messages
- 189
- Reaction score
- 8
- Location
- West Oxfordshire
- Name
- Ian L.
- LOCATION
- West Oxfordshire
Thanks for those links Dave, very useful.
I have been struggling with Sketchup for years and had basically given up......I am used to Autocad (going as far back as version 10 in the late 80s) and Autosketch and couldn't get used to the sketch up way of doing things. I would start on a drawing as an example to get me learning and rapidly realise that I was approaching the process in completely the wrong way.
Definitely going to have another go now.
StarGazer
I have been struggling with Sketchup for years and had basically given up......I am used to Autocad (going as far back as version 10 in the late 80s) and Autosketch and couldn't get used to the sketch up way of doing things. I would start on a drawing as an example to get me learning and rapidly realise that I was approaching the process in completely the wrong way.
Definitely going to have another go now.
StarGazer
I hope those videos give you some help, Stargazer. If you're interested, I did a video tutorial thing that is available on DVD or by direct download from the Taunton Store. The disk is evidently available through Amazon, too. It was done when SketchUp 8 was still current but nothing has really changed as far as drawing and creating models, goes.
Cheers,
Dave
Cheers,
Dave

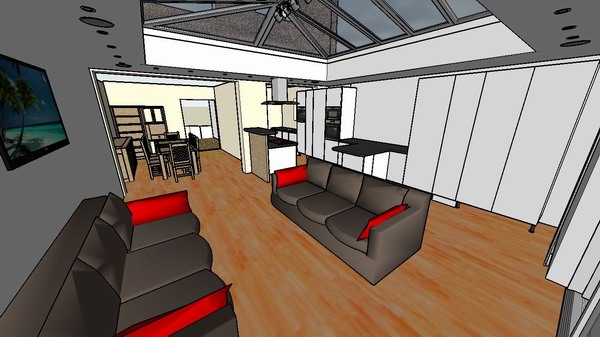
I've not drawn much for a while now. i guess my biggest use for sketchup was last year when we had an extension built. I used Sketchup to work out what we wanted (detail drawings were done by the builders) and to plan the kitchen layout.
here's the sketchup
And here is the extension today.
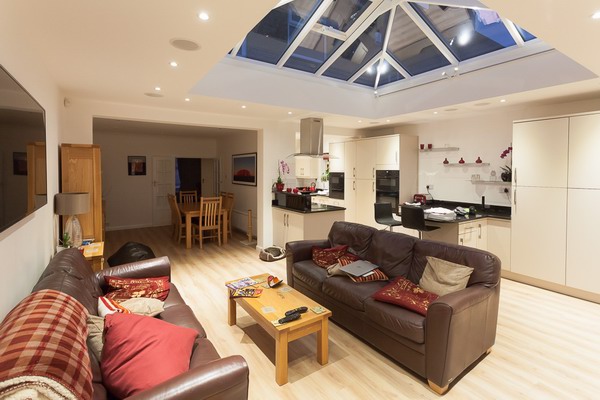
And yes I should have tidied the cushions etc before taking a picture but my wife is out so I didn't.
here's the sketchup
And here is the extension today.
And yes I should have tidied the cushions etc before taking a picture but my wife is out so I didn't.
Stargazer":o0rmjsfg said:Thanks for those links Dave, very useful.
I have been struggling with Sketchup for years and had basically given up......I am used to Autocad (going as far back as version 10 in the late 80s) and Autosketch and couldn't get used to the sketch up way of doing things. I would start on a drawing as an example to get me learning and rapidly realise that I was approaching the process in completely the wrong way.
Definitely going to have another go now.
StarGazer
i came from Autocad for work to Sketchup for home use and went through the same pain barrier.
As i remember it the key was to forget about layers (something i used all the time in autocad) and think components instead. Components are how you isolate things on the drawing. draw a few lines and think you might want to draw another part first.. make those lines a component before you move on.
Ignore the datum zero and draw where you want. If you want to draw a 50 by 100 rectangle just drag a rectangle that looks that proportion.. glance bottom right to see if the long size is first or second then just type in 50,100 and hit enter - no need to click anywhere. There is no absolute vs incremental sizes like autocad as far as i know.
I'm still learning the keyboard tricks and other ways to make life easier. Spacebar to go back to the select arrow is useful...treble click on any part of something you have been drawing to select all 'loose' geometry ready for making a component (right click menu)... there's a long list of time savers and I only know a few.
persevere and it gets easier

Good comments Robert.
I would suggest not forgetting about layers but keep in mind that they are used for controlling visibility and not for separation. Always leave Layer 0 active, keep primitives (edges and faces) on Layer 0, and assign layers to components.
I would suggest not forgetting about layers but keep in mind that they are used for controlling visibility and not for separation. Always leave Layer 0 active, keep primitives (edges and faces) on Layer 0, and assign layers to components.
Stargazer
New Shoots
- Joined
- Sep 4, 2014
- Messages
- 189
- Reaction score
- 8
- Location
- West Oxfordshire
- Name
- Ian L.
- LOCATION
- West Oxfordshire
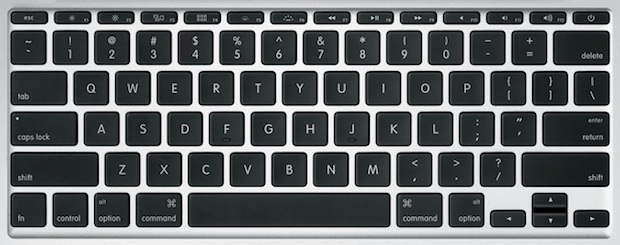
What is the option key ? I am using a macbook and don't seem to have this available to me?
I have made more progress in the last 30min than before, but am getting stuck trying to soften the edges to get rid of the extra little lines.
SG
I have made more progress in the last 30min than before, but am getting stuck trying to soften the edges to get rid of the extra little lines.
SG
Stargazer
New Shoots
- Joined
- Sep 4, 2014
- Messages
- 189
- Reaction score
- 8
- Location
- West Oxfordshire
- Name
- Ian L.
- LOCATION
- West Oxfordshire
Ahh, the alt key.......doesnt have the word option on UK keyboards!
Getting there, not always exactly sure how, so I am repeating stuff to make sure I understand. Not having a right button to click to get menus is a pain, might try a mouse rather than the trackpad.
Cheers
SG
Getting there, not always exactly sure how, so I am repeating stuff to make sure I understand. Not having a right button to click to get menus is a pain, might try a mouse rather than the trackpad.
Cheers
SG
By all means, you should be using a mouse. Get an inexpensive USB or wireless 3-button mouse. Left, right and center mouse button. The center button is under the wheel. You need the wheel and the center mouse button to navigate the 3D space efficiently.
- Joined
- Jul 21, 2014
- Messages
- 10,414
- Reaction score
- 164
Robert":3dfqp2mt said:[
Ignore the datum zero and draw where you want.
Well I gave that a try using my simple table as an exercise.
by ignoring the datum I had an absolute nightmare try to move parts into contact with each other through the 3d space.
Only sanity returned when getting a corner of a part back to the origin and then moving it one axis at a time with an offset to where it needed to be and so on until the table came together
To my mind SU needs the capability of indentifying a point on a drawn object and placing it to a 3 dimensional coordinate entered from the keyboard. just moving parts around on screen is just too haphazard.
Off to find a tranquilliser now!
Bob
Ah, but you can use coordinates, either absolute or relative in SketchUp. I think it makes more sense, though, to draw parts in place rather than drawing them somewhere else and moving them into place. And, if you do have to move components, you can use logical points such as corners or midpoints or you can create temporary points to either grab the component by or move to.
9fingers":3et3asay said:Robert":3et3asay said:[
Ignore the datum zero and draw where you want.
Well I gave that a try using my simple table as an exercise.
by ignoring the datum I had an absolute nightmare try to move parts into contact with each other through the 3d space.
Bob
All I do is draw some guide lines with the ruler tool. If your table legs are 1000mm apart just draw guide lines to make a grid at that pitch and move your component to the intersection. you could even just draw a rectangle to size then move components to the corners and delete the rectangle afterwards.
There is more than one way to do most things in sketchup so whatever works for you.
- Joined
- Jul 21, 2014
- Messages
- 10,414
- Reaction score
- 164
Robert":23gmzx4x said:There is more than one way to do most things in sketchup so whatever works for you.
Agreed. I think that is both a strength and a weakness in SU as having done something one way I've found that subsequently, another operation does not seem to work properly. Like anything it needs practice. Even at Dave's level of skill, he talks of doing things as an exercise to keep him fresh.
It took me years to get the hang of Visio (2D) and now I have, I turn to that first which is possibly hindering my learning SU.
Bob
chippy1970
New Shoots
- Joined
- Oct 5, 2014
- Messages
- 147
- Reaction score
- 0
Dave R,
I'm drawing up some bookcases for a job at the moment. Theres a load of frame and panel doors all the same size with panel moulding to look more traditional.
I've now decided to widen some of the cupboards so some doors will need to be widened. I've drawn them as I would make them with separate rails and stiles , with stub tenons and a panel. Then I drew the profile of a panel mould in one corner of the panel at 45 degrees. I then used the follow me tool to extrude all the way round the panel.
My question is how do I widen the doors without making the stiles and moulding wider. Is there a quick way ?
Sent from my MotoE2(4G-LTE) using Tapatalk
I'm drawing up some bookcases for a job at the moment. Theres a load of frame and panel doors all the same size with panel moulding to look more traditional.
I've now decided to widen some of the cupboards so some doors will need to be widened. I've drawn them as I would make them with separate rails and stiles , with stub tenons and a panel. Then I drew the profile of a panel mould in one corner of the panel at 45 degrees. I then used the follow me tool to extrude all the way round the panel.
My question is how do I widen the doors without making the stiles and moulding wider. Is there a quick way ?
Sent from my MotoE2(4G-LTE) using Tapatalk
chippy1970
New Shoots
- Joined
- Oct 5, 2014
- Messages
- 147
- Reaction score
- 0
OK cheers Dave
Sent from my MotoE2(4G-LTE) using Tapatalk
Sent from my MotoE2(4G-LTE) using Tapatalk
Stargazer
New Shoots
- Joined
- Sep 4, 2014
- Messages
- 189
- Reaction score
- 8
- Location
- West Oxfordshire
- Name
- Ian L.
- LOCATION
- West Oxfordshire
Dave,
Macbook now mouse enabled (with a scroll wheel) and getting on much better than the trackpad.
SG
Macbook now mouse enabled (with a scroll wheel) and getting on much better than the trackpad.
SG
Stargazer":13xue8wr said:Dave,
Macbook now mouse enabled (with a scroll wheel) and getting on much better than the trackpad.
SG
Brilliant!