• Hi all and welcome to TheWoodHaven2 brought into the 21st Century, kicking and screaming! We all have Alasdair to thank for the vast bulk of the heavy lifting to get us here, no more so than me because he's taken away a huge burden of responsibility from my shoulders and brought us to this new shiny home, with all your previous content (hopefully) still intact! Please peruse and feed back. There is still plenty to do, like changing the colour scheme, adding the banner graphic, tweaking the odd setting here and there so I have added a new thread in the 'Technical Issues, Bugs and Feature Requests' forum for you to add any issues you find, any missing settings or just anything you'd like to see added/removed from the feature set that Xenforo offers. We will get to everything over the coming weeks so please be patient, but add anything at all to the thread I mention above and we promise to get to them over the next few days/weeks/months. In the meantime, please enjoy!

Motor heating

Phil

Old Oak
Joined
Jul 23, 2014
Messages
4,240
Reaction score
490
Location
Southern Africa 0054
This one is for Bob 8-)

My big Hegner has an induction motor (?)

It is a Bauknecht 0.18Kw

I did some cutting on Sunday and when I cleaned up found that the motor is extremely hot (burn hot)

What would cause this? Do I need to be worried?

What can I do to remedy?


HegnerMotor.jpg
 
I know Bob will be along shortly, but I would see if the fan is still firmly attached to the end of the motor shaft.
 
DaveL":2u3rffe8 said:
I know Bob will be along shortly, but I would see if the fan is still firmly attached to the end of the motor shaft.

This is quite a low power motor and they don't always use a centrifugal switch to disconnect the starter winding but IF yours has a switch, it might have stuck shut and the starter winding is connected all the time. This will cause considerable extra heating.

hth

Bob
 
DaveL":1mw6x9ng said:
I know Bob will be along shortly, but I would see if the fan is still firmly attached to the end of the motor shaft.

Thanks Dave, I will check the fan.


9fingers":1mw6x9ng said:
DaveL":1mw6x9ng said:
I know Bob will be along shortly, but I would see if the fan is still firmly attached to the end of the motor shaft.

This is quite a low power motor and they don't always use a centrifugal switch to disconnect the starter winding but IF yours has a switch, it might have stuck shut and the starter winding is connected all the time. This will cause considerable extra heating.

hth

Bob


Thanks Bob.
How do I check that? I will remove the motor and open up to check the fan.
 
Surely everything runs hot in South Africa? ;)

Sorry, I’ll get my coat. :lol:
 
Motors with centrifugal switches tend to make characterisitic noises.
When you switch off and as the motor slows there should be a click usually followed by a rubbing sound until the motor stops.
If there is a switch then there are more tests that you can do.
Do you have a multimeter capable of measuring resistance and ac voltage up to 250v ac?
A old fashioned filament light bulb fitted in a table lamp can be useful too.

Bob
 
9fingers":untl6x95 said:
Motors with centrifugal switches tend to make characterisitic noises.
When you switch off and as the motor slows there should be a click usually followed by a rubbing sound until the motor stops.
If there is a switch then there are more tests that you can do.
Do you have a multimeter capable of measuring resistance and ac voltage up to 250v ac?
A old fashioned filament light bulb fitted in a table lamp can be useful too.

Bob


I removed the motor from the saw, removed the fan cover - fan functions well, and then connected to power and ran it on the workbench.

It heats up on the inboard side (pulley side).

There is no play or movement on the shaft, everything solid.

The drive pulley and saw mechanism turns smoothly, nothing to cause a load on the motor.

Hegner_Drive pulley.jpg

When the motor is running a slight vibration can be felt on the mounting plate.

My neighbour is an electrical engineer (was working in his garage) and I asked him for an opinion.

"Can't see or feel anything wrong, there is the click when switching on so thats not the issue"
"Just run the motor on the saw and check if it keeps heating up"
"Maybe the sealed bearing is a problem?"

The saw was made in 1982 and this looks like the original motor, so maybe yes the bearing?
To look at the bearing means I would need to remove the drive pulley, which means the use of a tool which I do not have.

I don't particularly want to just run the saw with the motor heating up. Could end up a very expensive mistake.

Bob, I have a small multimeter and will look at what it can measure. Other alternative is to visit Son (he is more electronics)

Phil
 
Difficult to think that a bearing would heat up as much as you suggest and yet be free to turn and have little or no play.

Are there oil cups/nipples on the bearings - it possible on older motors. if nipples then unscrew and add a little oil - anything you have handy ever drips of the end of car dipstick will do. or just fill the cups and let it soak before run testing it.
If there are no oil points then up end the motor and make a reservoir from a ring of Blutak or similar (Plumbers Mait also good) and add oil inside the recess to let it soak into the bearing down the shaft. Not too much oil as you dont want excess in the rest of the motor.
Again let it soak before run testing it.

If that fixes the problem you can either leave well alone and be prepared to do this every year or so whenever it gets warm, or bite the bullet and fit a new bearing which will possibly see you out and the next user too.

If you think oil has got in and yet made no difference then we are possibly back to an electrical problem.

Bob
 
Bob, thank you very much.

Will try some oil first.

I need the saw back up and running ASAP as I need to start making Xmas goodies (If I get a good start now, I should be done by December 2021 :lol: :lol: )
 
9fingers":3d1wgkva said:
Difficult to think that a bearing would heat up as much as you suggest and yet be free to turn and have little or no play.

Are there oil cups/nipples on the bearings - it possible on older motors. if nipples then unscrew and add a little oil - anything you have handy ever drips of the end of car dipstick will do. or just fill the cups and let it soak before run testing it.
If there are no oil points then up end the motor and make a reservoir from a ring of Blutak or similar (Plumbers Mait also good) and add oil inside the recess to let it soak into the bearing down the shaft. Not too much oil as you dont want excess in the rest of the motor.
Again let it soak before run testing it.

If that fixes the problem you can either leave well alone and be prepared to do this every year or so whenever it gets warm, or bite the bullet and fit a new bearing which will possibly see you out and the next user too.

If you think oil has got in and yet made no difference then we are possibly back to an electrical problem.

Bob


Ok, tried the oil bit.
Still heating up.

Will see if I can find a motor repair place close by.
 
Phil":cfh2ghl6 said:
9fingers":cfh2ghl6 said:
Difficult to think that a bearing would heat up as much as you suggest and yet be free to turn and have little or no play.

Are there oil cups/nipples on the bearings - it possible on older motors. if nipples then unscrew and add a little oil - anything you have handy ever drips of the end of car dipstick will do. or just fill the cups and let it soak before run testing it.
If there are no oil points then up end the motor and make a reservoir from a ring of Blutak or similar (Plumbers Mait also good) and add oil inside the recess to let it soak into the bearing down the shaft. Not too much oil as you dont want excess in the rest of the motor.
Again let it soak before run testing it.

If that fixes the problem you can either leave well alone and be prepared to do this every year or so whenever it gets warm, or bite the bullet and fit a new bearing which will possibly see you out and the next user too.

If you think oil has got in and yet made no difference then we are possibly back to an electrical problem.

Bob


Ok, tried the oil bit.
Still heating up.

Will see if I can find a motor repair place close by.

A bit too far to send it to me Phil :lol:

Bob
 
9fingers":21wx1faa said:
Phil":21wx1faa said:
9fingers":21wx1faa said:
Difficult to think that a bearing would heat up as much as you suggest and yet be free to turn and have little or no play.

Are there oil cups/nipples on the bearings - it possible on older motors. if nipples then unscrew and add a little oil - anything you have handy ever drips of the end of car dipstick will do. or just fill the cups and let it soak before run testing it.
If there are no oil points then up end the motor and make a reservoir from a ring of Blutak or similar (Plumbers Mait also good) and add oil inside the recess to let it soak into the bearing down the shaft. Not too much oil as you dont want excess in the rest of the motor.
Again let it soak before run testing it.

If that fixes the problem you can either leave well alone and be prepared to do this every year or so whenever it gets warm, or bite the bullet and fit a new bearing which will possibly see you out and the next user too.

If you think oil has got in and yet made no difference then we are possibly back to an electrical problem.

Bob


Ok, tried the oil bit.
Still heating up.

Will see if I can find a motor repair place close by.

A bit too far to send it to me Phil :lol:

Bob


Thanks Bob.
I would have brought it myself, but then looked at the cost of travel, it would be cheaper to buy a new machine! :lol: :lol:
 
I went back this morning to collect the motor.

However before I went I first had a look at young Minchin's guide to motors. 8-) So I at least had an idea of what the techy is talking about.

The thing-me-jigs that are around the shaft at an angle - they are worn away. They are unable to replace just that part.
I can carry on using it till the motor burns out. :shock:
Cool the motor with ice blocks and fans. :lol:

An identical new motor will set me back ZAR1500 aprrox (GBP75)

I will apply apply my mind to this situation while I carry on sawing away.
 
9fingers":vhwwqv92 said:
Can I have some photos of the motor under the connection plate and where the capacitor connects in please.
Bob

Bob, on their way on the 17:00 mail delivery.

Cheers
 
You will need a single pole push to make , let go to break switch capable of passing say 3 amps at 250v and to find room for it on the side of that box where your on off buttons are at the moment.

The action would be to push this switch first hold whilst the motor starts and then let go once it has got up to speed.

I've no idea what sort of electronic hobby type stockists you have in RSA but it wont be to sort of house wiring type switch but something much smaller. you might be limited for depth inside the box so that will be important in your choice.

Maybe have a look round and show me some examples of what you can get or instead give websites of likely suppliers and I can see what they have suitable.

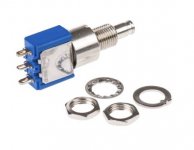
Here is one suitable but RS known to be expensive so you might find the same elsewhere but cheaper
https://za.rs-online.com/web/p/push-but ... s/1035732/

push button.jpg

For scale the threaded part is 1/4" 6.35mm diameter

Bob
 
Assuming we are talking about a starting winding maybe a domestic light switch on a surface box? turn it on to start then off once it is running. Not as guaranteed to be off as a push to make but maybe more likely to have one laying around.

Not seen the pictures of course..
 
Robert":4ixmilta said:
Assuming we are talking about a starting winding maybe a domestic light switch on a surface box? turn it on to start then off once it is running. Not as guaranteed to be off as a push to make but maybe more likely to have one laying around.

Not seen the pictures of course..

That would work of course but I was trying for a more elegant solution with two buttons close together to be pushed with adjacent fingers.
Let's see which way Phil wants to take it re budget and ease of sourcing parts in RSA

Bob
 
Bob, thank you very much for the input.

I am parking this project for a couple of days as I have urgent work to finalise our audit report. :(
 
9fingers":1cecmsdw said:
You will need a single pole push to make , let go to break switch capable of passing say 3 amps at 250v and to find room for it on the side of that box where your on off buttons are at the moment.

The action would be to push this switch first hold whilst the motor starts and then let go once it has got up to speed.

I've no idea what sort of electronic hobby type stockists you have in RSA but it wont be to sort of house wiring type switch but something much smaller. you might be limited for depth inside the box so that will be important in your choice.

Maybe have a look round and show me some examples of what you can get or instead give websites of likely suppliers and I can see what they have suitable.

Here is one suitable but RS known to be expensive so you might find the same elsewhere but cheaper
https://za.rs-online.com/web/p/push-but ... s/1035732/

View attachment 1

For scale the threaded part is 1/4" 6.35mm diameter

Bob


Just to get my mind in the right direction............. :lol:

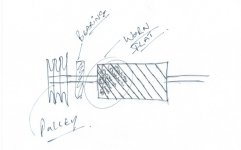
According to the chappie, the rotor is worn on the one side, see the CAD drawing, and that is causing the heating up of the motor.

Rotor_Worn.jpg

Bob, the switch - what will that bypass or assist in the starting up?

What wires would I cut and connect to the switch?
I like Robert's idea (cheap and easy as I have a switch) before I look for and invest in a switch.
 
The rotor wear is new information and so you might not need an electrical solution.

The question has to be how on earth the rotor can be rubbing to cause that. The bearing would have to be very badly worn to cause that or the motor end(s) have been fitted badly.

I should have been well within the capability of the motor shop to have solved that problem for you.

However I think they also told you of the centrifugal switch failure and that they could not fix that.
My electrical solution would solve the centrifugal switch issue - if it exists (?)
I've mentioned how to connect the switch. In series with the one of the capacitor leads.

Bob
 
9fingers":1cn972rg said:
The rotor wear is new information and so you might not need an electrical solution.

Bob

I phoned just to understand exactly what he told me, and I think I got it right.

9fingers":1cn972rg said:
However I think they also told you of the centrifugal switch failure and that they could not fix that.
My electrical solution would solve the centrifugal switch issue - if it exists (?)
I've mentioned how to connect the switch. In series with the one of the capacitor leads.
Bob

:oops: I read but did not read, and then did not understand. (This is way outside my technical abilities and understanding! I can add 1 + 1 and give you an answer that will satisfy the tax people :lol: :lol: )


Phil
 
Question - with the rotor wear - new motor?

A new machine like this is GBP2,300 translates into about ZAR40k
:o :shock: :(
 
9fingers":24qwybkl said:
Phil":24qwybkl said:
Question - with the rotor wear - new motor?

A new machine like this is GBP2,300 translates into about ZAR40k
:o :shock: :(

Minimal importance just get it running true in the stator.

Bob


This is way beyond my expertise or knowledge.
will take a drive to the repair place.
 
Ok, new motor purchased.


The new motor – with a few snags ……………………

The power connection sits on top – motor will not fit under the saw table


MotorPower-OnTop.jpg

Solution – move the mounting plates to another side swinging the electrics onto the side of the motor.
All the bolts are 5mm diameter.
Easy peasy!

There are no holes pre-drilled – so what now?

Dig out a metal case where the compressor fittings are.
Inside are also a range of taps and dies and luckily a 5mm tap with the right thread!

Having not used stuff like this before, I approached Mr Google who kindly provided me with a Tap-Drill Chart.


TapDrillChart.JPG

“To Tap This Size Screw Or Bolt” 5mm
“Use This Drill Bit” 4.2mm

No 4.2mm drill bits in the collection – so a trip to Mica around the corner.


Mark the bit with some masking tape to indicate a depth of 15mm
Drop of oil in the hole, and drill slowly till required depth.
Clean up using the vac.

The Tap also gets some oil and is then turned very slowly into the whole.

Clean up using vac.

Test hole with 1 of the bolts.
Fits (big sigh of relief)

Carry on and do all the other holes.

First go with switch on side – a stuff up.
Power cord will interfere with bottom saw arm.
The capacitor catches on the table top.
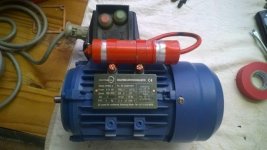

First Try.jpg

Move it to the other side, but turn the switch box around.

The techy used some large blocks to connect which I then changed to smaller blocks to fit it in.
Also extended and connected the earth wire.
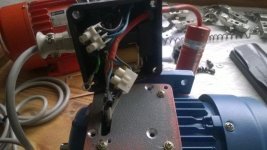

Turm wiring around.jpg

Next problem – the cable connector is too large and catches on the bottom plate.


CableCatchesPlate_2.jpg

CableCatchesPlate.jpg

Will go and see what is available.


Next problem ………………..

The drive end of the motor is %*$%$*$$ not quite the same as the old motor.

The pulley sits right back and the large pulley wheel cannot be used. (this is BIG sh!t)


Shaft_Pulley_1.jpg

The motor shaft is 11mm, so if I stick a washer in, then the pulley will stand out enough to be able to use all 4.


Shaft_Pulley_2.jpg

The pulley fits ‘loosely’ on the shaft, so it just might need a small hole and screw.
Drill + tap + allenkey head flush screw. (this is getting very complicated …………)


Will have a look tomorrow.


.
 
Looks like you are getting there. I might have been tempted to extend all the wires emerging from the motor and put the box somewhere else...just make a smaller cover for the terminals and cord grip.

What is inside that box? looks like some kind of overload trip?
 
Robert":58n14uaf said:
I might have been tempted to extend all the wires emerging from the motor and put the box somewhere else...just make a smaller cover for the terminals and cord grip.

That is plan B.

Will go and have a look this morning for a shorter connector.


Robert":58n14uaf said:
What is inside that box? looks like some kind of overload trip?

I am not quite sure. This is way beyond my knowledge. :o
I can change a socket and light bulb :lol: :lol:
 
Progress is slow, but I am getting there.

Power cable connector has been changed, so that problem is out the way.

Motor fitted to base plate and offered to the machine.

Oooooooooooooo, craps, the capacitator is in the way of the table.
The table is tilted to the left for easier access.

CapacitorTooHigh.jpg


Solution - an extension arm

Capacitor Extension arm1.jpg

Capacitor Extension arm2.jpg


Next job - is to align the motor + pulley to the driving pulleys.
Need to build up some patience first.
 
Back
Top