• Hi all and welcome to TheWoodHaven2 brought into the 21st Century, kicking and screaming! We all have Alasdair to thank for the vast bulk of the heavy lifting to get us here, no more so than me because he's taken away a huge burden of responsibility from my shoulders and brought us to this new shiny home, with all your previous content (hopefully) still intact! Please peruse and feed back. There is still plenty to do, like changing the colour scheme, adding the banner graphic, tweaking the odd setting here and there so I have added a new thread in the 'Technical Issues, Bugs and Feature Requests' forum for you to add any issues you find, any missing settings or just anything you'd like to see added/removed from the feature set that Xenforo offers. We will get to everything over the coming weeks so please be patient, but add anything at all to the thread I mention above and we promise to get to them over the next few days/weeks/months. In the meantime, please enjoy!

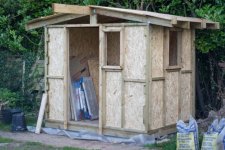
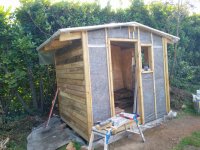
Nick's practice shed

bluebirdnick":n46rjtev said:
Phil":n46rjtev said:
I am a clueless builder. :?

The fundy's will be along soon. :D

The left overhang for firewood – I would make the overhang longer for more protection, fit a nice beam across underneath next to the edge and then in the middle have a treated round pole (decent diameter) planted into the ground to support it right in the middle. Tie it together with a strap.

Phil
Thanks. I think some sort of support for the overhang would be good, even if only for appearance.

I have also realised that my own thinking of the design has moved on from my powerpoint sketch. In the powerpoint sketch I had the sole plate sitting on the lintels, but I think it makes more sense to build the floor first and have the walls built off that, as is shown in the sketchup.

A question too:

One thing I was worried about is cutting the cladding. It will be pressure-treated, but to my mind cutting it does mean you create a partially untreated face. For this reason I had initially assumed that I would build walls that were exactly 1.8m and 2.4m wide, and then have a number of timbers to make up four corner posts and fix the walls to those. However the advice on here seems to be to avoid big corner posts, so my sketch-up shows instead that I have doubled up the timbers at the edges of each wall and will attach the walls to one another directly. This means that the 2.4m wide wall will not be exactly 2.4m, so I will have to cut one end of the cladding. Now I will clearly cover this with a strip of something, but do I need to be concerned about cutting it in the first place?

Depending on the quality of the cladding, you may find that you need to cut the cladding square as the tolerance at the saw mill might not match your tolerance. I found with the 4*2 2.4m etc that the ends were not always square enough to make the frame. I painted some end grain treatment stuff from Toolstation, just be safe.
 
Hi all

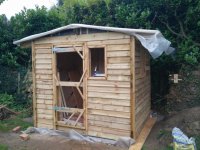
I did actually build this in the end. Or at least, I have almost finished. Still to do are roof covering; roof insulation and OSB lining; finishing the door, painting everything, and getting some glass for the windows. Apologies for not updating: it's been hectic in work and with our first baby due any minute now, I've been short of time! Also, the problems with uploading pics has really made it hard to ask questions so I sort-of gave up.

Anyway, as I mention in my original post one of the main reasons for building this was as a practice to see whether it is genuinely feasible for me to build something significantly bigger in Jan-Feb, when I am off work for 2 months. I will not be able to spend all day every day on it, but I would hope to get a few full days in, and chip away at it for an hour to two each day otherwise. So to that end and to get around the problem with pics, I have thrown together a quick blog showing the progress and what I think I have learned from the process. It should start from the bottom up but the "top" post is the groundwork which should come first, and I've not worked out how to change site title etc. If I could transfer all of this stuff to this site then I would, but pictures are so important and I am struggling to work out how else to incorporate them.

So in the meantime in case anybody is interested, here is where I have got to. Comments (on this forum please, I don't plan to use that blog at all really!) are welcome!

https://nickspracticeshed.wordpress.com/

Thanks,

Nick
 
Well done, Nick. Bloody brilliant.

I wished I had kept a journal as well as just a photo record.

I bet there are guys out there reading your diary with interest and taking notes of what to do and not to do.
 
Nice, the picture hosting has been sorted, have a look for the announcement at the top of each forum that shows how to do it.

Cheers
Mark
 
Mark - will do. I would much rather have it all on this thread so I will look to transfer it all across one evening this week.

EDIT: updated now. For those reading this, the posts up to cladding were all added after the act - if something is wrong it is now too late to fix it!
 
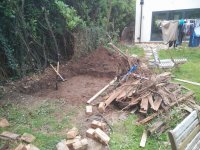
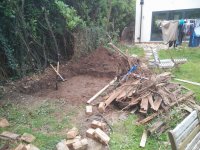
Day 1 - dig a hole

dig hole.jpg

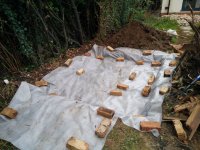
Then line hole with geotextile.

line with geotextile.jpg

Took a day of work, split in to two half days on the weekend. Time was mostly spent removing 3 tree stumps.

Lessons learnt for workshop:

1. Digging is misery and my back doesn’t hold up well to it. Can I get a labourer to do it? Have asked the labourer/gardener on the extension next door to quote.

2. I dug too deep – 300/400mm. Don’t. It makes it harder, there is no need, and it makes filling it with hardcore and type 1 (concrete, for the workshop) harder and more expensive.

3. Ivy is a pain. Leave plenty of time and patience to clear properly. The garden is full of roots.

4. Don’t be lazy and leave the soil right next to the hole. It made the rest of the job hard. Take more time and move the soil at the same time.

5. I forgot to treat the soil with weedkiller. Let’s see if it matters. I cleared 6 or 7 blackberry plants from the area, so it might matter.
 

Attachments

  • dig hole.jpg
    dig hole.jpg
    511.5 KB · Views: 11,168
I spent 1.5 days laying a base. I don’t have any photos of this, but it was:

Hardcore (bricks)
1 bag of type 1
Patio slabs, levelled on a bed of mortar
Concrete lintels (100×65)
DPC
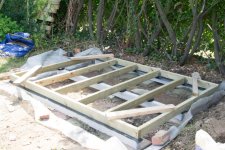
Timber floor frame (100×47).

Here is a photo I do have. To get this far took 1.5 days! Dad helped and put in a big shift – in particular on mixing mortar. His experience of designing road surfaces came in handy too for getting a good base. This doesn’t show a continuous DPC above the middle lintel, but there is one now. it was folded up like this as well and packed in, because despite my best efforts the middle lintel seemed to be 2-3mm lower than the outer two, so I packed the small gap with DPC (seemed as good as anything else).

base.jpg

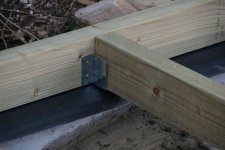
The timber frame was easy and quick to put together. One error though: I had intended to clamp the two long pieces together and mark the two together for where the shorter joists would sit. I forgot. And that added 30 mins of measuring. Also – I used mini joist hangers, as well as putting in some big screws in at an angle (pic should show the heads). The joist hangers were great the top of the joists flush, but I don’t know how to use them! This pic shows the problem:

joist hanger detail.jpg

I didn’t put in any fixings between the hanger and the shorter joist. Why is the hanger not at 90 degrees? As shown, it is more “open”. Was I supposed to fix it to the shorter joist first so that it closed up? If so, it would not have done the job I wanted which was to get everything nice and flush.

What this does not show is that Builder Depot were dreadful and failed to supply the 18mm OSB sheet material for the floor, despite guaranteeing that they would do so. They offered to deliver 18mm exterior ply instead the following which I took, but it was shuttering ply. It’s awful, but I didn’t have time to do anything about it so my floor is crap shuttering ply. I also failed to get insulation sorted out in time, so the floor is not insulated.

Lessons learnt for the workshop:

Not a lot really as the base is so different for the workshop. I will still be doing a timber suspended floor though so:

Do not trust suppliers to get stuff to you on time. Have a space ready to take materials (pallets in the back garden with some decent sheeting will do) and have stuff delivered at least 2-3 days in advance of needing it – reliance on an untested just-in-time system means I ended up with a crap uninsulated floor.
Learn how to use joist hangers! (See above)
 
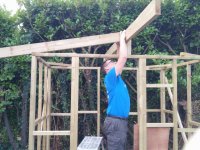
Sadly very few pics here. Doing the wall frames was easy – took 2-3 hours with Dad’s help. Putting up the ridge beam took about an hour on my own one evening. A friend very kindly lent me a morning of his time to help with the rafters and roof sheet material which was invaluable – it would have been nigh-on impossible on my own. Here is a pic – the only one I have of the basic frame:

rafters.jpg

So all told, that adds up to a day’s work for two people.

Lessons learnt for the workshop:

1) The plans show double studs at the edges of the walls. Stick to that. I did it for the side walls but not the front and back (thanks, Builder Depot, for not delivering the full order and leaving me scrambling around for workarounds). This was a mistake. Having the double studs would come in really handy for lots of things, including lining the inside of the shed, and battening for cladding. Here is a pic of a bodgy workaround I did for both, which made insulating harder and less effective:

bodge.jpg

2) There is a fairly obvious mistake here – the ridge beam’s weight is borne by a single 47×47 top plate. Not clever. If I am doing a ridge beam for the workshop and its supports do not sit over a stud, then double up the top plate.

3) Work on the roof is a two-man job. Buy bottles of wine and offer them to anybody willing to give me a day of help.

4) Make everything level and square, even if you don’t think it needs to be. I didn’t really bother too much with the noggins because it didn’t seem to matter, but it made insulating and lining it harder because I was not sure that I had made sure they were exactly horizontal, and because I had just put them in with no real pattern. Don’t do this: far better to have it all level and proper and to plan – the minutes it saves at the time can cost ten times that at a later stage when you cannot rely on the location or position of something.

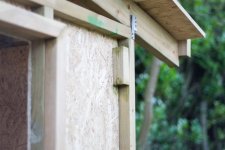
5) Learn how to use the metal connectors for the rafters. They did an OK job here, but it’s clearly not how they are supposed to be used. And it will make lining the roof hard because the clips are in the way…

6) Bolt the walls together, and use timber connectors. I had them ready, but it seemed sturdy enough with the massive screws I was using so didn’t bother to go back and bolt the walls together. Even if it makes no difference, it’s maybe £30 to know it’s been done as well as can be done. Just do it.

7) Spacing of studs. I did it to accommodate 455mm cavity wall batts, but the ones I ended up using were 600mm anyway (partly because just-in-time ordering is great in theory but terrible in practice). 600mm (or at least spaced to accommodate the OSB internal lining) would be far better really.
 
Sadly very few pics of this. Here is what I do have:

lining walls.jpg

This was easier than anticipated. 11mm OSB is manageable on my own, for the walls. Insulation took 1-2 hours. Lining the walls about double that – so well under a day’s work in total. I used omnifit slabs, because that is all I could get hold of. It wasn’t much fun to work with, but if I had 600mm spacing between studs it would be infinitely easier than having to cut all of them. Noggin spacing to accommodate full sheets would be a good idea too. I bought a cheap staple gun which fired 32mm staples – this did a great job with the OSB.

Some stuff that took ages/lessons for the workshop

1. Insect mesh. How do I actually fix this stuff?! Tried the staples. then duct tape but the tape peels off and the staples don’t completely fix it. Argh!

2. Fascias. Do this when you do the rafters and before I put the roof sheeting on. It took about 2-3 hours! Fixing it was hard work working in awkward positions. They should be the same size as the noggins (just under 600mm) so do them at the same time and use them to help space the rafters.
 
This was on my list as an “easy” job. It was not! Even with Dad’s help, the membrane took about 3 hours.

membrane.jpg

Firstly: I think I used a membrane for a roof, not a wall. Not sure if it matters: it’s waterproof but breathable.

Secondly: Possibly a stupid question, but how are you actually supposed to fit the membrane?! I used the staple gun and taped the seams with duct tape (but looking at the pics I clearly missed at least one seam).

It was a bugger to cut, too.

Battening was easier, but again my failure to have enough of the right stuff on site meant that I was running around trying to find battens. End result was that I ended up with 19mm deep battens which, allied to a “challenging” session with the breather membrane and dad having used offcuts to insulate some of the cavities means that I think I have effectively failed adequately ventilate my walls. Which is really, really annoying as 25mm battens cost nothing, and we had more than enough insulation anyway.

I struggled with the corners. In the end I took the mystery 4.2m 200x50mm that Builder Depot delivered and ripped it in two, and then halved each length to give me oversized 100x50mm corners, and fixed them in such a way that the cladding finished flush on all sides with the corners. It does give the building a chunky look – I was after something a little more delicate but couldn’t work out how else to do it (plus the timber I used was free, and it got rid of a massive plank of wood that I would otherwise have had to store or get rid of).

You can also see here that I added 47x47mm timbers around the windows and doors, again to prevent the edges of the cladding from being exposed.

Lessons learnt for the workshop:


1) Work out how to do more refined corners!

2) Get 25mm battens. At least. And don’t use offcuts when doing the insulation – it will bulge!

3) Learn how to properly fix the breather membrane to the studwork.

4) double up the vertical studs around the windows. It will make battening much easier. (It’s hard to nail cladding to a batten that is not backed by a stud)
 
This is the fun part!
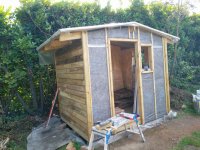
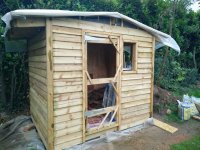
cladding 1.jpg

cladding 2.jpg

cladding 3.jpg

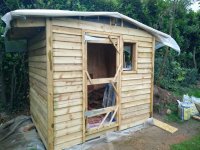
This took about 1.5 days on my own. It’s good fun! (If you are concerned about how close the cladding goes to the floor, I share your concern but the pictures are a bit misleading: the geotextile is bunched up and the shed is at least 100mm above ground level, probably 200mm at the left hand side.

It’s not finished yet- I had to get as much on as I could before the weather changed so focused on getting as much of the easy stuff on as possible rather than completely finishing each wall. The cladding is 6/22mm treated feather edge, 150mm deep. I allowed a 30mm overlap. I didn’t want feather edge. I wanted loglap. Or, at least, shiplap. And when budget dictated that feather edge was my only option, I promised myself I would get the chunkiest stuff I could. But sadly when it came to it, the fact that we have a baby due any minute meant that I really had to cut back and went for the cheapest, thinnest feather edge. However I was actually pleasantly surprised by the stuff that was delivered – it does feel reasonably chunky, and I really love the appearance of the feather edge and will likely use it (albeit thicker stuff) for the workshop. I WILL be using more expensive stuff for the workshop, but this was a case of spending £200 to get the job done, or £400 to do it was I wanted it done and regretting the over-spend.

The little jig I made to space the boards (you can see it hanging on the broken old fence on the right hand side in the second pic) uses two timbers of different depth, so it will give different spacing if used one way up as opposed to the other! Basic error, and I think this explains the rather irritating difference between the board spacing on the front face, and the left side wall. Bugger.

Some other things to note: the board above the door and the window on the front walls are put there as full boards for convenience. This is not ideal, but I was due heavy rain and had 3 hours to clad the front, back and right hand side walls or risk having it all getting drenched. Perfect is the enemy of done, and I am perversely quite proud of myself for choosing to live with this very visible imperfection in favour of getting the job done in the time I had. With a baby arriving in the next few weeks and all of my tools in its room, getting the job done is the main aim now!

And while I am blowing my own trumpet: when designing this, I obsessed over having 2.4m x 1.8m external walls to make cladding easier. The 2.4 dimension changed by a few cm for reasons that I won’t go in to (and in any case it transpires that my supplier of the cladding – the excellent Beaumont Forest – don’t stock 2.4m anyway). However I did have 1.8m side walls and the supplier did supply 1.8m cladding, so I was delighted when I didn’t have to cut a single 1.8m board; every one of them fitted by pressure with no holding needed when fitting (some required a gentle tap with a hammer to get them in) which means that my walls, and the boards, must have been accurate to within a mm or so, all the way up. As an aside, where I did cut boards for the other walls I cut them generally a mm too wide so that I did have to hammer them in a bit, but the boards were still a bit wet from the recent rain so I figure they can only shrink.

Fitting them was generally easy, but tricky for the back wall (which is up against a hedge). I used the jig, and a 25mm nail from the nail gun/stapler to temporarily fix them, and then used a hammer and bright nails to fix them properly (one nail at each batten). I trusted my jig, but on every other board I used a spirit level to check the level of the bottom of the board as this would be the visible bit. Generally it was all OK with just the jig, but a few needed adjusting. I put the nails high on the boards so that they would be covered by the overlap. Not sure if this is right – time (or someone who knows what they are talking about) will tell. Also not sure if I used the right nails. I used lost head bright nails, but wondering if I should have used galvanised nails.

Fixing the boards was manageable on my own but tricky for the longer boards, and they were only 2.4m. This will be a two-man job for the workshop where I am working with boards twice that length.

You will also note that the wood has not been painted. It was wet when it arrived and it has been raining since. We had a few days of dry weather so they had mostly dried by the time I fixed them, but sadly not dry enough to paint. And getting hold of Barn Paint was a bit of a problem too. The local supplier told me that they stock loads of the stuff, and that they sell all colours. Both of which are true, but what he really means is that they stock loads of white and black, and they do sell any colour but only after ordering it in specially. Oh well. Another example of lack of research and over-reliance on just-in-time ordering. And I actually really like the appearance of the treated timber.

Lessons learnt for the workshop:


1) With the jig, have an obvious “top” and “bottom” to avoid the error made on the shed. And if I am working alone: make two, and temporarily fix one to the wall in place, to free up hands to work with the rest of the board.

2) Nailing was easy and quick (if a little noisy). Contrary to expectations, no need to hire a paslode to speed things up. But make sure I have the right nails – and two hammers. It is a two-man job for the workshop, so both should be hammering.

3) Have lots of end grain preservative ready. I have been splashing it everywhere whenever I cut anything, and in particular for the cladding.

4) Don’t over-order! I’ve got maybe 50m of leftover full boards left, which is crazy. I am not a very good quantity surveyor.

5) Consider using steel sheeting for the back walls if I am using it for the roof. Probably cheaper (in particular as I want to clad the workshop in thicker feather edge, or shiplap/loglap), probably quicker and probably more resilient which is particularly important as access to the back of the workshop will be very difficult.

6) Order the timber long in advance; let it dry; then paint. And then fix. I will end up painting the shed when finished and the end result will be poorer than giving myself the time to paint it first.

7) I use a laser level all the time in the house. I didn’t use it at all for the cladding. Use it. It would have been really, really useful on the front wall where I was (and will be) running different lines of cladding that are supposed to be exactly in line.
 
I am struggling with the door.

door.jpg

As you have seen previously, I have added timbers on the front wall around the door opening to act as an edge for the cladding. Which I think looks great. Problems:

it is just one timber deep. the hinges are attached to it, and not to the doubled-up studs I put around the door opening in the wall.
I want to clad it, but that will mean that the doors stands proud of the rest of the wall. This has the benefit of hiding the hinges (which should add security), but will look rubbish and will also not be ideal as regards rain. What did I do wrong?
I want to insulate it too. So how do I clad it, insulate it and leave it flush with the rest of the building?
I would like a window in the door too. Too ambitious? (I do plan to add a diagonal brace to the lower part of the door)
The windows are rather easier – I will just order sealed units to fit.
 
That brings us up to date. I am off to do the roof felt now; and finish off the door etc. Any comments welcome!
 
Looking good, Nick, and probably a steep learning curve like has mine has been.

I share your 'what do I do with the corners and doors' edges for the cladding ends?'

I've looked at MikeG's suggestion of 3x1 and 2x1 in an L shape and I'll try and work something out for that, based on the depth created by the counter battens and the FE being a minimum of 2".

I also think I need to fix (screw or bolt) 2" extensions to the door frames to bring them out to meet the FE and be beefy enough to take the hinges, but I won't decide on that depth until after the FE arrives and I can measure it modelled on a batten.

MikeG's tip with the strap hinge looks good and I shall try that.

Good luck and keep going.
 
bluebirdnick":2l3ooqkd said:
..........I put the nails high on the boards so that they would be covered by the overlap. Not sure if this is right .........

No, it is definitely wrong. The nails should be approx 30mm up from the bottom of the boards if you have a 25mm overlap between boards. This means the nail is holding the bottom edge of the upper board (the board it is nailed into), and at the same time traps the upper edge of the board below. This prevents curling / cupping of the boards, and yet allows for shrinkage.

You are right about nail guns for this job. It is quicker and easier, and far, far better, to use the old fashioned hammer and nails.

Oh, and paint: a mist coat and a full coat to the boards before fixing, then a second full coat once in place on the shed, paying particular attention to covering the nail heads.
 
Thanks both, much appreciated. I didn't do much yesterday but today I took on the challenge of getting the roof finished before the rain came at 4pm, and managed it with enough time to spare to clad the door. The roof is asphalt shingles over standard shed felt as an underlay. Pics to follow - it was raining quite heavily by the time I finished and didn't want to risk the camera.

Malcolm- I have been watching your build with wonder and envy - looks fantastic! You are also using the roofing that I really wanted to use, but cost and difficulty with getting hold of it ruled it out. It looks great, though.

Mike - thanks for the advice. Is it worth me adding nails in the "proper" location now? Or does the fact that they would be fixed at top and bottom mean that it's not worth doing? I'll add it to the list for the workshop build. As regards the paint: I was gutted not to get it on before I did the cladding, but I just ran out of time. Hugely disappointing, in particular as the main problem was my misunderstanding as regards the difference between what the local supplier means by "we stock it" and "we sell it"!

Lessons for workshop

Nail cladding at a single point only, low on the boards but just above the one beneath.
 
Looks good mate and great way to document all the gotchas for the 'proper' build.

Cheers
Mark


Sent from my iPhone using Tapatalk Pro
 
Back
Top