• Hi all and welcome to TheWoodHaven2 brought into the 21st Century, kicking and screaming! We all have Alasdair to thank for the vast bulk of the heavy lifting to get us here, no more so than me because he's taken away a huge burden of responsibility from my shoulders and brought us to this new shiny home, with all your previous content (hopefully) still intact! Please peruse and feed back. There is still plenty to do, like changing the colour scheme, adding the banner graphic, tweaking the odd setting here and there so I have added a new thread in the 'Technical Issues, Bugs and Feature Requests' forum for you to add any issues you find, any missing settings or just anything you'd like to see added/removed from the feature set that Xenforo offers. We will get to everything over the coming weeks so please be patient, but add anything at all to the thread I mention above and we promise to get to them over the next few days/weeks/months. In the meantime, please enjoy!

Shadow lines with flush-fitting face frames

BaronBiscuit

Seedling
Joined
Mar 3, 2024
Messages
16
Reaction score
3
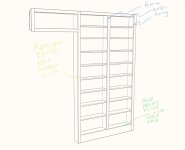
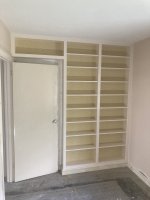
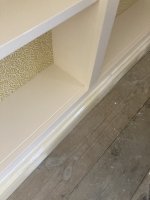
I’ve a small commission, to make a couple of fitted bookcases. The lowest shelves have a flush-fitting face frame and I’m concerned about the joint line between the self and face frame cracking over time. My dry-fit is good but I’m sure fate will decree otherwise, when I’m fitting them on site.


I’ve used shadow lines in the form of 45 bevels on some side panels, these look good to my eye, but I’ve started to think I should be using the same technique on the edges of the bottom- most frames/shelves.


I’ve googled this and the hive-mind has little/nothing to say about shadow lines.


Could someone let me know the best way to go about this, and or the “proper” way to do it.

Hopefully I’ve managed to upload some pictures to illustrate…. IMG_1473.jpegIMG_1472.jpeg
 
The crack will be in the bottom of the V should it appear. The purpose of the detail is to give a crack somewhere to hide.
 
The crack will be in the bottom of the V should it appear. The purpose of the detail is to give a crack somewhere to hide.
Sorry, maybe I wasn’t clear. I’ve already used shadow a line on a horizontal side panel, which returns to the wall. I attached one image of the 2 45 degree bevels I machined. But I haven’t created a ‘V’ where the shelf meets the face frame (my other picture). I’m wondering whether it would be prudent to add one.
 
If you have glued the frame to the shelf I can't see why there should be a problem forming to any great degree.
Leaning towards the flush fit at the moment…. A shadow line on the bottom shelves may become a literal dust-trap!
 
Are you saying that the top of the face frame acts as the front of the shelf, deepening the shelf by the thickness of the frame?
 
Last edited:
Leaning towards the flush fit at the moment…. A shadow line on the bottom shelves may become a literal dust-trap!
I would just do the flush fit. Not exactly sure if you are gluing the face frame to the back shelf but either way a small crack (if it ever appears) would in my mind be preferable to a horizontal dust trap that will create a black line in the long run.
 
Are you saying that the top of the face frame acts as the front of the shelf, deeping the shelf bny the thickness of the frame?
Yes, it’s overhanging the carcase by 6mm on the sides and top edges with the exception of the bottom.
 
Sorry Mike, I appreciate the help!
Here’s the plan (literally)…
In my first post one photograph is of the shadow line I’ve routed into the side of the bookcase components (annotated in yellow on the plan). The other is a close up of the bottom of the bookcase (blue on the plan), where the face frame meets the lowest shelf… it’s here I’m debating the merits of having a shadow line to hide any potential cracks that might occur. It’s not designed to hold a huge weight, but might settle a bit.
 

Attachments

  • IMG_1475.jpeg
    IMG_1475.jpeg
    77.8 KB · Views: 21
I think either approach would work, but I’d love to know what the “correct” way to do this would be, if there is such a thing.
 
I would definitely not chamfer the edges of the join in that location. It would look weird to have a v-shaped groove in a shelf. I would also have had the frame finish underneath the overhang of the shelf. It sounds as though it's too late for that now. If it's the same wood then joining it long grain to long grain like that should result in an invisible junction, so long as you're a little careful with your grain matching. I wouldn't have chamfered the join up the verticals either, (but is it MDF to timber?......in which case maybe a groove was the best choice)...but there's no harm done.
 
I don't think there is a right way to do it, for me it depends on the look you are going for. As it's a MDF to timber joint I think you will always see it so I can understand why people would choose to make a feature of it. I do the V thing sometimes, generally if going for a modern style but I do think it has a bit of an Ikea look about it. Sometimes I have the face frame just a mill or so above the shelf with a small round over or just the arris removed, I know it sounds wrong but doesn't seem to cause any problems. I am currently making a cabinet like you which has a V on the sides and I'm leaving the face frame and shelf just flush because that's what I feel suits this job.
 
Hi all, I wanted to thank you for all the help you've provided. I don’t know if anyone is interested, but I’m grateful for all your suggestions and sometimes it’s useful to offer some feedback on how stuff went.

The install was a tricksy beast, mainly due to me allowing a mere 25mm between the top of the bookcases and the ceiling! Barely enough room for the L-brackets I needed to fit. I had to screw them horizontally to some 18mm blocks and glue these onto the cabinet tops! Urgh!

As for the face frame... well, I had a good fit in the workshop, but fate would decree that this wouldn't be the case on site. Despite best efforts, I couldn't get a perfectly tight joint between the bottom shelf and the face frame. I ended up adding a chamfer to the mating corners,. Not the plan, but an acceptable solution.

Thanks for all your help!

Here’s a picture of the finished job…
 

Attachments

  • IMG_6242.jpeg
    IMG_6242.jpeg
    142.7 KB · Views: 24
  • IMG_6249.jpeg
    IMG_6249.jpeg
    132.5 KB · Views: 24
It looks like you did not make use of any cover strips where the bookcase meets the room which would have made fitting easier. It does look like you have made a very good job, nice, tidy and neat.
 
Back
Top