• Hi all and welcome to TheWoodHaven2 brought into the 21st Century, kicking and screaming! We all have Alasdair to thank for the vast bulk of the heavy lifting to get us here, no more so than me because he's taken away a huge burden of responsibility from my shoulders and brought us to this new shiny home, with all your previous content (hopefully) still intact! Please peruse and feed back. There is still plenty to do, like changing the colour scheme, adding the banner graphic, tweaking the odd setting here and there so I have added a new thread in the 'Technical Issues, Bugs and Feature Requests' forum for you to add any issues you find, any missing settings or just anything you'd like to see added/removed from the feature set that Xenforo offers. We will get to everything over the coming weeks so please be patient, but add anything at all to the thread I mention above and we promise to get to them over the next few days/weeks/months. In the meantime, please enjoy!

Small workshop

MY63":2rh3a5cz said:
The band saw has what look like small brass bars as guides and I was wondering how close to the blade they need to be. They are about 5mm away presently.

What you can do is to replace those blocks with self-lubricating Lignum Vitae and set them so they just touch the blade. As it's a timber, they soon wear and provide a perfect clearance - Rob
 
Thanks Rob I will keep that in mind for when the brass runs out although small pieces of wood are guarded around here as I use them in my pen cases I have already started using the pieces you were kind enough to sort out for me.
I invested in a pair of plastic feather boards (hope that is the correct term) for the band saw which will be a great help as two of my fingers are not releasing when required which is a bit of a nuisance when you want to let go of a trigger :D.
I am making my first official project in the workshop and I needed to rout a groove in some 35mm x 10mm sapelle no chance of doing it by hand so I got out the cheap router table. And using clamps fixed the feather boards in place. Perfect two passes and I have a nice groove for my bases to fit in.
 
I am currently making a set of legs for my first work bench. I started with the top cutting mortices using the drill press and a good bit of 14mm. Tenons made on the band saw which takes seconds :D.
My problem is the top of the mortices keep splitting out as each leg needs two mortices I have only cut them halfway through.
Clearly I am doing something wrong other than making the tenons smaller is there anything else I should be doing.
I will take some pictures if it stops raining.
 
Glad to see you are up and running. I have a stash of lignum vitae in th shape of a few lawn green bowls. To send a whole one in the post is prohibitive expensive but small pieces for band saw guides are no problem.
 
Splitting - clamp the ends or cut further away from the edge, then cut off the waste.

You seem to be working in a corner which will limit your length of timber being worked?
Fasten the legs to some 18mm ply board then attach some lockable castors - then you can move the saw to a more convenient space.

You could have made a feather board, very easy on a saw. [emoji3]

Rod
 
That is very kind of you Andy should I replace them now or wait until the brass wears down.I have a couple of questions relating to the band saw.

In this picture you can see the blade and the guides there is a roller bearing behind the blade but it appears to be side on.
2019-06-24_11-45-10 by my0771, on Flickr

2019-06-24_11-45-19 by my0771, on Flickr

I don't think I noticed this before as I put the band saw into the garage when I first got it. Is this some sort of speed adjustment device.

2019-06-24_11-45-00 by my0771, on Flickr

Thanks
 
Thanks Rod I bought the timber machined to the correct size as I did not have a mitre saw at that point.

Is there a tip for clamping the ends without long clamps or should I start saving for long clamps :)

The band saw is currently in a corner and as you say I was planning on adding wheels in the future the current metal base that came with the saw is quite tall the table is 1200mm.
Ideally I would like wheels that can be fitted to the sides that can be raised and lowered easily should such a thing exist.

Time is my enemy I am afraid Rod I wanted to finish the first work bench in time to start a small wood working project this week. I also have a number of leatherworking projects backing up so £25 for two robust feather boards with an assortment of fasteners. I think it was good value really.
 
MY63":gkxuanwq said:
I am currently making a set of legs for my first work bench. I started with the top cutting mortices using the drill press and a good bit of 14mm. Tenons made on the band saw which takes seconds :D.
My problem is the top of the mortices keep splitting out as each leg needs two mortices I have only cut them halfway through.
Clearly I am doing something wrong other than making the tenons smaller is there anything else I should be doing.
I will take some pictures if it stops raining.

I think you had this problem before. Keep the mortise well away from the end of the legs.
Maybe the promised photos will give more of a clue?

Bob
 
Those are the 'Cool Blocks' on the bandsaw as I mentioned and can be easily replaced with Lignum Vitae. The Euro 205 bs that Andy P bought off me a few years ago should still have the Lignum blocks in it that I fitted when I first bought the machine - Rob
 
9fingers":2ind946a said:
MY63":2ind946a said:
I am currently making a set of legs for my first work bench.

I think you had this problem before. Keep the mortise well away from the end of the legs.
Maybe the promised photos will give more of a clue?

Bob

Yes Bob you are correct I did have a similar issue with the doors where I was making mortises across the face wood rather than vertically. I had assumed these would be ok 15mm down from the edge..
Sorry about the lack of photos Flickr stoped responding and I cannot upload anything maybe tomorrow.
Is it possible that I am trying to make the m&t joints too tight?
 
Malc2098":3sgaf5jv said:

Those are indeed the sort of thing I need Malcolm as I don’t have a lot of space I was hoping to find them in a pair where the front and rear worked off the front or all four working from one pedal.
Although thinking out loud as it were if I am going to pull it out to use it then it can stay on the wheels when in it’s stored position.
 
Woodbloke":s5k52vlg said:
Those are the 'Cool Blocks' on the bandsaw as I mentioned and can be easily replaced with Lignum Vitae. The Euro 205 bs that Andy P bought off me a few years ago should still have the Lignum blocks in it that I fitted when I first bought the machine - Rob

It does
 
MY63":33bcjjmi said:
9fingers":33bcjjmi said:
MY63":33bcjjmi said:
I am currently making a set of legs for my first work bench.

I think you had this problem before. Keep the mortise well away from the end of the legs.
Maybe the promised photos will give more of a clue?

Bob

Yes Bob you are correct I did have a similar issue with the doors where I was making mortises across the face wood rather than vertically. I had assumed these would be ok 15mm down from the edge..
Sorry about the lack of photos Flickr stoped responding and I cannot upload anything maybe tomorrow.
Is it possible that I am trying to make the m&t joints too tight?


Working in softwood, I would not make mortices so close to an end but maybe they are too tight. You should be able to fit T into M without tools but not so loose as it can wobble. Too tight and there will be no room for glue.
Bob
 
Hi Bob so tapping together with a hammer is a no go then.
Simple mistake easily fixed.
Rather than have 15mm from the top and bottom can I have 30mm from the top and 0 at the bottom.
Is it acceptable to fill the current mortises with wood and glue and turn the legs upside down and start over.
I can reuse the tenons on their rails as the lower stretchers
 
MY63":vbfjbyl9 said:
Hi Bob so tapping together with a hammer is a no go then.
Simple mistake easily fixed.
Rather than have 15mm from the top and bottom can I have 30mm from the top and 0 at the bottom.
Is it acceptable to fill the current mortises with wood and glue and turn the legs upside down and start over.
I can reuse the tenons on their rails as the lower stretchers


Not in softwood. You could go for more of a honeymoon fit in seasoned oak but you will only wipe off all the glue when you fit them.
Yes flipping legs top for bottom will be fine.
As a niecety it is always good to have a little bit of a shoulder on the tenon to hide any scars on the edges of the mortice. So 2mm at the bottom and 28 at the top.

Bob
 
Thanks Bob my plan has always been to enclose the sides and back in plywood with storage for my mitre saw below so the joints will never be seen. I will follow your advice and 28 and 2 it will be.

I think I am going to need a couple of long clamps around 1.2m as this bench is 1100mm has anyone got any recommendations in the budget section please.
 
MY63":25p86pec said:
Thanks Bob my plan has always been to enclose the sides and back in plywood with storage for my mitre saw below so the joints will never be seen. I will follow your advice and 28 and 2 it will be.

I think I am going to need a couple of long clamps around 1.2m as this bench is 1100mm has anyone got any recommendations in the budget section please.

You could look at clamp ends which you fit to lengths of wood for a lost cost versatile solution.
I quite like pipe clamps using glavanised water pipe. Some need the pipe threading on the fixed end which needs plumbers tools to do, others have a sprung gripping mechanism at both ends.
Bessey clamps are the mutts nuts with prices to suit but rutlands do own brand Dakota knock offs which get reasonable reviews for diy/lght trade use.
Traditional record T bar clamps are very good but pricy - avoid second hand as they are often abused or have pins missing
I'd avoid any based on aluminium tube/box section.
For your bench and other open frame work, what could be cheaper than a tournique with rope?

Bob
 
Thanks Bob I went with the Axminster clamps in the end I bought two 54 in and two 42 in to start with.

I got the lights last week my brother returns from holiday next week and he is comming to help me with the sockets. Which along with the work benches are the final tasks. Oh except shelving and drawers decking and everything else. Some sort of extraction unit powered by the Lidl Vac

I have a lot of leatherwork and other things going on at the moment so have not had any spare time to finish things off.
 
9fingers":18c26rox said:
Too tight and there will be no room for glue.
Bob
Going slightly 'off piste', if the joint is a little tight you can, though I've never done it, use the slightly domed end of a Japanese Geno hammer to lightly squish the tenon to compress the fibres. It will then hopefully slide into said mortice and as soon as the glue hits it, the fibres will then expand again to give you a super tight join. In theory :eusa-pray: -Rob
 
Thanks Rob I think my issue with the M & T joints was me making them too tight and splitting the wood when I brought them together plus the usual mistake of putting mortices at the end of a piece of timber.

In future I am going to make the a little looser and either use wedges or expanding glue or both.
 
Finally I am making some progress.
My brother has wired all of the sockets connected both ends of the cable to the house and workshop under instruction I have fitted the lights and only dropped one :eusa-whistle:
I will take some pictures tomorrow.

Meanwhile I have finally found some time to make the replacement guides for my bandsaw.

2019-08-03_09-46-32 by my0771, on Flickr

2019-08-03_09-46-16 by my0771, on Flickr
 
Well done. They should last for ages. Are they pushed up a bit closer to the teeth than is shown on the first photo?
 
Andyp":z7ol4a2p said:
Well done. They should last for ages. Are they pushed up a bit closer to the teeth than is shown on the first photo?

Yep ideally they should be just behind the gullets of the teeth to support the blade as far forwards as possible.
 
Thanks guys I had backed them off to help getting the brass ones out. If gullet is the term for the bottom of the valley between the teeth then yes that is where I have positioned them.
These LED panel have screws holding the back panel in place so I bought some small metal plates 75mm x 12mm x 3mm which I planned to attach using the screws on the back.
When that failed I realised there was a groove all around the edge of the frame that the plates fit into so I put the plates in a screwed them to the ceiling.

2019-08-04_12-42-42 by my0771, on Flickr

I really do not like this so my next plan is to cut some wood and make a groove to take the edge and start over.
Sockets look great all 17 of them.

2019-08-04_01-08-35 by my0771, on Flickr

The breaker is not fitted at the other end so nothing works yet but we are getting there.
It is amazing that the giant black bee hive is super cool in the hot weather as long as you remember to close the doors.
 
Looking good Michael.

I know what you mean about the shop being cool. I think the insulation makes a massive difference because even on the hottest day we had a week or so back, it was unbearable outside but even with the velux in the roof of the shop, the temp was many degrees cooler than outside and easily comfortable to work in. Same in Winter, freezing outside but a good 4-6 degrees higher in the shop even without heating on.
 
Electrics

TICK

2019-08-14_12-05-19 by my0771, on Flickr

I am pleased to say the electrics are now finished.
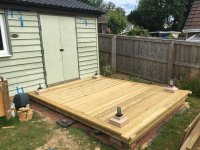
The decking out in front of the workshop round the rear of the house has been moved up the priority list the stone for part 2 of the new paths has also arrived all 1800 kg on 2 pallets.
As the edge of the decking forms the edge of the path they need to be done together.
It has been suggested that the join in the decks should be mitred where they meet I wanted a nice simple 90 degree corner. where one deck would go the full width and the other would butt up to it.
 
Looking really good, Michael. I can see the work flying out of there now!!


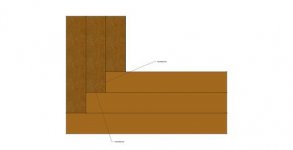
How about a lapped corner for the deck? I think that there will be less movement gap noticeable than with a mitre or a butt as the boards shrink.IMG_2873.JPG
 
Thanks Malcolm as usual my explanation was not up to the job, The deck extends along the back of the house.
Currently there is a decked area 3.2m out from the back of the house running for 3.6m I am going to add 5.3 m to go right across the width then add a 90 degree corner to go up to the workshop this leg will be 7m long and 3.1m wide.

Please excuse the poor drawing with the dodgy planks

2019-08-14_03-10-03 by my0771, on Flickr
 
Malc2098":3fwh2wi6 said:
I'd be inclined to do an alternate lap across that corner.

Malcolm I am not sure I understand what exactly that means.
I think the mitre would look good but working out the lengths of decking required has made my head hurt. :)
 
I think Malc means instead of cutting a diagonal mitre, to alternate which board is long and which is short to butt up to each other, to create the look of a staggered mitre without the need for any diagonal cuts.

See below:

lq684tj.jpg
 
Oh no that looks even more complex than the mitres.
I just don't seem to be able to get my head around this.
I would like the joints to be lined up nice and straight rather than staggered I think I may have to just build it as two separate decks with an ugly butt joint.
 
If it helps your calculations, for a 90 degree mitre, the length of each board changes by one width compared to its neighbour.

This applies to both boards meeting at a mitre. If a board has a mitre join at both ends, then the length "grows" by two widths compared to the previous one.

Might be easier if you think of the two boards meeting at a lap joint for the purposes of working out the lengths and then the mitre is simply fomed by cutting both at 45 degrees.

Bob
 
Back
Top