• Hi all and welcome to TheWoodHaven2 brought into the 21st Century, kicking and screaming! We all have Alasdair to thank for the vast bulk of the heavy lifting to get us here, no more so than me because he's taken away a huge burden of responsibility from my shoulders and brought us to this new shiny home, with all your previous content (hopefully) still intact! Please peruse and feed back. There is still plenty to do, like changing the colour scheme, adding the banner graphic, tweaking the odd setting here and there so I have added a new thread in the 'Technical Issues, Bugs and Feature Requests' forum for you to add any issues you find, any missing settings or just anything you'd like to see added/removed from the feature set that Xenforo offers. We will get to everything over the coming weeks so please be patient, but add anything at all to the thread I mention above and we promise to get to them over the next few days/weeks/months. In the meantime, please enjoy!

Toothing plane built

Sheffield Tony

Nordic Pine
Joined
Nov 25, 2020
Messages
756
Reaction score
190
Location
Bedfordshire
You might remember that in ->an earlier thread<- I mentioned a toothing plane iron I found in an oddments box at a Tools for Self Reliance stall.

Thanks to all who provided help on what the plane should look like, AndyT in particular. I finally got off my a**e this weekend and made a start. The article I'm following as a guide suggested making it in two halves to ease cutting out the mouth, bit where's the fun in that ? it is surprising what you can do with a brace and bit and a coping saw. This is where I'm at:
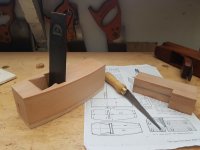
20210830_175540.jpg

My block of quartersawn beech turned out to be a bit scant on thickness, but I did have some offcuts of hornbeam from Wimpole estate, so came up with a plan to add a hornbeam sole to make up the thickness.

It needs some chamfers, a wedge and a bit of tidying. This is a hand tools project; so far, no electrons have been inconvenienced.
 
Looking good!

Challenging things to make, planes.
 
That's a thing of beauty, Tony. And a round of applause for the traditional construction.

Years ago, I picked up a copy of John Whelan's book on wooden planes, read it, and quietly put it on the top shelf of my woodworking library. One day... possibly :oops:
 
Thanks for the kind comments.

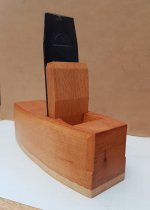
I have to confess, not only do I not have a toothing plane to use as a model (seems like a good enough reason to make one) I haven't even seen one ... so I'm working from pointers from tbis forum and some Googling. The range seemed to be 75-90 degrees and a 6-10 degree wedge angle - I've aimed for 86 degrees and an 8 degree wedge. Though having forgot that my iron tapers, it may be 10 degrees I need. But the mouth is still quite tight and the bed needs final finessing yet.
 
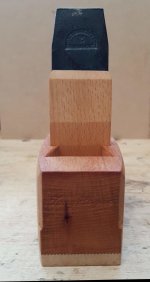
Pretty much done. Still soaking up linseed oil at the moment.

20210917_181101.jpg

Opportunity to play with my Chalco stamp.

20210917_181320.jpg

That little dark feature is a very small buried knot which wasn't apparent until I trimmed the ends to length, i.e., a bit too late. I don't suppose it will cause any problems, but it looks more conspicuous after the oil.
 
Whoah!

Very nice, but you seem to have whizzed past the stage when you fitted the sole, with those lovely German style corrugations. Any more pics of how you did that?
 
Aha. I deliberately didn't mention it, I wondered if anyone would pick up on that. As I mentioned, the sole was just a work around for not having a thicker block of beech, but I liked the look of those continental planes with the corrugated join, and wondered if if would look interesting around the curve of a coffin shaped plane.

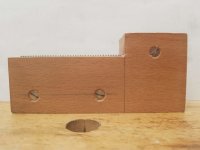
I'm guessing they are usually machine cut, so I had to think of another way. i thought up various elaborate ideas, but then settled for the simplest. There was a clue in the first picture. There are three tools I used - a pattern maker's plane (for inspiration only), a home made float, and the tool in question - a scratch stock I knocked up from some of the beech offcuts and a bit of hardpoint saw blade. The scratch stock cutter has teeth filed at 2mm pitch using a saw file and a printed paper template. The tips of the teeth are taken off by a light stoning so the teeth match more closely the rounded bottoms of the gullets made by the saw file - here's a closer look:

20210918_170259.jpg

At the stage I had my pieces of beech and hornbeam with two parallel faces and one perpendicular edge, but still a bit over long by about 50mm and slightly wide, I used the scratch stock to cut the corrugations on both pieces. Needs a bit of care to use the fence initially to establish the parallel groves, but once the scratch stock would just follow them, moving it a few teeth left, right and even reversing it occasionally evens out any eccentricity in my filing of the teeth. Once both parts are done, a quick check for fit, then it is just a case of brushing on hide glue and clamping up. I would have more clamps to hand if I did it again to get a finer glue line.

Does it work ? Well, what it doesn't do is produce pretty shavings. It produces either dust, or stringy / wooley stuff depending on direction, cross grain or parallel - I presume with the toothed blade and high pitch, this is normal (??) It seemed to flatten down a bit of rough sawn elm fairly effectively.
 
That does look a very ingenious way of getting that distinctive join - nice one!

In my very limited experience, the shavings really depend on which wood you are planing - but of course, it's the final surface that matters.
 
Back
Top