• Hi all and welcome to TheWoodHaven2 brought into the 21st Century, kicking and screaming! We all have Alasdair to thank for the vast bulk of the heavy lifting to get us here, no more so than me because he's taken away a huge burden of responsibility from my shoulders and brought us to this new shiny home, with all your previous content (hopefully) still intact! Please peruse and feed back. There is still plenty to do, like changing the colour scheme, adding the banner graphic, tweaking the odd setting here and there so I have added a new thread in the 'Technical Issues, Bugs and Feature Requests' forum for you to add any issues you find, any missing settings or just anything you'd like to see added/removed from the feature set that Xenforo offers. We will get to everything over the coming weeks so please be patient, but add anything at all to the thread I mention above and we promise to get to them over the next few days/weeks/months. In the meantime, please enjoy!

Wadkin PK restoration

wallace

Old Oak
Joined
Aug 17, 2014
Messages
1,349
Reaction score
504
Since I finished the bandsaw yesterday I thought I'd crack on and start this thing. I got a message a couple of years ago asking if I knew of any history to it. All I knew was that it was an early generation 1 machine. Oh and I wants it.

I offered to buy it but he was not ready to sell it. But he did say if and when he would contact me. Going forward I messaged him every few months to see if it was for sale and eventually he must of got sick of me asking so he offered it. The price was high, twice as much as I knew I could buy one for elsewhere. But like I said earlier 'I wants it'.


His place was not suitable for pallet collection so I drove to halifax and put it in my VW. I remember it well because after I'd loaded up and secured everything I had a little rest and had some food and coffee. It was then I saw a middle aged woman saunter up to my window and ask, 'do ye fancy any business luv' in a very yorkshire accent. I declined but did offer her a butty, she looked knackered.


Anyway I digress, I've been looking forward to this one for ages.



0aIkobG.png


Do you see the 115 stamped after the PK, that is what number it is but wadkin started at 100 so my machine is the 6th machine built.



qZm6Igp.png


It was built on 13th sept 1928


b0eqEQL.png


It was overhauled 4 years later and it looks like the speed was changed. Can you imagine a machine nowadays being tested for 6hrs.


The thing that floats my boat is that the PK was unveiled to the public at the 1928 trade exhibition, maybe this is my machine.




23BViVI.png


Tys1A7J.png


Yu5rt3i.png


8I978Bo.png


GQdyyaG.png


atBNgdF.png


m58sdLw.png


This is the first time I've done a generation 1 and their are lots of modifications on later machines



LXI7pVb.png


ZmOc4k8.png


The ruler is etched into the table, later a chesterman ruler was inset



p1xTol5.png


These bolts are for extensions to acomodate a longer slider



XuW4ejd.png


hiSD3LO.png


BJmyc2n.png


9dOaFrb.png


XT2pxTq.png


Its had alot of work done to it at some point, it has a modern dc break and a crown guard from a much later PP



x9NpMnJ.png


Back in the day this is what was in use



gKV71ki.png


I cant imagine why the PK took off



x3bkNYR.png
 
Nice.

I'm already enjoying the 'spot-the-difference' with later models.

Yours was only the second PK built as an AC powered machine - PKs 105 to 113 having been built as DC machines (230v or 460v) although several of those were modified to AC before leaving the factory. I guess even back then DC was loosing popularity.

Cheers, Vann.
 
This one is going to be a good one, do you have a matching crown guard or are you going to keep the one off the PP on it?

The P.J. is an interesting one, I've don't think I've seen a table saw with a tilting table in use, must be very awkward to use when tilted with the weight of the timber bearing into the blade thanks to gravity.
 
Vann I knew you would like this one, dont you have a tag picture of an earlier machine.

Trevannion, I have a crown guard off a AX but I think it has the mounting hole diagnally and not right angles, I also have a nice brass crown off a big rip saw bench but that is meant for a 30" blade so no use. Ideally I would like a wadkin & Co crown guard.


I actually have one of those PJ machines I got it from a really old foundry in blackburn. The sad bit is its had its double arbor mechanism removed. It has some crappy pillow block bearings with a spindle holding a metal cut off disc. It was being used to cut off sprues on castings.


Can you imagine doing a 45 degree rip on the thing
 
I made a mistake in my earlier post this machine was the 11th made and wadkins machine numbering starts at 105. Thanks to Vann the wadkin statistician.


Wadkin added flip top oilers on later models here for the raise and lower shaft.


CqtaZw5.png


I find you dont need much heat to free up stuck pins


Dm1agZP.png


NDr5qPW.png


This has definately been taken to bits in the past. The tapered pin has been wacked in too hard. I had to drill it out.


gOLXIes.png


plcCCdM.png


The grease nipple has been rubbing when tilted


pGMXk2o.png


AqwzfjZ.png


I found a broken stud which someone has attempted to drill out not so well. I wont be able to drill it out so might try the doubleboost method of welding a nut on it.


luJTBYh.png


Now this is a bit odd, this is where the gear for the tilt is attached,


3cSGMRP.png


Its almost as if someone messed up the pattern for the base casting, and forgot to add a hole and a raised area that would normally be machined flat for bolt holes.


8NLpZlG.png


8NLpZlG.png


And this part has been cobbled together, the bit where the shaft goes through is nicely bored with oil grooves inside, but there is thick steel welded on the sides for the bolt holes.


b9rdbfn.png
 
wallace":58vzfcyw said:
Vann I knew you would like this one, dont you have a tag picture of an earlier machine...
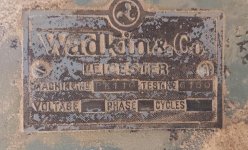
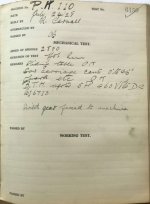
Hi wallace. I have a picture of the tag off PK 110 (in Scotland) and of the test page.


wPK 110 6150 Scot.jpgPK 110 test 6150.jpg
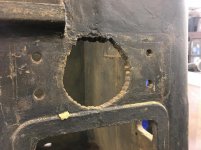
After seeing that mess they made with the tilt gear on PK 115...
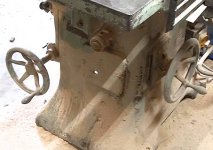
PK 115b.jpg... I tried to blow up the only photo I have of that part of PK 110.PK 110a.jpgAs far as I can make out, PK 110 has a cast boss there. That would suggest the 'bodge' on PK 115 is not a modification to early PKs - but a machining cock-up specific to PK 115 (if I'm seeing the detail correctly with these old eyes :eusa-shifty: )

Cheers, Vann.
 
That makes sense especially the way the section is drilled out of the main casting. Someone probably screwed up the machining and it had to be bodged.
 
Ive been removing the old paint mainly at the bottom where it was really chipped, theres no point removing every bit because the filler they used is really solid.


IVEUpjr.png


lsE0n7o.png


Followed by a load of aluminium filler


FYiIy8P.png


I've done quite a few PK's and never thought to put the casting on a bench to work on.


F6wVDCU.png


Wadkin would stamp parts with the machine number to keep them with the correct machine. Looks like someone picked up the wrong bit.


Zuw49eI.png


This part is off an earlier version


cMyLCrX.png


This poor thing has certainly been in the wars, the fence plate has been welded and re machined


F19o908.png


Also the blade flask has been snapped and welded back together


iFo9qyt.png


7A54PYG.png


A later version of the trunnion


zTeM8Jt.png


UNoJA2Z.png
 
There's some great restoration channels on Youtube, but none of them are as good as this......
 
Mike G":3773b5kz said:
There's some great restoration channels on Youtube, but none of them are as good as this......


I thought the same this week after reading this thread then saw someone restoring a Startrite pillar drill
 
wallace":1dh08f7n said:
...This poor thing has certainly been in the wars, the fence plate has been welded and re machined

F19o908.png

Also the blade flask has been snapped and welded back together

iFo9qyt.png
Hmmm. I suppose you could pick up a better condition fence plate off a later machine, but I guess most of the other battle scars you'll have to live with.

I can't tell, is the blade flask aluminium or cast iron/brass?

Cheers, Vann.
 
Mike G":26c5y26r said:
There's some great restoration channels on Youtube, but none of them are as good as this......

:oops:

I saw one of someone restoring an old adjustable wrench which had over a million views and people gushing about how fantastic it was. It was ok but nothing grand. :D

Vann whoever did the repair on the fence plate did a great job, it must of been done properly with cast iron rods because you cant see the repair on the other side. Normally people use nickel rods or braze which sticks out like a sore thumb.
The blade flask is aluminium, and quite crude compared to the gen 4 ones, I was going to shine it up but I'm not so sure. It is quite distorted by the welding
 
Running low on consumables, £100 for this lot. The sanding discs will last a while though, I've only used two so far.


uQ8Urzi.png


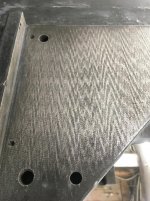
Anyone explain the pattern? Is it the cooling of the cast iron


56Tf3HV.png


Taking the handwheels off is just a matter of drilling the peened end and wacking with a punch


GvEUwRD.png


But wadkin thought it needed to be threaded and peened


K9SO1Jx.png


The main casting is nearly ready for some primer


geIe3eQ.png


I was contemplating using some polyester spray filler but I think it might be too cold


The blade flask cover is very basic, wadkin changed to cast iron with a much more complicated casting then they changed to aluminium


4laGJFK.png


8g6IJqF.png


z2cdhkP.png


The brass cages look like they are supposed to be attached to the sliding table judging by corresponding holes, they werent attached , just floating around.


OWpfGap.png


The balls are kept in place by the brass being chiseled slightly


9X9GCmm.png


At first I thought it was supposed to slot into the groove at the bottom, but its thicker and doesn't reach.


00ZR1nc.png
 
wallace":2dec1mac said:
Anyone explain the pattern? Is it the cooling of the cast iron

That is an unusual one, I'm no metallurgist, but I wonder if it's got something to do with the way the mould was prepared? I know casting sand is typically tamped quite hard, but perhaps they used some kind of vibrating machine afterward to maybe try and compact any bits that would've been difficult conventionally around the casting pattern which resulted in the weird pattern you're showing?

I'd be tempted to DM East Coast Casting on Insta and ask them if they know what it is.
 
I believe the pattern is from scraping the surface flat. I believe that various patterns can be achieved with scraping as seen below (no, I don't know how to do it). Extreme flatness can be achieved. My understanding is that this table is within .0004" over it's width of about 4'. This is a Devlieg jigmill.

Devlieg jigmill table.jpg

Kirk
 
kirkpoore1":sv2m9yam said:
I believe the pattern is from scraping the surface flat. I believe that various patterns can be achieved with scraping as seen below (no, I don't know how to do it). Extreme flatness can be achieved.

I might be wrong, but I thought this was unmachined raw cast iron. It's hard to say from the photo :eusa-think:
 
Trevanion":3hasmw7f said:
kirkpoore1":3hasmw7f said:
I believe the pattern is from scraping the surface flat. I believe that various patterns can be achieved with scraping as seen below (no, I don't know how to do it). Extreme flatness can be achieved.

I might be wrong, but I thought this was unmachined raw cast iron. It's hard to say from the photo :eusa-think:

I agree, the photo could go either way. If it's smooth, though, I would say it's scraped.

Kirk
 
I dont think its a scraping affect, I've seen that on wadkin stuff in the past. The surface is not smooth, I think it is a planed surface.
 
wallace":3odzbsxx said:
...Taking the handwheels off is just a matter of drilling the peened end and wacking with a punch

GvEUwRD.png

But wadkin thought it needed to be threaded and peened

K9SO1Jx.png
You may remember sending me a horn handle for my Wadkin LP recessor. The hole in the handwheel for that is also tapped (1/2" BSW).

wallace":3odzbsxx said:
...Anyone explain the pattern? Is it the cooling of the cast iron

56Tf3HV.png
You're looking at it all wrong. Rotate it.

W.jpgYou can see it's obviously 'W's for 'Wadkin' :eusa-whistle:

I'll get my coat...

Cheers, Vann.
 

Attachments

  • W.jpg
    W.jpg
    612.1 KB · Views: 3,948
wallace":11dkq06r said:
I dont think its a scraping affect, I've seen that on wadkin stuff in the past. The surface is not smooth, I think it is a planed surface.

So it does appear to be machined? It's certainly an unusual pattern if it was caused when machining, an over dull tool that's chattering whilst planing wouldn't do that kind of pattern I don't think, possibly something to do with the actual planing machine itself being a bit ropey in its travel and giving out weird results?

I suppose it'll be one of life's many mysteries, like who actually shot JFK.
 
More filler application


Er3rzjJ.png


I thought I'd give the spray filler a go. This stuff is literally liquid car filler with an activator. It goes on horribly and is a nightmare to clean the gun, apparently you need acetone which I never had.

There is nearly a litre on the these two parts, so you can imagine how thick it goes on.


k0ojmmh.png


RlUeCe0.png


The fence plate cleaned up nice, you wouldn't think this has been broken and welded


xDwZqqm.png


eBPu4th.png


One strange thing is this machine was one from the first batch made and yet has a slider from a PJ but the fence says PK. I have done PK's which had a PJ fence.


15ljMrB.png


I normally take the wheels off the shaft but the tapered pin was solid so I stuck the whole thing in the lathe. to clean up.


JmNEppB.png


Cast iron is really hard to get a full on shine. It needs buffing on a mop next.


PAlc7U9.png


Got some more supplies in. Someone mentioned those paint removal discs on my bandsaw thread so I thought I'd try them. I got some other ones that are like fine scotchbrite.

I also got some steel rod for new locating pins and a box of 5 wire wheels for the silly price of £21, I normally pay £10 for one wire wheel.


oeftY8Y.png
 
To get a good result with the writing its best to flood the area with primer, obviously you can get more paint on if its flat.


QAF7bfb.png


QNCMw1X.png


And then a big dollop of water drips from your mask


HTzfpOY.png


The day after, I did manage to rescue it, had to sand and fill it then sprayed again


yT3eUoM.png


Top coat


8GmLMlt.png


MMcZW5T.png


dSyXxBu.png


5yH7x2k.png


Whilst the filler was drying I started on the handles, In the lathe slow speed and used the grinder with a flapper disc then sandpaper from 120 to 800 followed by a buff with red silverline compound


lNAO3dQ.png


kTtomq6.png
 
More shiny stuff, I use a little disc sander with velcro stuck so I can change the sanding sheets easily


SAYAJ3d.png


Sanded to 500 grit then polished


5FAOrMI.png


The bolts were in a sorry state so I touched each face up on the sander


WrCX8HD.png


TyoE3HH.png


A bit frog tape action


Ffux3y3.png


038vB12.png


rWK6YK7.png


RJ23vri.png


eJkYcYU.png


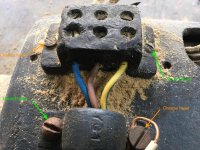
Oh look its single phase


S52iKRk.png


A bit heat shrink me thinks


KfWPDWd.png


Peculiar place to put the tag


ZipgU0Z.png


yBIemVp.png


Thats not good


drzkHxY.png


mtPvxUY.png


The bitumen insulation is in nice nick


wVlXech.png


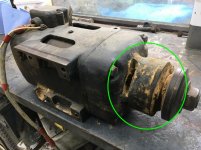
The bearing ran here, do you think it spun a bearing and the punch marks are to raise the surface. They are 4 sets around the shaft opposite each other.


oP1dGOg.png


The front bearing looks good


59KfGdL.png


But the back one could spin freely in its end bell, so will need changing


i6CVDGG.png


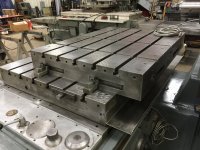
Got the main table hoisted up to start on it


ZPBTXyN.png


Very different design than what came after. These are what the sliding table frame sits on and can be altered to change the height. Later these were part of the casting.


3nUKVlT.png
 
That motor is different (as you'll know, having overhauled many PKs by now). I guess it's not a ZF. That whole front bearing arrangement is unusual.
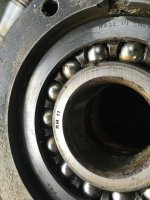
eJkYcYU.jpgThe the front bearing itself is an RM 11 whereas the ZF motor has an RM 9 bearing.
Front bearing.jpgI can't work out which number the rear bearing is, but I hope you can pick one up at a reasonable price.

And isn't this typical.
S52iKRk.jpgThe terminal block has one round head and one cheese head set screw :eusa-snooty: . Same for the other fitting. I'm sure you'll put that right.

Cheers, Vann.
 
Its a odd design Vann isn't it, it only has one end bell that comes off. I was thinking they must of done the windings within the metal ring then slipped it into the motor casting. Thats why the motor tag is where it is.
The smaller bearing is equivalent to RMS8, the online suppliers wanted £76 for a skf but I found a old stock japanese bearing for £8.

Yes Bob 3 phase, I was just taking the pith, :D Whoever wired it up bought a really nice break for it, in a sturdy metal enclosure. Seems strange to scrimp for a bit of wire. It has wired remote buttons so I will be able to use an original on/off
 
who's paint .....never really found a decent tough enamal.....
best I ever got was a tractor paint.....
once it was a month old it was almost bomb proof......

I have a few machines that need a paint job was thinking a 2K......??
 
I did a machine which had been rebuilt by a proper machine builders at some point, calderdale machinery I think. Anyway whatever they used was super tough, it would barely sand and you could bash it with a hammer with little damage.
I've used 2k in the past, it gives a lovely finish but can go tits up really easy. I spent 2 weeks prepping a machine for paint, all very maticulus only for it to go pear shaped. Its alot more expensive, a tin of enamel is £11 a litre, a litre of 2k is £50 then you need hardener and special thinners.

A bit more disassembly


ehjFYMS.png


sToSaUg.png

And just for Malcolm more shiny stuff :D


xlNFc7z.png


lSYYGKC.png


mnQZdKS.png


FO0usfO.png


The saw came with a nice brake


3UbQoU8.png


mRxZ0cr.png


I have a cunning plan, this saw would originally of had its starter in a cast iron box bolted to the back of the main casting.

You can just see it behind the extraction pipe


oTPF13i.png


BNNoaVo.png


This is one of those rocky horse poo items


w8D4RHr.png


3o5iSKF.png


This is one of my favorite pics in my collection. Wadkin made a display at one of the last wood machine exhibitions they attended. They had pictures enlarged and printed on foam board.


FYYM9Tv.png
 
I found some cool buttons in my stash


D5Y9wZC.png


100 years old and still good


lfq9kwT.png


I have a couple of crown guards but there not correct. The top one is off a big saw bench and too big, the next came with the saw but is off a PP saw so not in keeping with the age of mine.


p8hI5RZ.png


This one is the correct size but its off a small saw bench and attaches diagnally instead of right angles like the pk. I would really like a Wadkin & Co one.


q1KfPoS.png


This is an early wadkin one but its been chopped in half


JOUKmp3.png
 
If that push & turn button metal ? If it was given the Wallace metal polishing treatment it would look so cool.
 
A nit more shiny stuff


xSNhsRh.png


The little end bits are sometimes threaded on or like these, peened over. Just file off a bit and punch through.


DUlvOVx.png


I put them in a drill and use a power file


9J6su3K.png


lv0Zy0Z.png


lv0Zy0Z.png


Then hold some sand paper in your hand and spin it with a drill


JYI7feJ.png


You can do the same with the centre bit, just put some threaded rod and clamp in the chuck


PnnmKrZ.png


Ioh1Xcg.png


More puddling primer


4aO0Y9H.png
 
When driving around in the bush in Zambia many years ago I came across an overgrown railway yard full of old steam locomotives. They're almost certainly sitting there to this day. They were used in logging, and when all the teak ...Rhodesian teak... ran out, they were parked up as redundant.

One of those would keep you busy for a week or two, and wouldn't it look pretty special when you were done. :)
 
Back
Top