• Hi all and welcome to TheWoodHaven2 brought into the 21st Century, kicking and screaming! We all have Alasdair to thank for the vast bulk of the heavy lifting to get us here, no more so than me because he's taken away a huge burden of responsibility from my shoulders and brought us to this new shiny home, with all your previous content (hopefully) still intact! Please peruse and feed back. There is still plenty to do, like changing the colour scheme, adding the banner graphic, tweaking the odd setting here and there so I have added a new thread in the 'Technical Issues, Bugs and Feature Requests' forum for you to add any issues you find, any missing settings or just anything you'd like to see added/removed from the feature set that Xenforo offers. We will get to everything over the coming weeks so please be patient, but add anything at all to the thread I mention above and we promise to get to them over the next few days/weeks/months. In the meantime, please enjoy!

Winder staircase (renamed post)

HOJ

Sapling
Joined
Nov 26, 2020
Messages
348
Reaction score
187
Location
South Norfolk
Name
Paul
Wood for this is due in tomorrow, Oak stringers and 100mm Oak box newels that I make using a mitre lock corner joint, MDF treads and Plywood risers as it will have carpet over, setting out rod is already done, so will be prepping 41mm KD sawn Oak boards for edge jointing to make up the width of stringers, this drawing was just to work out yield for material order, I will finesse and flair the look once the boards are jointed up and I lay them out.
stair2.jpg
Only issue is this doesn't comply with building regs @ 45.9 degree pitch, but it is replacing an existing one. (glass balustrade not shown)
 
Could you stick out the bottom step (onto the face of the newel) with a bullnose? That might be enough to stretch it out and get it into compliance, possibly.
 
I have tried everything to make this work, legally, but I have no where to go in all directions, the front door is right next to and almost under the top winder, with another door next to the bottom tread, this is so tight its criminal, the old stairs treads were chopped into the wall with no wall stringers. Its a lovely little (tiny) thatched cottage.
 
Jobs like that are super awkward. Have you tried laying out one or even two four-step winders rather than three-step ones?
 
Trevanion":1higp2xo said:
two four-step winders rather than three-step ones?

I have made a 9 tread winder, more on the lines of a semi spiral stairs but most are 3 step winders, this was a recent one i made, around the corner, ended up closed in with a WC underneath:
3 tread winder.jpg

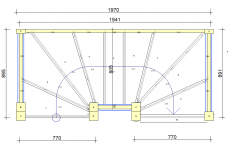
This is the floor plan for the one I'm starting on, really tight on space, with doors in the way, no where else for it to go:

stair plan.jpg
 
Yes, but if you turn your three-kite winders into four kite winders it will lower the pitch angle as you will be adding two steps to the whole run.
 
Hmmm.........I'm not so sure. Wouldn't you be still gaining the same height in the same length, so the angle would remain the same? Yes, each riser would be reduced, but that isn't the issue here. Also, 4 step winders need a doubled newel to keep to the 50mm minimum going rule, unless you just have a massive single newel. Don't you? Am I missing a trick here?
 
Having had the pleasure of removing a set of MDF stair treads I would be using ply or solid....
Okay the risers had given way and years of them flexing had turned em into multiple separated layers but they had to be replaced but worth thinking about.
Cheers, Andy
 
Just to add some numbers, the FFL to FFL is only 2265mm, in this solution rise is 205.91mm with the going at 200mm, Ive tried various iterations to get it to work better, and tried to rotate it, but then headroom kicked in because the roof is a 4 corner hip, with 1400mm tall walls up to wall plate of the 1st floor, its still very tight.
stair plan roof.jpg
Trevanion":wfip2gur said:
Yes, but if you turn your three-kite winders into four kite winders

I forgot, we did look at a 4 winder option but we don't have the space on the bottom right wall side next to the door (arrow should be pointing the other way) the pitch on this one is 48.56 degrees.
stair 3.png

More than open to other ideas, you do go blind after looking at all the options.
 
Mike G":22bo6l5n said:
Hmmm.........I'm not so sure. Wouldn't you be still gaining the same height in the same length, so the angle would remain the same? Yes, each riser would be reduced, but that isn't the issue here. Also, 4 step winders need a doubled newel to keep to the 50mm minimum going rule, unless you just have a massive single newel. Don't you? Am I missing a trick here?

Yes, you’re right Mike, I didn’t take into account the fact that a bullnose step couldn’t be fitted. There are ways to get a four-kite to fit onto a standard 90mm newel but it is awkward as you need to project out of the front and out of the back of the newel. The only way I can see this really getting anywhere near compliant is to reduce the width of the entry and exit as much as possible to fit an extra tread on the straight flight so that you could have 12 steps up which would bring the pitch angle down.
 
I realise that winders are sometimes unavoidable, as here. But I truly detest them and consider them to be an accident waiting to happen. We have similar in our house and it is such a terrible design. I have slipped on them at least three times because as the triangular step narrows, it is so easy to slip if you have big feet and are clumsy, like me.
 
Thought I would update my slow progress, this is a back burner job and not particularly interesting, quite a few pictures though.

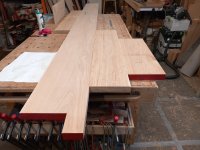
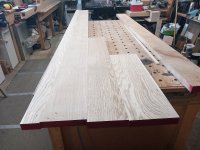
As always we need some timber Oak boards 41 & 27mm thick:
1 stock.jpg

First job was to make the box newels so timber planed to 22mm thick then machined up on ths SM to give me the lock mitre joint:
2 newel boards machined.jpg

Dry fitted together,the long one is 3.4m
3 newel posts.jpg

Then onto the wall stringer, edge jointed boards to make up the width, I usually aim for a finished size of 270mm wide X 34mm thick
4 stringer boards.jpg

Then to make the easements, these are again edge jointed to give the extra width for the the winder treads
5 stringer easement 2.jpg

We need them on the top and the bottom of the wall stringer
6 stringer easements.jpg

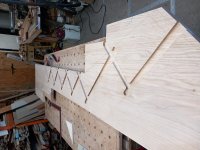
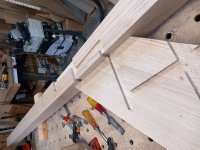
I then rout out the for the treads and risers on the wall stringer before gluing on the easements
7 routing.jpg

Then glue on the easements
8 gluing easements.jpg

Rout out the T's & R's on the easements
9 routed easements.jpg

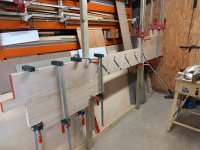
Stand it up in the fabrication department
10 stood up.jpg

Cut and rout the bottom return, again that is made up from edge jointed boards.
11 corner fitted.jpg

To be continued.
 
Agree. Top notch work.

In my own house I would use oak treads as well, even if carpet was intended. Minds can change later.
 
I agree about Oak treads, but client wants carpet so the dog can get up and down as well!
 
Letting the dog upstairs!! My goodness, that won't do at all.
 
Cabinetman":ah26pj4t said:
Good God, it’ll be in the bed next!

Too late for that, Its not a small dog either!

Mike G":ah26pj4t said:
Letting the dog upstairs!! My goodness, that won't do at all.

Agreed, mine have never been up the stairs.
 
Slow progress, fitting it in when I can, moving on to the tall newel and outboard stringer, M&T'd the stringer into the newel about tread 7 & 8, then coordinating the treads and riser housings as they work around the newel and upwards to tread 11, the finished 1st floor level:

I hope to start on the MDF :twisted: treads in the coming week as I have got some workshop time.

stringer newel.jpg
 
For those that are remotely interested, nothing particularly exiting, but I squeezed a day or so in the shop this week, so onto treads and risers:

treads 1.jpg

treads 2.jpg

treads 3.jpg

Now got to take it all apart, shape the stringers and get it ready for the install, may be a while yet, as I'm off working away.
 
I can only guess that the success of something like that is down to precise measurements, accurate drawings, careful marking out and skilful cutting.
You make it look so straightforward.
 
Andyp":3hmtwaek said:
the success of something like that is down to precise measurements, accurate drawings, careful marking out and skilful cutting

Thank you for the comments.

In some respects stair's are quit simple! once you have the overall height (rise) and the length (run) its down to simple trig, given that the pitch angle shouldn't be more than 42 degrees (not in this case though).

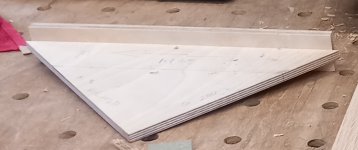
With winder stairs I set out, on a sheet of hardboard, a full size plan (rod) which I can lift all the measurements off and with the aid of a simple triangle of ply (pitch board) lay out the lines on the stringers.

pitch board.jpg

Getting the treads and risers cut in around the newels is a bit tricky but again the measurements are all on the rod, its just a case of being competent in measuring off.
 
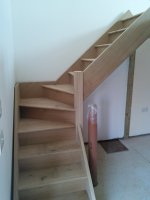
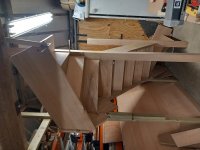
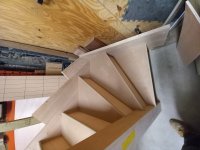
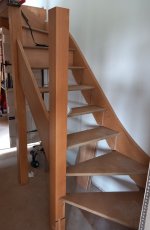
Finally got to fit the staircase over this weekend, waited on the "builder" to prep the walls and get large items into the room above before we closed it up:

winder1.jpg

winder2.jpg

Light was terrible so pictures don't do it justice, it doesn't look much but double winders are challenging to put together in a small space, ironically we discovered its 6 years ago that I finished the roof on the new build part on this job, talk about slow!!! and still no where near finished.

roof.png
 
HOJ":3s5qmm9a said:
........double winders are challenging to put together in a small space.....

Two of the three staircases I've designed in my current big project have a note in bold along the lines of "the contractor should think very carefully about the order of construction and installation because access for fitting the stairs will be extremely challenging". One of them is a double winder stair like yours. (The other has winders at the bottom, doesn't sit on the main newel, and has to fit in behind a floor to ceiling post between the first and second floors!).
 
Mike G":3q74vtps said:
Two of the three staircases I've designed in my current big project have a note in bold along the lines of "the contractor should think very carefully about the order of construction and installation because access for fitting the stairs will be extremely challenging"

In a place where I worked previously that happened once or twice in the short spell I was there, make a staircase and you can't actually get it into the building because nobody's thought about how it was supposed to get in and around a tight corner in one piece. Both times the staircases had to be disassembled and reassembled on-site, which was tricky when the wedges were glued in.

Another amusing time was when a staircase was assembled and it ended up being 50mm or so wider than it was supposed to be because the treads and risers had been cut to the finished width of the staircase, not allowing for the strings. Everyone argued whose fault it was (fortunately I had nothing to do with it) and spent a good amount of time wondering how they were going to sort it out with suggestions of disassembling the whole thing like on the previous two staircases on site, or trying to run a handheld circular saw down one side of the string and handsawing the bits you couldn't get with the circular saw... My suggestion was to carefully rip the whole stair down on the big bandsaw referencing off the fence against the string with it set so that the cut was to the finished width. Four people manhandled the staircase through the saw, which would've made for a good YouTube video if someone was recording it, the cut worked and it was easy work to hack out the glued in wedges of the now cut-off string and then reassemble the one side.
 
The mention of complex stair fitting reminds me of a triple winder we had to fit for one of the UK's national house builders.
It was delivered in 3 parts, and when built there would be no access to the back of the staircase, the brickies had to knock a hole in the wall so I could crawl out when the staircase was built around me.


Sent from my Redmi Note 9S using Tapatalk
 
Not sure I would have agreed to being walled up!!
Well I’m glad to hear there’s clever people out there who have made a bigger hash of it than me.
When fitting the new stairs in my workshop we had to lift it up to the first floor level and slide it downwards into place, my usual fault of making things too tight a fit raised its head, stuck! I risked a big hit and it slid home perfectly, huge, huge relief!
 
Trevanion":2san1bwb said:
make a staircase and you can't actually get it into the building because nobody's thought about how it was supposed to get in and around a tight corner in one piece

One of the most difficult stair jobs I had was a loft conversion staircase, part of it was a straight flight of only 8 treads, could I get it in through the house, too long by an inch!, ended up calling a mate of mine who's built like a BSH, triple extension ladder shot up outside, past the gutter line, threw a rope out the Velux I'd just fitted, tied it on, I pulled, he pushed it up the ladder, dragged it through the Velux and slid it down in to position.

flight.jpg
 
Back
Top