Hello everyone!
I've lurked on this forum for some years and in summary have followed the "Mike's Workshop Build (Extension & slates)" design/build principles as laid out there. Mike - Just after some advice/clarification on a water ingress problem if I could kindly pick your brains please?
Bit of a long one....sorry!
A bit of background...3 years ago I discovered my shed (sat directly on concrete base. There since we moved in I will add!) was severely rotting. I knew I needed something bigger to store all my tools etc, balking at the cost of the prefab jobs and being somewhat practically inclined I stumbled on Mike G's thread mentioned above and decided I was going to build my own workshop, so thanks for the inspiration Mike!
So 3 years after having removed the rotting mess, the greenhouse converted into a "greenshed" storing lawnmower etc, bikes stacked up in the side of my office I am pleased to say that I am on the home straight with a 7m x 3m apex workshop.
I have followed the design per the aforementioned thread barring a few differences one being the roof construction which I made up of plywood underside, 100mm insulation between 150mm rafters, membrane, battens, OSB, felt. There are small gaps in the battens top and centre at each gable end with insect mesh over each and then its open all along the bottom edges by the fascia/soffit but covered with insect mesh again.
The other difference is the base of the wooden frames are sat on single skin brick, 2 courses on the edge of the slab which itself has a damp proof membrane under to stop rising damp. This is as opposed to the 2 skin with block and 3 courses of brick as per the thread I avidly read and digested. Understand 2 courses, single skin is fine however.
Internally the walls are boarded with 12mm plywood down to the floor.
I'm hoping that you can advise/steer me in the right direction on the following issue I have encountered. Hopefully I've not been a numpty and suffered from ambition beyond my competence!
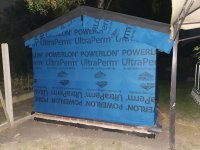
I should state at this point I am yet to batten out and clad the external walls. The weather has not been great recently and I have struggled for time in the preceding months, with a health issue also preventing progress. The building is wrapped in Powerlon ultraperm membrane with the joints all taped up and is basically weatherproof for the moment.
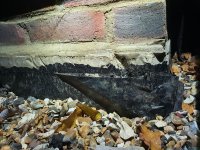
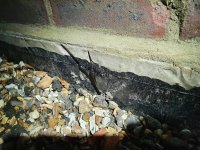
It rained very heavily here for some weeks. I noticed that there was green mould along the bottom edges of the plywood and also noticed that in one of the corners there was a damp patch on the concrete floor. I removed the plywood and found there to be a lot of green mould all along the bottom edge of the plywood up to the height of the top of the brick course. The wooden frame (sat on dpc) and insulation were all bone dry so its not water coming down from the roof I don't believe. I think this is rain pelting the side of the workshop, running down the membrane, the bricks getting wet and I also noted on inspection that the water seemed to be making its way down between the concrete base and damp proof membrane.
The mould was in fact all the way around the workshop on every wall at the level of the bricks. I have removed all the internal plywood wall (just love undoing work already completed!), treated the mould with some spray I bought and I have now liberally coated both sides and edges with a preservative that will hopefully suppress the mould re-growing. I intend to also apply a matt varnish to the bottom sides facing the bricks, edges and the entire side facing internally. I have not re-attached the plywood yet. This alonq with a long delay on the upvc windows (coloured frames delays due to Covid) with delivery date now confirmed for middle of December (ordered August), I feel like I'm in limbo a bit at the moment and really want to get it completed.
Anyway, none of the above is addressing the cause of the problem. What I am looking for is advise on whether I need to;
a) just pull my finger out and get on with cladding the exterior as quickly as I can and that will largely resolve the issue. My only reservation in assuming this will sort it is something that happened a couple of weeks ago mentioned further down.
b) look to apply some weatherproofing sealant to the bricks (Ibstock West Hoathly Medium Multi)
c) Trim the internal plywood so that it doesn't cover the bricks inside (I'm fine with doing this, I have no hang-ups over aesthetics and see no practical issues) as some level of damp could always be an issue with a single skin setup maybe? This doesn't solve the problem of damp bricks/concrete around the edges of the workshop though.
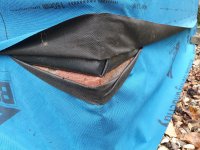
d) do something to seal the damp proof membrane to the concrete. I will admit that I have rightly or wrongly already applied a bitumen rubbery liquid membrane in an attempt to do this prior to the heavy rains as I need to build up the ground on two of the sides and the membrane was such that it would make a great rain collector. That was fine but it hasn't bonded the DPM to the concrete very well in some places thus probably rendering it completely ineffective! There is a 50mm portion of the concrete base above ground level, DPM stops about 50mm short of this so is at ground level apart from on two sides as mentioned. I have been careful to ensure that I haven't got the liquid DPM on the 50mm odd of exposed bit of concrete. In terms of the seal between the DPM and concrete its good about 80% the way round I'd say, with some gaps that I could address. Corners with folds are the main challenge.
e) Combination of the above?
Someone did suggest cladding all the way down over the bricks externally but I don't want to do that as it defeats the purpose of the brick course and will inevitably mean the bottom edge of the cladding rotting away relatively quickly.
The other point to note is during a particularly heavy downpour two weekends ago, with rain pelting one corner in particular, water was soaking out of the brick internally onto the concrete inside, literally forming a puddle as I stood there watching it with a depressed look on my face!
I am open to all suggestions at this point and don't believe in any way its an issue in the design I have followed but more than likely an issue in the execution of said design as applied to my build or also a consequence of not having finished the outside just yet.
I wanted to get advise now before continuing further so that I don't end up having to undo or redo anything. Happy to share pictures if needed if it will help, I've taken quite a lot throughout.
Thanks
Toby
I've lurked on this forum for some years and in summary have followed the "Mike's Workshop Build (Extension & slates)" design/build principles as laid out there. Mike - Just after some advice/clarification on a water ingress problem if I could kindly pick your brains please?
Bit of a long one....sorry!
A bit of background...3 years ago I discovered my shed (sat directly on concrete base. There since we moved in I will add!) was severely rotting. I knew I needed something bigger to store all my tools etc, balking at the cost of the prefab jobs and being somewhat practically inclined I stumbled on Mike G's thread mentioned above and decided I was going to build my own workshop, so thanks for the inspiration Mike!
So 3 years after having removed the rotting mess, the greenhouse converted into a "greenshed" storing lawnmower etc, bikes stacked up in the side of my office I am pleased to say that I am on the home straight with a 7m x 3m apex workshop.
I have followed the design per the aforementioned thread barring a few differences one being the roof construction which I made up of plywood underside, 100mm insulation between 150mm rafters, membrane, battens, OSB, felt. There are small gaps in the battens top and centre at each gable end with insect mesh over each and then its open all along the bottom edges by the fascia/soffit but covered with insect mesh again.
The other difference is the base of the wooden frames are sat on single skin brick, 2 courses on the edge of the slab which itself has a damp proof membrane under to stop rising damp. This is as opposed to the 2 skin with block and 3 courses of brick as per the thread I avidly read and digested. Understand 2 courses, single skin is fine however.
Internally the walls are boarded with 12mm plywood down to the floor.
I'm hoping that you can advise/steer me in the right direction on the following issue I have encountered. Hopefully I've not been a numpty and suffered from ambition beyond my competence!
I should state at this point I am yet to batten out and clad the external walls. The weather has not been great recently and I have struggled for time in the preceding months, with a health issue also preventing progress. The building is wrapped in Powerlon ultraperm membrane with the joints all taped up and is basically weatherproof for the moment.
It rained very heavily here for some weeks. I noticed that there was green mould along the bottom edges of the plywood and also noticed that in one of the corners there was a damp patch on the concrete floor. I removed the plywood and found there to be a lot of green mould all along the bottom edge of the plywood up to the height of the top of the brick course. The wooden frame (sat on dpc) and insulation were all bone dry so its not water coming down from the roof I don't believe. I think this is rain pelting the side of the workshop, running down the membrane, the bricks getting wet and I also noted on inspection that the water seemed to be making its way down between the concrete base and damp proof membrane.
The mould was in fact all the way around the workshop on every wall at the level of the bricks. I have removed all the internal plywood wall (just love undoing work already completed!), treated the mould with some spray I bought and I have now liberally coated both sides and edges with a preservative that will hopefully suppress the mould re-growing. I intend to also apply a matt varnish to the bottom sides facing the bricks, edges and the entire side facing internally. I have not re-attached the plywood yet. This alonq with a long delay on the upvc windows (coloured frames delays due to Covid) with delivery date now confirmed for middle of December (ordered August), I feel like I'm in limbo a bit at the moment and really want to get it completed.
Anyway, none of the above is addressing the cause of the problem. What I am looking for is advise on whether I need to;
a) just pull my finger out and get on with cladding the exterior as quickly as I can and that will largely resolve the issue. My only reservation in assuming this will sort it is something that happened a couple of weeks ago mentioned further down.
b) look to apply some weatherproofing sealant to the bricks (Ibstock West Hoathly Medium Multi)
c) Trim the internal plywood so that it doesn't cover the bricks inside (I'm fine with doing this, I have no hang-ups over aesthetics and see no practical issues) as some level of damp could always be an issue with a single skin setup maybe? This doesn't solve the problem of damp bricks/concrete around the edges of the workshop though.
d) do something to seal the damp proof membrane to the concrete. I will admit that I have rightly or wrongly already applied a bitumen rubbery liquid membrane in an attempt to do this prior to the heavy rains as I need to build up the ground on two of the sides and the membrane was such that it would make a great rain collector. That was fine but it hasn't bonded the DPM to the concrete very well in some places thus probably rendering it completely ineffective! There is a 50mm portion of the concrete base above ground level, DPM stops about 50mm short of this so is at ground level apart from on two sides as mentioned. I have been careful to ensure that I haven't got the liquid DPM on the 50mm odd of exposed bit of concrete. In terms of the seal between the DPM and concrete its good about 80% the way round I'd say, with some gaps that I could address. Corners with folds are the main challenge.
e) Combination of the above?
Someone did suggest cladding all the way down over the bricks externally but I don't want to do that as it defeats the purpose of the brick course and will inevitably mean the bottom edge of the cladding rotting away relatively quickly.
The other point to note is during a particularly heavy downpour two weekends ago, with rain pelting one corner in particular, water was soaking out of the brick internally onto the concrete inside, literally forming a puddle as I stood there watching it with a depressed look on my face!
I am open to all suggestions at this point and don't believe in any way its an issue in the design I have followed but more than likely an issue in the execution of said design as applied to my build or also a consequence of not having finished the outside just yet.
I wanted to get advise now before continuing further so that I don't end up having to undo or redo anything. Happy to share pictures if needed if it will help, I've taken quite a lot throughout.
Thanks
Toby