
-
Hi all and welcome to TheWoodHaven2 brought into the 21st Century, kicking and screaming! We all have Alasdair to thank for the vast bulk of the heavy lifting to get us here, no more so than me because he's taken away a huge burden of responsibility from my shoulders and brought us to this new shiny home, with all your previous content (hopefully) still intact! Please peruse and feed back. There is still plenty to do, like changing the colour scheme, adding the banner graphic, tweaking the odd setting here and there so I have added a new thread in the 'Technical Issues, Bugs and Feature Requests' forum for you to add any issues you find, any missing settings or just anything you'd like to see added/removed from the feature set that Xenforo offers. We will get to everything over the coming weeks so please be patient, but add anything at all to the thread I mention above and we promise to get to them over the next few days/weeks/months. In the meantime, please enjoy!
You are using an out of date browser. It may not display this or other websites correctly.
You should upgrade or use an alternative browser.
You should upgrade or use an alternative browser.
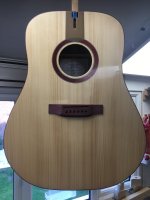
Dreadnought SS Guitar (Demo Time)
- Thread starter Malc2098
- Start date
NickM
Old Oak
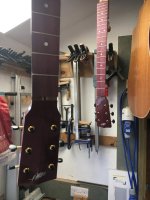
They're looking great.

Dr.Al
Old Oak
Top job
duke
Old Oak
Your turners look sharp Malc.

Malc2098
Sequoia
Before I lacquered them, the body and neck slid together nicely. That was a while ago, and even with the dehumidifier going in the workshop, it's been about 10% higher in the weather we've got right now. So a bit of fettling was necessary. But they got together in the end.
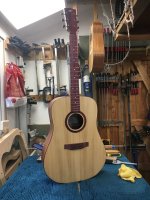
Not bad. I can see some faults that I hope you can't see. But I'll learn from them.
I do love the the way the colours have worked. That bloomin' Purpleheart is a so and so to work. But I think it was worth it.
Next, on to shaping and grooving the nut for the strings.
Not bad. I can see some faults that I hope you can't see. But I'll learn from them.
I do love the the way the colours have worked. That bloomin' Purpleheart is a so and so to work. But I think it was worth it.
Next, on to shaping and grooving the nut for the strings.

Are you kidding us?Not bad. I can see some faults that I hope you can't see.
I'd be surprised if I, we, could see any faults even if we had the guitar in our hands. Besides it is hand crafted in wood and if the proof of the pudding is in the eating I bet it sounds good too.
Malc2098
Sequoia
It surprised me how much goes in to this little thing. On cheap instruments, they're moulded plastic. These are bone, like the saddle. Because of bone's density it transfers the energy of the strings better to the soundbaord.
Having first set its face side, face edge and length with a sanding board to fit it's slot on the neck, I mark the curvature of the neck. For this I use the trick, which I think I've mentioned before of half a pencil along the the frets, and sliding across them to mark the nut.
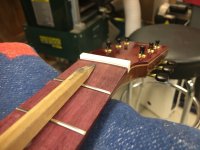
(Half a pencil lengthways, half sanded off on a belt sander of planed off.)
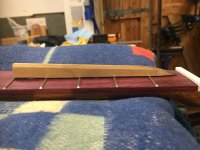
That line represents the height of the frets, so the bottoms of the slots for the strings must not go below or even touch that line, or the string will buzz, vibrating against a fret.
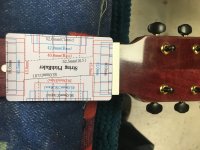
I have a little card with string spacings on for different nut widths. Mine is 42mm, in blue.
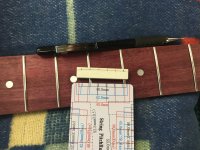
I pencil where the string slots should be.
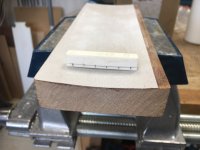
Although it's not absolutely necessary, it would ne nice if the top of the nut were the radius as the fretboard.
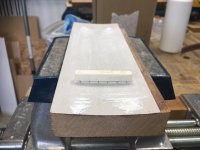
So I sand the radius using a fretboard sanding block with the same radius.
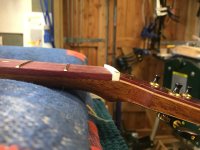
I also shaped the top of the nut back the same angle as the headstock, giving the strings a straight run to their posts.
Looks OK, but those shoulders are square and sharp.
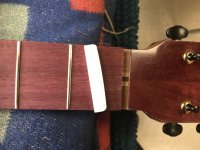
So I rounded them over.
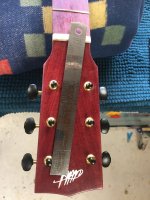
I then used a ruler to mark the lateral angle the strings will go across the nut in a straight line to their posts.
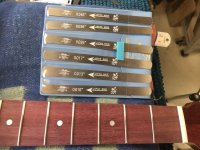
I invested in some special files to create the slots. Although they are each a specific size, I can make each slot a little wider if need be.
It looks relatively easy, but experience has taught me to have a stock of bone blanks.
Having first set its face side, face edge and length with a sanding board to fit it's slot on the neck, I mark the curvature of the neck. For this I use the trick, which I think I've mentioned before of half a pencil along the the frets, and sliding across them to mark the nut.
(Half a pencil lengthways, half sanded off on a belt sander of planed off.)
That line represents the height of the frets, so the bottoms of the slots for the strings must not go below or even touch that line, or the string will buzz, vibrating against a fret.
I have a little card with string spacings on for different nut widths. Mine is 42mm, in blue.
I pencil where the string slots should be.
Although it's not absolutely necessary, it would ne nice if the top of the nut were the radius as the fretboard.
So I sand the radius using a fretboard sanding block with the same radius.
I also shaped the top of the nut back the same angle as the headstock, giving the strings a straight run to their posts.
Looks OK, but those shoulders are square and sharp.
So I rounded them over.
I then used a ruler to mark the lateral angle the strings will go across the nut in a straight line to their posts.
I invested in some special files to create the slots. Although they are each a specific size, I can make each slot a little wider if need be.
It looks relatively easy, but experience has taught me to have a stock of bone blanks.
duke
Old Oak
What make of strings do you prefer?
NickM
Old Oak
There's a lot to think about there!
Malc2098
Sequoia
I'm not fussed manufacture wise. Medium to medium light is what I prefer to play.What make of strings do you prefer?

AJB Temple
Sequoia
- Joined
- Apr 15, 2019
- Messages
- 7,723
- Reaction score
- 1,202
Were the nut slot files sold for electric guitars Malc? Looks pretty light gauge. Near the end now and soon we will hear it hopefully.
This girl does, imo, an excellent job of the stairway solo in first position, which is very unusual on an acoustic. No bends and capo on 1.
This girl does, imo, an excellent job of the stairway solo in first position, which is very unusual on an acoustic. No bends and capo on 1.
Malc2098
Sequoia
While you've been away, I've been fitting on an old stock set of strings just to set the action, i.e. the height and angle of the saddle and the depth of the strings in the nut. My guidelines are dealing in thou between strings and frets at 1st and 12th fret. So I'm using feeler gauges, planing the bottom of the saddle and fettling the slots in the nut. I'm happy with it so far, and just waiting for my guitar playing mate to get home from Spain to try it out. I also found some ebony and MoP string pins. Sets it off nicely.
I got out some stock pick guards and couldn't find one with the right rosette radius. So I had to make up a jig with a scalpel blade and a radius pin to cut 8mm of the radius of this stock guard. Do you know how to find the radius of a random arc, like the one one the guard before I cut it? I do, now. So I added 8mm to that radius and set the jig up and cut the extra off. I hope you like the proportions of rosetted/soundboard/pickguard.
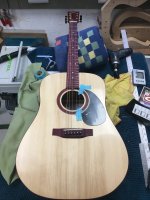
I think it's just about right.
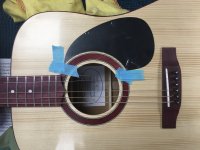
And don't tell me there's a string missing. I know. I said they were old stock, years old, and damp had got in, and it pinged on me. Modern phosphor bronze strings are on their way.
I got out some stock pick guards and couldn't find one with the right rosette radius. So I had to make up a jig with a scalpel blade and a radius pin to cut 8mm of the radius of this stock guard. Do you know how to find the radius of a random arc, like the one one the guard before I cut it? I do, now.
So I added 8mm to that radius and set the jig up and cut the extra off. I hope you like the proportions of rosetted/soundboard/pickguard.I think it's just about right.
And don't tell me there's a string missing. I know. I said they were old stock, years old, and damp had got in, and it pinged on me. Modern phosphor bronze strings are on their way.
duke
Old Oak
I like seeing the sliver of the sound board between the guard and rosette!
Malc2098
Sequoia
Thanks, Duke. So do I.I like seeing the sliver of the sound board between the guard and rosette!

thetyreman
Nordic Pine
Malcolm, do you have any tips on using nitrocellulose?
Malc2098
Sequoia
Well, Ben, I cannot call myself an expert, so I follow guidelines that came with the 12 string I bought from America. I use its 8 day spraying schedule. I've copied and pasted it out of the booklet and will attach it here. My supplier recommends his high gloss lacquer is thinned 50/50 with his thinners. I get mine from Nuagane in Bedford. They also do aerosols.Malcolm, do you have any tips on using nitrocellulose?
My biggest lack of knowledge is setting up the spray gun. I have invested in a LVLP which delivers far less overspray, but I'm still not convinced I've got it right. My coats seem very thin.
Apart from the cure rest days in the 8 day schedule, I let it cure for three weeks or more before cutting back. I cut back with Micro-Mesh all the way to 12,000.
Hope that helps.
Attachments
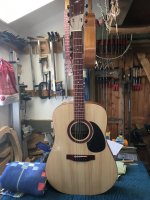
All looks very good to my uneducated eyes. Just curious, what is the pick guard made from? Looks like plastic to me. Can you not cut your own on the CNC ?
Malc2098
Sequoia
Thanks, Andy.All looks very good to my uneducated eyes. Just curious, what is the pick guard made from? Looks like plastic to me. Can you not cut your own on the CNC ?
Yes, I thought about making one from Purpleheart veneer. Maybe next time. Yes they're self adhesive plastic. I will have to find an adhesive to stick to the nitro lacquer.
duke
Old Oak
Very nice Malc, is this a keeper or are selling it on?
Malc2098
Sequoia
Thanks, Duke. It's available for sale.Very nice Malc, is this a keeper or are selling it on?
Malc2098
Sequoia
Well, it's all together. The neck is bolted to the body. The fretboard overhang is glued to the soundboard so there will be no vibration between them. I have strung it with Martin bronze 11 to 52 strings.
The following video is just over 3 minutes long in real time with sound. Those who have instruments will know what I am doing, but for those who don't, let me explain.
I use an electronic tuner to tune the strings; the notes are, from low to high, E A D G B E. Watch the screen. I am looking for the needle to be vertical and the two LEDs to be green either side of the needle. You might need a big screen to see them.
I pluck each string three times. The first pluck is the open string. The second is held down at the twelfth fret, which is the same note an octave higher, so the the tuner reading should be the same, because the half of the string closer to the bridge is vibrating. The last pluck is the 12th fret harmonic. I just touch the string above the the twelfth fret and then pluck. This makes the half of the string closer to the headstock vibrate.
If all three sounds for each string show the same on the tuner screen, then the instrument is in perfect tune to concert pitch and in perfect intonation.
Maybe you can't see, but, all harmonic plucks were in tune. Most open plucks were in tune. Only a couple of the 12th fret plucks were in tune. That meant the fretboard was exactly correct in dimensions. The bridge saddle was near enough the right distance from from the nut. The saddle angle was nearly right, which could be rectified with further carving of the top of the saddle.
My conclusion is that most people would not be able to tell that the intonation was not spot on while the instrument was being played. I'll settle for that.
The last clip is to demonstrate the sustain of the instrument after plucking the high E string. That's not too bad, either.
I'll try and get a proficient player to demonstrate soon.
Edit. Apologies for the missing title, but I'm not going back to edit that movie again!!
The following video is just over 3 minutes long in real time with sound. Those who have instruments will know what I am doing, but for those who don't, let me explain.
I use an electronic tuner to tune the strings; the notes are, from low to high, E A D G B E. Watch the screen. I am looking for the needle to be vertical and the two LEDs to be green either side of the needle. You might need a big screen to see them.
I pluck each string three times. The first pluck is the open string. The second is held down at the twelfth fret, which is the same note an octave higher, so the the tuner reading should be the same, because the half of the string closer to the bridge is vibrating. The last pluck is the 12th fret harmonic. I just touch the string above the the twelfth fret and then pluck. This makes the half of the string closer to the headstock vibrate.
If all three sounds for each string show the same on the tuner screen, then the instrument is in perfect tune to concert pitch and in perfect intonation.
Maybe you can't see, but, all harmonic plucks were in tune. Most open plucks were in tune. Only a couple of the 12th fret plucks were in tune. That meant the fretboard was exactly correct in dimensions. The bridge saddle was near enough the right distance from from the nut. The saddle angle was nearly right, which could be rectified with further carving of the top of the saddle.
My conclusion is that most people would not be able to tell that the intonation was not spot on while the instrument was being played. I'll settle for that.
The last clip is to demonstrate the sustain of the instrument after plucking the high E string. That's not too bad, either.
I'll try and get a proficient player to demonstrate soon.
Edit. Apologies for the missing title, but I'm not going back to edit that movie again!!
thetyreman
Nordic Pine
sounds very good malc! good luck with the sale, if I was closer to you I'd love to have a play of it.
AJB Temple
Sequoia
- Joined
- Apr 15, 2019
- Messages
- 7,723
- Reaction score
- 1,202
Well done for getting it finished. It will need playing in anyway - all hand made guitars sound better after they have done some work and settled down. 
Malc2098
Sequoia
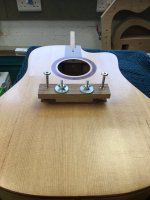
Gluing the bridge on the cutaway model.
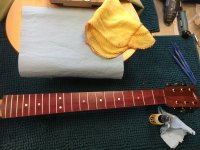
And oiling its fretboard.
I really like how the Purpleheart has turned out on both instruments, but it was a bit of a so and so to work at times.
My competent player will not be back in the country till next month, so it will be a bit of a while till we hear a demo video. But, boy, the symmetrical model is loud!
And oiling its fretboard.
I really like how the Purpleheart has turned out on both instruments, but it was a bit of a so and so to work at times.
My competent player will not be back in the country till next month, so it will be a bit of a while till we hear a demo video. But, boy, the symmetrical model is loud!
GaryR
Nordic Pine
I know less than nothing about musical instruments but I'm following closely hoping to learn a bit. Thanks so much for the detailed updates. The pictures and videos are wonderful.
Malc2098
Sequoia
Thanks, Gary. If ever anyone buys one of the instruments, they will have detailed documentation of how it was built.I know less than nothing about musical instruments but I'm following closely hoping to learn a bit. Thanks so much for the detailed updates. The pictures and videos are wonderful.
duke
Old Oak
Well done Malc, and now the cutaway will soon be finished.
Malc2098
Sequoia
Had problems with the first pickguard. It wouldn't stick down everywhere and was a nightmare to get off, taking lacquer and wood fibres with it. I had to reseal the damaged area with cellulose sanding sealer before respraying with nitrocellulose lacquer. It still looked like the moon surface, but I've been able to cover it with the new pickguard.
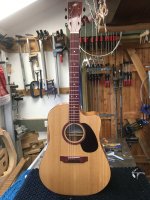
I've strung it with phosphor bronze 10 to 47s for those interested.
In previous posts, I talked about the stresses and pressures exerted on the instrument, especially the soundboard, by the strings.
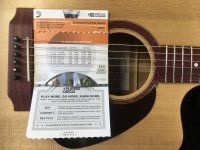
The makers tell me on the packaging that the strings when tuned exert a pressure of 132.25 LBs.
It sounds gorgeous with insane sustain, but my playing and iPhone's recording doesn't do it justice.
I've strung it with phosphor bronze 10 to 47s for those interested.
In previous posts, I talked about the stresses and pressures exerted on the instrument, especially the soundboard, by the strings.
The makers tell me on the packaging that the strings when tuned exert a pressure of 132.25 LBs.
It sounds gorgeous with insane sustain, but my playing and iPhone's recording doesn't do it justice.
NickM
Old Oak
Amazing!
duke
Old Oak
Nice Malc, are you going to take a break before starting another one?
Have you built a parlour guitar, if so I would like to see a pic.
Have you built a parlour guitar, if so I would like to see a pic.
Malc2098
Sequoia
Thanks, Duke. Not yet. No. The next project is for four heirloom Concert Ukuleles for the grandchildren. Our family has never had heirlooms, so I'm going to make some. It'll be for them to hand down to their children.Nice Malc, are you going to take a break before starting another one?
Have you built a parlour guitar, if so I would like to see a pic.
Malc2098
Sequoia
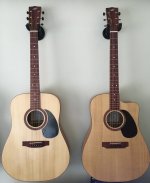
My pal has finally recorded his demos of these two. Once again he apologises for the sound quality of the recording. He acknowledges that it doesn't do the justice to how they sound live.
Last edited:
Well I recognise at least one of the tunes of which I Wish there was a lot more to listen to.
Excellent.
Excellent.