• Hi all and welcome to TheWoodHaven2 brought into the 21st Century, kicking and screaming! We all have Alasdair to thank for the vast bulk of the heavy lifting to get us here, no more so than me because he's taken away a huge burden of responsibility from my shoulders and brought us to this new shiny home, with all your previous content (hopefully) still intact! Please peruse and feed back. There is still plenty to do, like changing the colour scheme, adding the banner graphic, tweaking the odd setting here and there so I have added a new thread in the 'Technical Issues, Bugs and Feature Requests' forum for you to add any issues you find, any missing settings or just anything you'd like to see added/removed from the feature set that Xenforo offers. We will get to everything over the coming weeks so please be patient, but add anything at all to the thread I mention above and we promise to get to them over the next few days/weeks/months. In the meantime, please enjoy!

More spoked cart wheels

kirkpoore1

Old Oak
Joined
Jul 21, 2014
Messages
1,179
Reaction score
257
Location
O'Fallon, Illinois
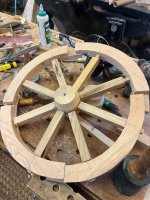
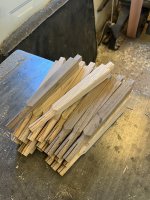
I’m starting on a batch of wooden spoked cart wheels. My hope here is to get a sturdy, easily made design to sell to reenactors for a reasonable price. Something like $300 for two wheels and a wooden axle, plus some more for a plan for an easily disassembled cart. IMG_5889.jpeg
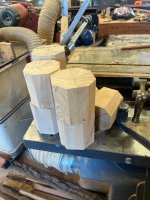
Hub blanks waiting to be turned and mortised.
IMG_5902.jpeg
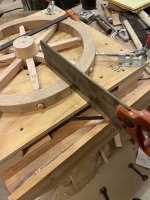
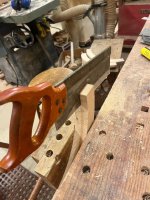
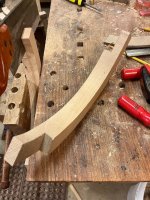
Sawing the lap joint on a felloe. Making the fellows fit together easily while maintaining strength and durability is the biggest design challenge. These wheels won’t have shrunk on steel tires.
IMG_5903.jpeg
IMG_5910.jpeg
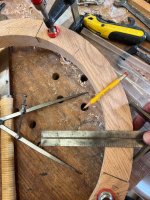
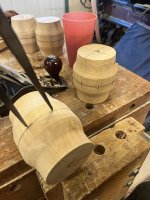
Marking the spoke mortises.
IMG_5911.jpeg
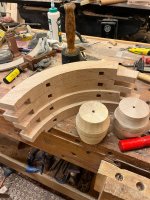
Each felloe gets two mortises.
IMG_5913.jpeg
IMG_5915.jpeg
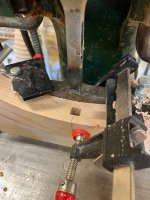
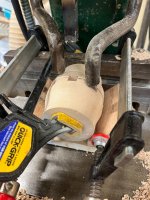
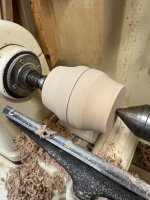
One lesson here is to turn the job round, then mortise, then taper the ends. I’ll do the mat with the next pair. I did have to make a jig to hold the hub.
IMG_5920.jpeg
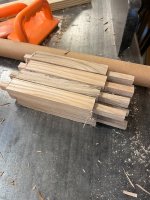
Tenoned spokes ready to test fit. I’ll taper them later.
IMG_5918.jpeg
IMG_5921.jpeg
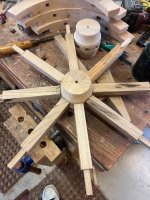
Test fit. These aren’t on all the way, obviously. I’ll do that tonight. If the fit is pretty good, I’ll disassemble it, taper the spokes, drill the axle hole in the hub, and cut slots in the felloe tenons for locking wedges.

If this design works out, I’ll likely use my tenoner to do the lap joints on the felloes. Fast—once I’ve got the right jigs built.

Kirk
 
Fascinating and quite a niche market I suspect.
Does the hub need to be circular? Would an octagonal shape where the spokes join the hub be stronger and leave less gaps for moisture ingress?
 
Fascinating and quite a niche market I suspect.
Does the hub need to be circular? Would an octagonal shape where the spokes join the hub be stronger and leave less gaps for moisture ingress?
Andy:

At the hub the spokes will have an overlap of about 1/4” on all sides. I’ll also slightly curve the shoulder (using a gouge) to make it match the hub surface a little better. Note also that the spokes won’t be glued in. This will allow a little pistoning motion at the hub as the wheel rolls and will probably tend to squeeze any water out. At the felloe end, the tenons will be wedged to hold the felloe on.

Kirk
 
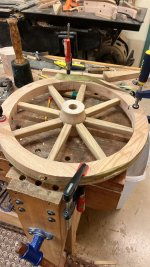
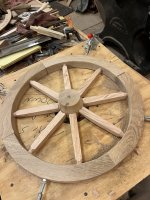
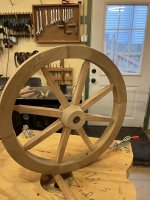
First wheel completed. I’m going to build a second and put it on my cart to test them under load.
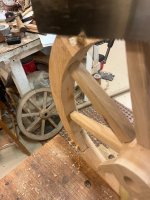
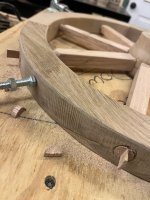
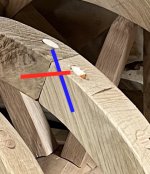
The felloes are pegged at crossed angles to keep the joints from pulling sideways. We’ll see if they last.
 

Attachments

  • IMG_5933.jpeg
    IMG_5933.jpeg
    178.9 KB · Views: 10
  • IMG_5937.jpeg
    IMG_5937.jpeg
    206.5 KB · Views: 9
  • IMG_5938.jpeg
    IMG_5938.jpeg
    186.1 KB · Views: 9
Great little project, Kirk. Why wouldn't you use a steel tyre? I imagine that getting someone to make them would be very cheap and easy.
 
Probably one of the most difficult objects to make without a history of doing it, you’ve had to design it to fit your methods and overcome all the obstacles. I think $300 a pair is very cheap though.
For us Brits, £300 seems a bit more like it but the exchange rate is way out of whack 300 dollars goes nowhere, and work done seems to be measured in thousands over here.
 
Great little project, Kirk. Why wouldn't you use a steel tyre? I imagine that getting someone to make them would be very cheap and easy.
For the tire to help hold everything together, it had to be sized for the specific wheel, then shrunk on by heating it to expand it enough to get over the wheel and cooling it. For heavy duty or daily use the extra strength and durability would be worth it.
For a light duty hand cart used a few weeks per year, I don’t think so. I built my original cart and wheels six years ago, and they’ve held up fine to 4-5 weeks a year of usage.
Also, I don’t think they’d be as cheap as you imagine—blacksmiths have to make a living too. :)
 
Probably one of the most difficult objects to make without a history of doing it, you’ve had to design it to fit your methods and overcome all the obstacles. I think $300 a pair is very cheap though.
For us Brits, £300 seems a bit more like it but the exchange rate is way out of whack 300 dollars goes nowhere, and work done seems to be measured in thousands over here.
I’m sure they’re much harder by hand. The thing is, with a mortiser, tenoner, lathe, thicknesser, and bandsaw it’s not that hard. The felloes and spokes are standard pieces and the hub is a simple turning. The wood has to be knot-free and the hub should be made of wood with cross-linked grain, but those aren’t serious restrictions.

I think this falls under “Not as hard as it looks” for light duty stuff. Large and heavy duty wheels probably need a lot more practice.
 
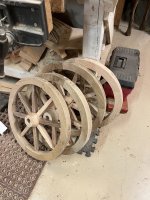
After completing the above wheel I tried one of my previous style, which has butted felloes pegged end-to-end instead of half-lapped and pegged crossways. This turned out to be easier to build, so built three more as part of my first practice production batch. This is "practice", in the sense I timed it to give me a good idea how long these wheels will take to make so I can put a price on them and see whether they'd be practical to sell.
I have a guess on what I want to charge but I’m not sure if that is realistic.

I started on making spokes for 3 wheels and spares. This involved selecting wood (mostly offcuts and scrap), jointing/planing/ripping/crosscutting the spokes to blanks, putting a tenon on one end, and made four tapering cuts on each spoke. For the tapering, I built a fixture to hold the spokes. It cuts to two different angles since the spoke need to be held to compensate for the taper on the opposite side for the second cut.
IMG_018357.JPGIMG_018358.JPG
Next, I used a Veritas dowel cutter to put a 5/8" cylinder on the felloe end of the spoke. This let me drill holes in the felloes rather than mortising a square hole. I also cut a kerf down the middle of the dowel to accommodate wedging it when in place in the felloe. The felloes were made of red oak, white oak, and
IMG_018360.JPGIMG_018362.JPGIMG_018365.JPG

Next up was to turn the hubs. These were 4" long and turned to about a 3-1/2" diameter. I marked the center band and afterwards stepped off the mortise centers with dividers then mortised the hub as above. This gave me 5 hubs for 3 more wheels. Hubs were elm or American sycamore.
IMG_018367.JPGIMG_018369.JPG

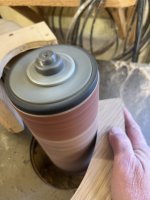
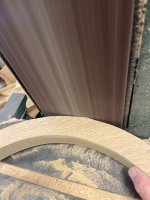
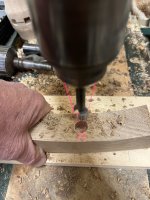
Felloes were next--cut out of 6/4 white oak and then sanded inside and out followed by drilling for the felloes.
IMG_018371.JPGIMG_018372.JPGIMG_018373.JPG


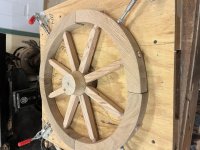
I then finished up the wheel holding fixture, which allows me to compress each felloe/spoke set separately without getting in the way of the work needed to wedge the spokes and insert joining dowels between each felloe.
IMG_018375.JPG
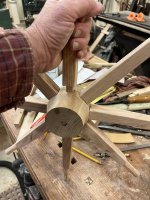
This worked pretty well on the first wheel, but I decided to add a dowel post to hold the hub in position while assembling the other pieces. I needed this because the first wheel hub came out a little cockeyed and I wanted to keep it perpendicular to the plane formed by the felloes. This did work, though I had problems keeping the axle hole perpendicular in the hub while drilling. This will require more practice and maybe a new technique--I haven't found why that is going awry yet.
Once the spokes were fully inserted into the hub and through the felloes, I used the jig clamps to hold the wheel in place.
IMG_018374.JPG
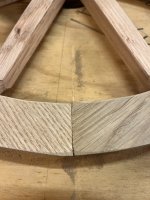
Now the fitting process started. The joints between the felloes were slightly angled, and the felloes weren't all at the same radius. Using a saw to cut straight down the existing joint between each pair of felloes results in a generally good fit, plus allows me to compress the radius of one felloe. Some joints require several cuts to get to a good fit. It also helps to unclamp the wheel and turn it over to make sure the other side is also a good fit--sometimes it isn't.
IMG_018376.JPGIMG_018377.JPGIMG_018378.JPG
The spokes are intentionally long so they stick through the felloe. After everything is adjusted, I saw them off and then hammer in the wedges to hold them in place. Then I drill for the felloe connection dowels using a drilling jig to get the placement and angle right, remove the jig, and glue in the dowels. After that I saw off the dowel excess and any wedge parts sticking out, and then sand the outside of wheel smooth. I then put it on my cart and spin it to see if it wobbles badly. So far, the wobbles have been minimal, with the last couple of wheels being pretty much wobble free.
IMG_018379.JPGIMG_018390.JPGIMG_018391.JPG
 
Last edited:
If the felloes are just butted, Kirk, what's to stop them springing out of line? A tyre would do that job, but you're not doing that. Could you drill a hole centred on each joint and drive a dowel in, perhaps?

For me, the spokes look a bit heavy and machined. I'd be tempted to spend a few minutes on each with a spokeshave, I reckon.
 
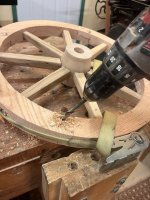
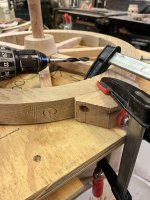
The felloes are butted, but then I clamp a wood drill guide to the joint area and drill two holes to add dowels. The holes are (theoretically) parallel to the plane of the felloes, but at crossing angles. Looked at from above the wheel plane, one runs from the lower left to upper right, and the other from lower right to upper left. This means that if you pull the joint apart parallel to one dowel, you'll be pulling across the other dowel. Both dowels are glued in.
crossed_dowels.jpg

The drawback here is that my drill guide, being made of red oak, is getting wallowed out. Also, I really need a much longer bit to be able to drill the hole while keeping the drill itself from running up against the fixture. I'm actually researching to see whether medieval wheels sometimes used nailed or riveted flat plates on either side of the felloes to keep them together.

One thing medieval wheelwrights did do was nailing iron strip to the wheel edge to hold things together. I believe heat shrunk tires only date to the 18th century. The strips were applied hot and bent into place, but were directly nailed to the felloes. There are many illustrations showing nails on the wheel edges, and I don't think they were for traction or reduced edge wear.
 
One other thing I'm going to try on the joints is to cut a slot in each end and glue in a spline. Cutting the slot will be the hard part--I can do it on the shaper, but don't know if I can go deep enough. Conversely, on the table saw with a dado blade, I'll need to use something like a tenoning jig to hold the felloes precisely. And will glue be enough, or will, under the vibrations of use, shatter? In that case I'll need dowels--but one dowel per felloe, or two to keep the spline from rotating on the felloe?

As you see, the research isn't done yet.
 
There are a number of working wheelwrights in the US and Canada that would likely be willing to help you, Bill Twigg at Moscow in Idaho would be one to contact. There's also a manufacturer of wheelwrighting tools in Idaho, Pine Creek industries that I've dealt with.
 
I expect you already know about the classic "The Wheelwright's Shop" by George Sturt. It's out of copyright and available here


It is later than you are asking about but goes into fair detail on the construction of wheels. It does briefly refer to the use of iron "shoes" before one piece tyres. And it's a fascinating read in its own right.

Also, thanks to the Bench Talk 101 group, I recently learned about one of Britain's few full time commercial wheelwrights, Phil Gregson.

There's a pleasantly rambling chat with him here


And an excellent documentary about him here, which illuminates more about making wheels


It's also available on Vimeo. If you do Instagram I believe you can find Phil there too. He's deeply interested in the history and development of wheels and keen to share his knowledge.
 
.

One thing medieval wheelwrights did do was nailing iron strip to the wheel edge to hold things together. I believe heat shrunk tires only date to the 18th century. The strips were applied hot and bent into place, but were directly nailed to the felloes. There are many illustrations showing nails on the wheel edges, and I don't think they were for traction or reduced edge wear.
Often called strakes which was an alternate to fully tyred rims.
Heat shrunk tyres are earlier than you mention, early 17th C, by this time dished wheels were common with one of the most common fines in the city of london from the worshipful company of wheelwrights being for incorrectly dished wheels. A dished wheel must have a single piece iron tyre.
 
Often called strakes which was an alternate to fully tyred rims.
Heat shrunk tyres are earlier than you mention, early 17th C, by this time dished wheels were common with one of the most common fines in the city of london from the worshipful company of wheelwrights being for incorrectly dished wheels. A dished wheel must have a single piece iron tyre.
Thanks! I'm still digging though a few sources and looking for more for the late medieval & early modern period. I have written to the Worshipful Company of Wheelwrights asking for good sources but haven't heard back yet.

I've started in on the Phil Gregson video, but it's a couple hours long and the sound isn't too clear, so it's a little slow going. Another good wheelwright channel is Engels Coach Shop:

Lots of clear and practical stuff, but again mostly about "modern" (i.e. 19th century or later) wooden wheels.

Kirk
 
What level of historical accuracy are you going for? I was just reading about an excavation of chariots dating from 250 BC that had iron tyres. From the start of the Iron Age to the mediaeval period, that’s a couple of millennia of iron use, people must have tried every combination of metal reinforcements over that period.
 

Absolutely brilliant series of videos. I watched from before the borax wagon was built, and it's as good a record of American coachbuilding and wheelwrighting as you could ever hope to find. Nice guy, too. Coachbuilding seems to be a good example of a skill where you do it well enough to work, but don't waste time and effort doing it too fancily. Efficiency is name of the game.
 
What level of historical accuracy are you going for? I was just reading about an excavation of chariots dating from 250 BC that had iron tyres. From the start of the Iron Age to the mediaeval period, that’s a couple of millennia of iron use, people must have tried every combination of metal reinforcements over that period.
Primarily 13th through 16th centuries. Yes, iron tires have been around a long time, However I don’t think they were used all the time and I’m trying to see what they did when just using wood.
 
Primarily 13th through 16th centuries. Yes, iron tires have been around a long time, However I don’t think they were used all the time and I’m trying to see what they did when just using wood.
Iron tyres, dished wheels and replaceable hub bearings were in use during the roman period, but do not get reinvented until the 16-17th C. My interest is primarily 6th to 11th C when iron for wheels seems to go out of use, but by the 14th C I have seen images of a wheel wright using the tenoned spokes inserted before the felloes which is a technique that almost requires the use of an iron tyre of some form. Scandinavian wheels during the 8-10th C use a completely different wheel construction, different spokes without tenons and much heavier felloes.

I have had several conversations online with Phill Gregson mainly along the lines of trying to find evidence for other european wheel construction, we have lots of manuscript images which sort of support the scandinavian wheel design but so much is left to the eye of the artist which can be seen to be in error in some cases. Unfortunately we have no actual wheel finds unlike the almost complete and also broken wheels from scandinavia.
 
Ian, that's helpful when going down this particular rabbit hole.
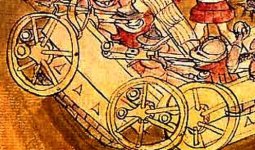
Hussite_wagon_detail.jpg
Lots of medieval images are pretty crude, yet they can show details which are of interest. For example, here's a portion of an image of a Hussite wagon fort from the early 15th century. (For those watching from home, Hussites were religious reformers who rebelled against the Holy Roman Empire in Bohemia around 1420. They fought wars using wagon trains and early cannons.) Although the wheel sketches are laughably crude, you can see where the spokes poke through the felloes. If these wheels had iron tires, that detail would be covered by the tires and the artist would likely have drawn a series of nail heads around each rim instead. I have a book with another image (Hungary, 1483) which has the same spoke detail. So these give me an idea of how some wheels didn't have tires, but do not address how these wheels were held together.

The next challenge will be to find images which provide sufficient detail. I also have some archeologist friends and will hit them up to see about recovered late medieval wheels.

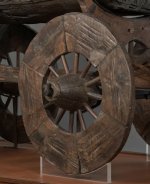
Oseburg_cart_wheel.jpg
Ian is exactly right that Viking-era wheels in Scandinavia were significantly different, as this detail from the Oseburg Cart shows. I haven't studied these, but my understanding is that the felloes are pegged together and the spokes driven through them and into the hub.

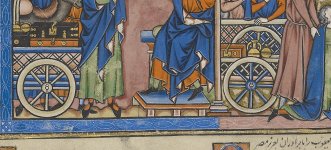
Just because you have a good artist doesn't mean they show you what you want. This image from the Maciejowski Bible (~1215), for example, is much clearer than the Hussite drawing but shows little useful detail other than that the wheels had 8 spokes and were held on with a peg through the axle.
Maciejowski_Bible_wheel_detail.jpg

Anyway, the search continues...

Kirk
 
Back
Top