• Hi all and welcome to TheWoodHaven2 brought into the 21st Century, kicking and screaming! We all have Alasdair to thank for the vast bulk of the heavy lifting to get us here, no more so than me because he's taken away a huge burden of responsibility from my shoulders and brought us to this new shiny home, with all your previous content (hopefully) still intact! Please peruse and feed back. There is still plenty to do, like changing the colour scheme, adding the banner graphic, tweaking the odd setting here and there so I have added a new thread in the 'Technical Issues, Bugs and Feature Requests' forum for you to add any issues you find, any missing settings or just anything you'd like to see added/removed from the feature set that Xenforo offers. We will get to everything over the coming weeks so please be patient, but add anything at all to the thread I mention above and we promise to get to them over the next few days/weeks/months. In the meantime, please enjoy!

What I have fixed today

I paid a visit to my local bike shop and discovered that the sign that is usually put out to let us know that Leighton is in the shop. His unit is at the back of a small cluster of commercial workshops and not visible from the road, was broken.slot.jpghanger.jpg
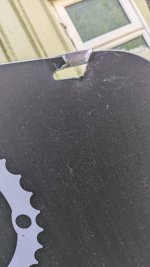
The aluminium sheet was just hug on a slot through which a bracket was hooked.
Leighton said the sign was 3 and a bit years old but at about £350 he was not sure about replacing it, so I said that I was sure I could fix it.
So the sign was removed, and I took it and one of the brackets home. I measured the slot and set to work in Fusion 360, It took 3 iterations to get to something that would work, I 3D printed each one in a cheap PLA with very low wall counts and infill, just to get something I could offer to the sign.
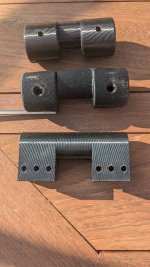
test.jpg

The top one was first, and it matched the slot, but the bracket did not fit, I had neglected to measure it.
The middle one fitted, but I was not happy with the bolt hole. I then asked myself why I used round ends on the design?
I had no good answer so redesigned it with rectangular ends which removed the problem for the holes and made printing it much easier.
I printed the final design using ABS to make them more robust.
I had put 3 holes each side for 4mm bolts but on fitting them I only drilled for 2. I had to flatten the sign to get it to slide into the 3D printed parts.
fitted.jpg
Leighton was well pleased with the repaired sign and will be using it to show when i is there.
The Boss.jpg
 
Nice work
It's always amusing/entertaining what businesses are charged for kit - £350!!!
My son had a Saturday job at a supermarket who were under a contract from Niceday who charged them more for reams of paper for the back offices than they were selling the paper in the shop.The contract strictly forbade them from using their own retail stock.
I was reading a dentist trade magazine while waiting to be butchered recently and one of the suppliers had a sale on.There was a little melamine cabinet on casters with a lower draw and two slide out trays at the top.
Reduced to £1999.00.
 
Last edited:
Nice work
It's always amusing what businesses are charged for kit - £350!!!
My son had a Saturday job at a supermarket who were under a contract from Niceday who charged them more for reams of paper for the back offices than they were selling the paper in the shop.The contract strictly forbade them from using their own retail stock.
I was reading a dentist trade magazine while waiting to be butchered recently and one of the suppliers had a sale on.There was a little melamine cabinet on casters with a lower draw and two slide out trays at the top.
Reduced to £1999.00.

I was branch manager for a national plastics distibution company and a competitor had the contract to supply prisons nationally with polycarbonate sheet which was an expensive material. The prisons weren't allowed to order elsewhere but got around that by using their £500 per order option to buy from me at 45% less than the full retail they would have to pay on the contract. It meant multiple orders and split invoices sometimes but a win for them and for me and after all it's our taxes that pay for these purchases. Maybe I should have applied for a tax benefit for saving the country money. :unsure:
 
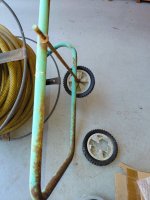
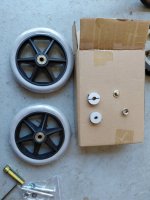
Plastic wheels on my hose reel trolley disintegrated weeks ago. Found some replacement wheelchair wheels with same size and axle diameter and bought a couple of different types of fixings. One the fix once spring tupe, which can’t be got off without destroying them, the other a two piece retainer
.IMG_5057.jpeg

IMG_5058.jpeg

Had to remove a fair bit of rust before the new wheels would slide on and when they did the CU fairy appeared.

IMG_5059.jpeg
I had not thought the to measure the width of the new wheels. No room for the retaining clips.🤬
I could try and remove the flange that stops the wheels going any further along the axle but for now the honeymoon fit is good enough for the wheels not to come off after a few laps of the garage.

Oddly there is no hosepipe ban here. Just a ban on washing cars, patios etc and potagers (veg plots) can only be watered after dusk.
 
if it fails in the future,you could drill and tap the ends of the axle and use a screw and penny washer to retain the wheels.
Interesting idea but I am not at sure I could drill a pilot hole in the middle of the 8mm axle which is about 18” long.
 
You could drill and tap them Andy as the axles will be mild steel and soft, I'd drill and tap to M4, they don't need a deep hole.
If you aren't bothered about future removal and because they're a tight fit you could just take a punch around the outside edge of the axles to lock on the wheels as it looks as if they have bearings. If you did want them off in future they might need a little gentle persuation
 
I mentioned here a few months ago that I found on a skip and easily repaired a Hetty(pink Henry vacuum cleaner).
I happened to mention this tale to a friend, she said we have got one of those at work and the cable has jammed, “ I’ll have a look at it” sez I.
She turned up with a nearly new Henry XL plus, it took me 15 minutes to fix, so I messaged her to say that it was repaired and ready for her to collect, she replied that they would not allowed to use it so I was welcome to keep it.
A google shows that these are 200 quid.
 
You could drill and tap them Andy as the axles will be mild steel and soft, I'd drill and tap to M4, they don't need a deep hole.
If you aren't bothered about future removal and because they're a tight fit you could just take a punch around the outside edge of the axles to lock on the wheels as it looks as if they have bearings. If you did want them off in future they might need a little gentle persuation
The problem I foresaw Bob was how to hold an 18” rod still while drilling a hole, perfectly centred, down the middle of it.
 
The problem I foresaw Bob was how to hold an 18” rod still while drilling a hole, perfectly centred, down the middle of it.
Do you have a vice or workmate Andy?

As long as you pop/ punch a start for the drill bit and use a sharp bit it's rarely a problem in my experience. It isn't the end of the world if not dead centre as long as there's enough metal left around the hole and it's reasonably straight. If I was doing it I'd just be using my cordless drill not the drill press.
You don't even need to tap a thread if you don't want to, just use a self tapping screw of relevant size, add a little Locktite or Araldite etc and it will work. If you need it back off you can apply a little heat and screw it off.

You might be over thinking it a bit. If you can do DIY and woodwork you can do that. It's just a hose trolley after all not a precice bit of gear.

Pop over to Northumberalnd and I'll do it in 10 minutes. :ROFLMAO:
 
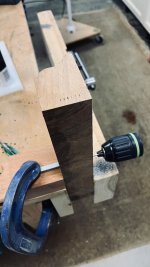
Do you have a drill press, Andy? If so:

Block of wood 50mm thick.
Drill a hole, diameter of the axle, halfway through.
Without moving the workpiece, drill right through at pilot hole diameter.
Drop the block over the end of the axle and use it as a guide to drill your pilot hole.

S
 
Last edited:
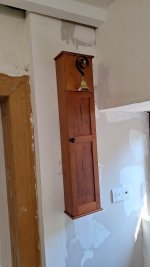
Yes, I know I claimed to have fixed this a couple of weeks ago. Well I've fixed it again...
20260730_163042.jpg

It's not that I had cocked up, it works fine, but it has a shortcoming.

The electric motor that jingly-janglificates the bell coil only jingly-janglificates for as long as the bell-push is pressed. That is fine if people press for several seconds, but if they just press and release, the jingly-janglificationiser doesn't get time to jinglify, let alone janglificate, and it is easy not to hear it.

So.

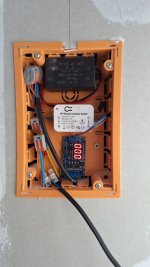
I found a timer delay module on the big river. It works over a range of voltages, 5V - 36V. The motor runs on 6V so it is a good fit. This module is programmable, in several modes, but I want a plain minimum operating time, so I programmed it for 5 seconds. The setup look like this:

delay timer installed.jpg

So I have 220V coming in from the bottom to a transformer at the top. That's the black box at the top.
That then feeds 6V to both the receiver (white box) and the timer delay module (with the LED display).
The output from the receiver used to go directly to the jingly-janglyficationiser, but now it serves as the trigger input to the delay module and the delay module goes out to the cabinet.

So now it doesn't matter whether the bell-push is pressed for 0.5 seconds or 4.9s, the bell will ring for 5s. If they press for 5.1s it will ring for 10s and so on. It works really well and I am chuffed.

S

PS That timer delay unit was made, in China, and the manufacturer made a profit. It was shipped to France and the shipping company made a profit. It was sold by a French vendor who made a profit, using the Amazon platform, who made a profit. It was then taxed by the French government, who made a profit and then got delivered by La Poste, who made a profit (actually I'm not sure about the last one, I don't know what the economic health of the French postal service is, maybe they lose money, I don't know.) So all that and I still have to fork out only €7.19. Unbelievable.
 
Last edited:
Do you have a drill press, Andy? If so:

Block of wood 50mm thick.
Drill a hole, diameter of the axle, halfway through.
Without moving the workpiece, drill right through at pilot hole diameter.
Drop the block over the end of the axle and use it as a guide to drill your pilot hole.

S
Excellent timing there Steve thanks!
had to tap a M4 bolt in the end of a lock spindle, would of normally done it free style and probably got it all wonky. Your idea made it look professional IMG_0887.jpeg
 
Yes, I know I claimed to have fixed this a couple of weeks ago. Well I've fixed it again...
View attachment 57541

It's not that I had cocked up, it works fine, but it has a shortcoming.

The electric motor that jingly-janglificates the bell coil only jingly-janglificates for as long as the bell-push is pressed. That is fine if people press for several seconds, but if they just press and release, the jingly-janglificationiser doesn't get time to jinglify, let alone janglificate, and it is easy not to hear it.

So.

I found a timer delay module on the big river. It works over a range of voltages, 5V - 36V. The motor runs on 6V so it is a good fit. This module is programmable, in several modes, but I want a plain minimum operating time, so I programmed it for 5 seconds. The setup look like this:

View attachment 57542

So I have 220V coming in from the bottom to a transformer at the top. That's the black box at the top.
That then feeds 6V to both the receiver (white box) and the timer delay module (with the LED display).
The output from the receiver used to go directly to the jingly-janglyficationiser, but now it serves as the trigger input to the delay module and the delay module goes out to the cabinet.

So now it doesn't matter whether the bell-push is pressed for 0.5 seconds or 4.9s, the bell will ring for 5s. If they press for 5.1s it will ring for 10s and so on. It works really well and I am chuffed.

S

PS That timer delay unit was made, in China, and the manufacturer made a profit. It was shipped to France and the shipping company made a profit. It was sold by a French vendor who made a profit, using the Amazon platform, who made a profit. It was then taxed by the French government, who made a profit and then got delivered by La Poste, who made a profit (actually I'm not sure about the last one, I don't know what the economic health of the French postal service is, maybe they lose money, I don't know.) So all that and I still have to fork out only €7.19. Unbelievable.
I’ve always regretted not getting to know electronics, I’m sure it would have been so useful over the years. Nice fix Steve.
Ian
 
Do you have a drill press, Andy? If so:

Block of wood 50mm thick.
Drill a hole, diameter of the axle, halfway through.
Without moving the workpiece, drill right through at pilot hole diameter.
Drop the block over the end of the axle and use it as a guide to drill your pilot hole.

S

Or... just slip off the wheels, apply some Locktite and knock them back on.
Thanks both.
If the wheels do work loose (they needed quite some persuasion in the first place) I will come back to this thread.
 
Back
Top