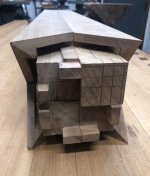
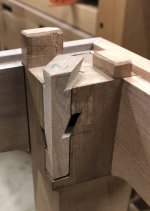
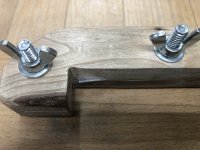
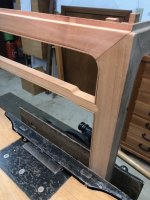
• Hi all and welcome to TheWoodHaven2 brought into the 21st Century, kicking and screaming! We all have Alasdair to thank for the vast bulk of the heavy lifting to get us here, no more so than me because he's taken away a huge burden of responsibility from my shoulders and brought us to this new shiny home, with all your previous content (hopefully) still intact! Please peruse and feed back. There is still plenty to do, like changing the colour scheme, adding the banner graphic, tweaking the odd setting here and there so I have added a new thread in the 'Technical Issues, Bugs and Feature Requests' forum for you to add any issues you find, any missing settings or just anything you'd like to see added/removed from the feature set that Xenforo offers. We will get to everything over the coming weeks so please be patient, but add anything at all to the thread I mention above and we promise to get to them over the next few days/weeks/months. In the meantime, please enjoy!

A Ming table

GaryR

Nordic Pine
Joined
Jan 22, 2024
Messages
659
Reaction score
1,165
Location
Bloomington, Indiana, USA
Name
Gary
Blackswanwood's lovely box with madrona burl veneer reminds me to show you all a table made with madrona I finished two years ago.


ACE6B872-4848-4886-91A2-A3C9B52409D4_1_105_c.jpeg


This is the first piece I've done that I've had professionally photographed. I'm glad I did because I'm proud to say that a picture was accepted to the Gallery section of Fine Woodworking magazine (USA) online and in print for their February 2024 issue.

There is a lot to discuss about this table and I'm happy that the new forum software makes it easier to add pictures because I have a lot of them.

The impetus for making the table came when I was waiting for the green timbers for my Japanese shed to dry. My wife noticed I was between projects and asked whether I could build a table to support a lamp along a particular wall in our family room. She pointed and waved her hands at this space:

5FB4C959-17B1-4B46-817B-CBBAED190EB8_1_105_c.jpeg

Her only request was that it be about waist height. Then she said the magic words: "You pick the style. I know I'll like whatever you make." Did I mention she is a psychologist?

After noodling and sketching a bit and not coming up with anything that really grabbed me I recalled a build thread by one of my favorite woodworkers, the late Chris Hall, for a large Ming-inspired dinner table:


It wasn't Hall's table itself but rather the Ming era joinery of the top and its triple mitered legs, inspired by this elegant 16th century piece:

A57DEFF4-207E-4F9D-8417-8841E2BF6A91_1_105_c.jpeg

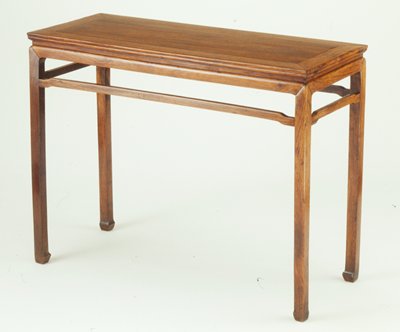
Since I was unfamiliar with Ming furniture designs, I spent a couple of months doing research looking for something that could incorporate the joinery I wanted to try and also fit in our 21st century American home. I decided that a classic Ming table called a tiaozhuo (a narrow corner legged serving table) would fit the bill. I modeled the overall form of mine roughly after this museum piece. Frame and panel top, narrow waist above aprons, triple mitered corner legs, stretchers near the top, and horse hoof feet.

052C9360-7193-40CD-891C-821BE4C509F2_1_105_c.jpeg

Then I made some elevation mock-ups in scraps to work on the proportions. This is the second or third iteration that included humpback stretchers. At that point we had removed the carpet anticipating some new hardwood flooring.

86910032-76A6-490B-8D75-903063B35188_1_105_c.jpeg

More to come.
 
There's a couple of parts of this that I'm looking forward to seeing. Firstly, the classic 3 way mitre joint where the leg joins the apron, and secondly, the little bead that goes around the outside of all the frame timbers following the curves. It surely has to be a variation on a scratch stock that was used, but I'll wait to find out.
 
Yes! The Ecke book is very useful. I used some of his measured drawings to work out the leg proportions. Another excellent source is Wang Shixiang's Connoisseurship of Chinese Furniture, which has many detailed joinery drawings.

Since Mike asked about the triple mitered leg joints I'll start there. And yes, the beading was done mostly with a scratch stock.

There are several joinery methods to get the look of the triple mitered corner. Chris Hall had a post about them in which he described them from most secure and difficult to get right to easy but half-hearted. I chose the most secure. 992EC42E-AD5E-4F26-81BB-00DBDC26CB29_1_105_c.jpeg

The apron is joined to the leg by a tenon that is half enclosed by a mortise in the leg. It is prevented from withdrawing by a sliding dovetail on the leg oriented vertically. The apron drops in from above and is locked down when the top frame sits onto the stub tenons on the top of the leg. No glue required, except for the stub tenons. Gravity does most of the work.

Here is one leg joint in progress, before shaping the sliding dovetail. The tricky part here is excavating the part of the mortise that lies behind the dovetail.


B297332A-57B2-4714-BD26-AE344B53F011_1_105_c.jpeg

Here are the four legs in progress. This shows the cut lines for the stub tenons. Sawn first then the waste between them chiseled out. It is best to do this part after chopping the mortises.
7517C5D7-4FBB-4897-94B9-3F604A646949_1_105_c.jpeg

The female part of the sliding dovetail on the apron tenon is relatively easy saw and chisel work.

D0C0C630-F4CF-471E-985B-6AE95D4BF971_1_105_c.jpeg

I found madrone to be perfect for this kind of joinery. The wood I had was vacuum kiln dried and had a nice even texture. It pared beautifully, never tore out, and held crisp edges. Here are some just for fun cross grain parings made on the apron.
55AF95F8-CB11-48FB-8DD2-54C5F1331054_1_105_c.jpeg


And a test fit. There is an additional mortise on the inside corner of each leg, which I'll get to next.

FA43D8D1-E080-4034-9BD4-9A68EB544A0C_1_105_c.jpeg
 
Ooooh, that does me the world of good. Great joint. That wood looks surprisingly like walnut, and it sounds as though it behaves much the same.
 
Are these "puzzle" joints used with or without glue?
 
The triple miter joinery I've shown so far does not use or need glue. Other versions of the triple miter do require glue. Here is one without the sliding dovetail that requires glue:


ED940EA4-96A6-4FAF-B2DA-C0B46FB39594_1_201_a.jpeg

And here is one that uses a floating tenon instead of a sliding dovetail. No glue required and easier to make than a sliding dovetail although not as strong.

6BE500C4-359A-4D3C-B137-13F5991376B3_1_201_a.jpeg

And then there is this, when you just need to get the piece out the door and your customer wants the rock bottom price.

83EE0CCF-0870-4337-ADC5-B2C97E054C21_1_201_a.jpeg
 
I've mentioned that the stub tenons on the top of the leg are inserted into mortices in the bottom of the frame for the top. Those were typically glued to prevent the top from lifting off the legs. Instead of glue, I used a clever Japanese joinery solution invented as far as I know by Chris Hall. I've never seen this done anywhere else.

It uses floating spline or floating tenon with a dovetailed end called a yatoi hozo in Japanese. They take various shapes depending on the circumstances. Mine look like this You can see how the yatoi hozo inserts into an open mortice on the inside corner of the leg. The parallelogram shaped smaller mortices flanking the yatoi hozo accept tapered pins. Inserting the pins draws the yatoi hozo down toward the floor. The dovetail end is captured by two half mortices in the top frame that clamp around the dovetail at assembly. I'll describe more about that top frame joinery later.

66357AE2-1A92-4612-9417-C605DD1E371B_1_105_c.jpegyatoi hozo - 1.jpeg

yatoi hozo - 1 (1).jpeg

And a test fit of all the yatoi hozo assemblies.

A091C3AB-1D05-413A-9370-88FEA940AE5E_1_105_c.jpeg
 
Are these "puzzle" joints used with or without glue?
These complex Chinese joints were designed to hold together without glue. When they were originally made in China, the only adhesive available was hide glue and joints simply fell apart owing to the very high levels of humidity in the Far East; hence the need for mechanical joints that didn't. 18th century European furniture shipped to the Far East suffered a similar fate in that the joinery disintegrated during the humid season - Rob
 
crazy what lies beneath that mitre joint, would have never have though it was anywhere near this complex.
 
Rob has it right I think about why furniture from that era used mostly joinery rather than hide glue. I've read that sometimes fish glue was used, or a slap of lacquer, but the principle holds.

The next joinery is for the stretchers. Wang Shixiang has a helpful chart of the types of stretcher to leg joinery used for tables and chairs. I used 3.8c which is kind of a double tenon, one enclosed and one with an open double mitered face.

03404763-0FBA-468B-81CC-DA2FAA1155FB_1_105_c.jpeg

The layout for these is critical. The first few I tried were maddening but after awhile it got easier. A key is to keep the center lines of the mortice and the tenon intact. I knifed the important lines and followed up with pencil to highlight them.

369C2C96-ED4F-47FC-AA28-016AD4956549_1_105_c.jpeg

Drill and chisel the waste of the enclosed tenon.

A236AA41-82A8-49C1-BC07-766EB3A17F8E_1_105_c.jpeg

Then chisel most of the waste of the open tenon staying wide of the line.

571FB43E-78B3-482B-BBC9-B093E2E4F42E_1_105_c.jpeg

Then clamp a 45 degree paring jig to the leg and sneak up on the lines. The tenons are sawn to match and the tenon mitres also pared close to finish dimensions. The smudges inside the mortise are pencil marks that let me know where the tenon is touching.

1566D53F-85B0-403C-8B56-F8099B28E94B_1_105_c.jpeg


The closer to final fit, the slower it goes as I test fit and think about whether to take another shaving off the tenon, or the mortice.

Here is one nearly done. Still a hair's gap on the upper mitre and the lower mitre angle is slightly open. Now, where should the next paring cut be, on the mortice or the tenon? I don't recall what I did or whether I got this one right. But I probably took a break and walked the dogs before making the last cuts.

EB9F094E-EBBF-41D0-A28F-389414FACF3B_1_105_c.jpeg

And when the gods are smiling it all fits just so. One additional complication for this table is that the legs are tapered on their inside surfaces so the mitres on the open tenon are different lengths. Fun!


209FCDE4-1329-4814-A635-D3D613C1A5A7_1_105_c.jpeg

There are two advantages I can think of for doing this joint. One is that the mitred abutments provide a little more resistance to racking than a 90 degree joint. Not a lot, but some. The other is that it allows one to carry a chamfer or a bead around an inside corner with a clean mitred join.

This joint could get a small peg from the inside surface of the leg to hold it together without glue, but those tenons are pretty small for that approach and I didn't want any exposed joinery. I used hide glue instead—the only place I used glue on this piece. That joint on the left is as good as I can do. The one on the right: well, I turned the table so it faces the wall....

4697128B-2011-4F99-A4BA-E31DBB62F6F3_1_105_c.jpeg

I really like this "spear point" joinery. I used it on another piece, a chest of drawers, to carry a chamfer around the drawer openings. I'll show the chest another time.

BDE01610-166A-4596-B847-C357AAEFC625_1_105_c.jpeg
 
Last edited:
There are two advantages I can think of for doing this joint. One is that the mitred abutments provide a little more resistance to racking than a 90 degree joint. Not a lot, but some. The other is that it allows one to carry a chamfer or a bead around an inside corner with a clean mitred join.

I think that's a misunderstanding of the physics in this joint. A square shoulder line, I contend, gives a greater resistance to racking. Your second point is the real reason for the existence of this joint, I'm certain. It's all about aesthetics. It isn't an aesthetic I like particularly, but so what. I always........always......enjoy proper joinery, no matter whether the final result looks appealing or not.
 
Last edited:
Interesting. Certainly complex. I'm not familiar with madrone so although I know it's a hardwood I've no clue how hard it is. The texts suggest it's easy to work. In Japan I have only really experienced making (less complex) joints with Japanese Cedar (Sugi) which cut very easily but would compress a tiny bit if a heavy hand was used. The marking out is no doubt tricky with those joints. Very nice quality work.
 
Mike, just so I understand: you think the example on the left has greater racking resistance than the one on the right? That seems counterintuitive to me.

11AE841F-98BC-4698-90E8-2E3B89297D1D_1_201_a.jpeg

On to shaping the legs. I roughed out the shape on the band saw then attacked with rasps, spokeshaves, and finally sandpaper. Then the beading with scratch stocks and small chisels. For the beading profile I consulted this helpful chart by Wang Shixiang of different leg section in plan from various Ming tables and chairs.2670C07E-2C32-4528-A188-14DC582ED17B_1_105_c.jpeg

I chose the one on the left in the second row. I drew it out on paper and used that to define the cutter:

scratch cutter - 1.jpeg46AB94CC-41A9-4082-A75F-DD2C8879FCD9_1_105_c.jpeg

Then worked at it. The madrone was easy to shape this way. Almost no grain reversals or chip out to contend with. Pleasant, quiet work. This was test on a cedar scrap, not madrone.


43561EA1-1B30-4B2C-A183-1D56C8DEBA38_1_105_c.jpeg


I made two scratch stocks, one with a straight fence pictured above and one with a rounded fence to get into the curved areas. 074F9984-7774-4544-9059-131CD5C8015E_1_105_c.jpeg

The inside curves where apron and leg meet have a lot of short grain. In that area I went extra slowly and resorted to gouges and sandpaper to finish some of that stretch.

008A8E0C-6C38-4F22-B009-71E2C6A51D73_1_105_c.jpegDD437F3A-A20D-41A5-9E8F-79A1433B81D8_1_105_c.jpeg

5CA4AA09-E1A6-4059-BF63-18DF77540326_1_105_c.jpeg

Next will be making the unusual frame and panel top.
 

Attachments

  • 5DC920F3-D22C-4BF6-9749-2669BACF9589_1_105_c.jpeg
    5DC920F3-D22C-4BF6-9749-2669BACF9589_1_105_c.jpeg
    289.5 KB · Views: 4
Does your answer Mike assume a hidden mortice and tenon joint? If so, then it clearly resists racking more so I agree.

However, the Japanese joiners also do the illustrated joint with two 45 degree (or whatever) shoulders for aesthetics, and a hidden tenon. It is at times hard to see why the far eastern joiners need so much complexity. especially since they tend to eschew through pins (dowels) and stopped pins. However, there is elegance in craft and art for its own sake.
 
The joinery for the top is a modified version of that used for the Ming table I showed earlier:

Ming psaltery table - 1.jpeg

On first look it seems to be solid wood plank with everted flanges added to the ends. However, the piece was disassembled by the museum where it resides and they found this:

A3828BB5-97EC-43A5-BE04-AC563E5D79AD_1_105_c.jpeg

It is actually a frame and panel, with a single thin solid panel overlapping the long arms of the wide frame, held down by dovetailed battens on the frame and stiffened by two separate battens that are tenoned to the frame. The panel edges are invisible since they are mitred to the long arms of the frame while the panel's end grain is covered by a mitred breadboard end. The frame is mitered and joined by dovetailed tenons.

I puzzled for many hours about this construction. It seemed to me that a solid panel captured within a frame like that would suffer from seasonal humidity changes. Either gaps would open at the mitres, or the panel might buckle, or crack in the dry season. May be those potential problems are minimized by having the long edges of the panel able to ride up over the long arms at their mitres during the humid season. And the corner mitres of the frame are actually quite small to minimize gaps. In any case, it is a highly refined construction considering it was made over 500 years ago. All of this works together to present a unified look with no exposed joinery.

For my table I borrowed the joinery solutions Chris Hall used for his table. First up was to change the top frame's corner joinery from dovetailed tenons of the Ming table, which must be glued, to a Japanese locking mitred joint, which does not.

https://thecarpentryway.blog/2016/12/tajcd-monograph-series-the-locking-mitered-box-joint/

The joint is made of two identical mitered and tenoned halves each with half a mortice set into the tenon of each piece. Here is one half nearly done. The other piece is layed out identically but assembled upside down.
3DE7A86D-8706-46AD-8F00-9B2DD2D1E5C4_1_105_c.jpeg

05212A7D-5D79-47CF-AB40-11D7737387D2_1_105_c.jpeg

When assembled all that is visible is the slot on the inside corner for a double tapered pin called a shachi sen.

AE493A05-FFED-4BE6-9DB9-4FBCD9020090_1_105_c.jpeg

And as I hinted earlier, I added two half dovetailed mortices to each side of the mitred frame pieces to capture the yatoi hozo that hold the top frame to the legs. Here I left the shachi sen way long to make it easier to remove during test fits. The shachi sen here is made of Osage orange (Maclura pomifera) for no other reason that I had some and like the color contrast. But any hardwood harder than madrone would do.

You can also see the stub mortices that will accept the stub tenon on the tops of the legs, and groove that will accept a tongue on the tops of the aprons. Those are mostly for registration and to resist the frame or base twisting and were not glued.

A87EDAF1-5246-4330-8EC9-20EF369738E1_1_105_c.jpeg

This locked mitre joint is wonderful. A couple of taps on the pin and it truely is locked tight. It does require having some narrow chisels and thin saws to cut it out properly. The shachi sen can be cut flush on the inside or left proud either to remove it later for disassembly or to tap in further if the joint loosens up over time. I left mine proud. A1AFBF8C-2F5D-4E0D-81C1-4B526867961D_1_105_c.jpeg
 
Last edited:
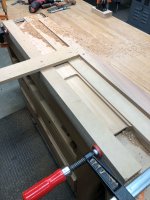
Working the long arms of the top required a way to shape two dovetailed lands for the thin panel. I routed the waste between the lands down to the panel thickness, then routed the height of the dovetail lands (or maybe I did it in reverse order. I can't recall) and then chiseled the dovetail profiles to 14 degrees and to match the dovetails on the battens. The tricky part here is that the sliding dovetails for the two panels are tapered across the panel. I didn't get the layout right the first time around and had to do some repairs and fixes later. None visible in the finished piece, fortunately. I consoled myself saying that I'll do better next time, knowing fully that there will be no next time.


3B5F035A-EF01-49C0-B674-27E9D1F4908E_1_105_c.jpeg


1CA25C39-2F0C-4B30-AF9C-0AE338356DD6_1_105_c.jpeg5B56B378-E24C-458E-908B-DEB896C090E0_1_105_c.jpeg

EC18108F-491B-4B47-AD71-59EE4521935F_1_201_a.jpeg

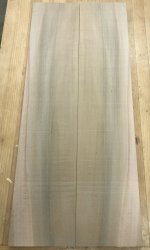
The panels were resawn from a single plank of quarter sawn madrone so that the wood would be more stable and so I could book match the figure. I know now that I was extremely lucky to get stock like this. I've checked and the supplier I used hasn't had anything like it the nearly three years since I bought it. it wasn't cheap. And my wife advised me at the time I begged her to let me buy it, " OK, but don't "mess" it up." (She used stronger language). These boards are about 7 inches wide.

98AEEF59-8AE3-444D-8CF7-CB76DCDD6D94_1_201_a.jpeg

I did not glue them together. Instead I deliberately left a 2 mm gap between to accommodate my worry about seasonal movement. That decision complicated the joinery where the panels meet the mitred breadboard ends. Perhaps you can see the next steps to fit the panels to the breadboards here:

B4A58F51-0B50-48D7-B252-D60428F18CAB_1_201_a.jpeg

The mitred ends of the panels also get a tongue that fits into a groove in the breadboard ends. That tongue and groove helps keep the panel flat.

00A79CEC-3D6E-4505-A575-9EE7218EAB91_1_105_c.jpeg

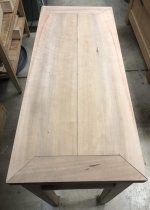
And then fitting the mitered panels to the mitred breadboards. This took a long time since the frame dimensions were fixed. Very little room for error. In the end I didn't get a perfect fit but maybe 95% overall. Here it was in progress with still much fitting to do.

F4E9026F-8360-47DC-ACAE-38C4A684F830_1_105_c.jpeg

And a little closer:

12435BF3-F465-4C48-8487-EC1B9D23EBE7_1_105_c.jpeg
 
For the life of me I can't see any advantage to that table-top design. I've seen a number of glueless top options which are much simpler, and which worked with any seasonal movement. I wonder whether the original was just an evolutionary dead-end: an experiment which didn't work well enough to come into widespread use.
 
From what I have read about historical Ming furniture construction, the approach I'm showing is unusual and yes, and experiment not replicated. I'd guess not because it doesn't work (the historical piece is, after all, intact after 500 years) but because as you suggest there were simpler and less expensive methods to give a similar look.

One thing to highlight is that better Ming furniture always hid endgrain. On narrow and long table tops that meant using mitred breadboard ends. And when wood was plentiful (pre-Ming) table tops were made of solid boards. That led to a common construction like this:

0D65F044-B186-4EA4-A9B2-B7E5CC13F6A6_1_201_a.jpeg


The best furniture was made of various expensive and slow growing rosewoods that were mostly all cut down by the 15th and 16th centuries. Thick slab tops of rosewood became impossible to make, but there was a demand for the same look. Today we would slap some veneers on a base wood but veneering was not done in China at that time. Hence a move to frame and panel construction that could use thinner stock. A typical construction would look like this, with battens to keep the thin panel flat.

1AA50D34-B9CE-4B06-A1BA-0C5BD6ECED89_1_105_c.jpeg

These would have been glued or if using through tenons, wedged and glued. The floating panel solves the problem of seasonal wood movement as in Western frame and panel construction that we are familiar with. But the panel ending at the inside frame border loses the illusion of the top being made of a single plank. The Ming long table and my smaller side table version try to keep that illusion.

My table was a lot of work, so much so that I doubt I would make another. I'd love to see solutions that meet these design criteria that aren't so time consuming.
 
I'd love to see solutions that meet these design criteria that aren't so time consuming.
Well, the (odd) dislike of endgrain is something I hadn't factored in, but I would suggest that a boarded top with 2 or 3 sliding dovetail cross members under would achieve the same look for a lot less work. The Japanese did this, certainly. Breadboard ends if end grain offends you, but they can be entirely orthodox (western orthodox) other than the mitre. They could be fixed to the outer boards at the corners, leaving the inner boards able to move with the seasons. All of that could be done entirely without glue, if gluing was an issue. My unglued bathroom cabinet door works like this, without the breadboard ends.
 
Interesting and you are clearly knowledgeable Gary. It is I think hard to compare western and eastern aesthetic tastes, both from history and today. Oddly enough I made a large kitchen table top with mitred picture frame corners and hidden tenons, (all oak - with deep brushed grain) long before I knew about Chinese and Japanese joinery. It was not copied from anything and is still in the family.

Edit - post crossed with Mike's which I had not seen.
 
Mike, your solution works to build a table but: 1) omitting the mitred breadboard end is kind of cheating! That's the part that makes the construction so difficult but is essential to being a Ming design. 2) a boarded table top without a frame requires thick boards to give the look of a solid plank. Very expensive and perhaps not even possible with difficult to source woods. Hence the use of a thin panel within a thicker frame. The problem then is how to give the look of a thick plank while using a thin panel. 3) an aversion to showing end grain does not seem odd to me at all, West or East. Plenty of European craftsman went to great lengths to hide end grain with veneers or mouldings, for example. FWIW, I think end grain can look just fine on the right piece.

There are only a few more photos to show. I shaped the edges of the aprons and top frame with planes and scrapers.


1DBB8043-6A49-4BD5-9185-9FAE2270814E_1_105_c.jpegABC1D2CD-1AA5-4F1B-9F30-A190815BBA7E_1_105_c.jpeg

024B85E6-458D-485A-916B-21D32E5F094A_1_105_c.jpeg

Then finished all the parts before assembly using several coats of a Tung/Linseed oil concoction.

Then came assembly. I glued the stretchers to the legs and dropped in the aprons to complete the base. Then assembled the top starting with setting the battens into their grooves under the top panels.

4361FB9B-D810-4810-ACDE-437DFBF67CB6_1_105_c.jpeg


8F3D3894-55D2-4F3B-8525-936480357244_1_105_c.jpeg

Then flip the top over and wiggle the long arms of the frame onto the batten tenons

65A2C6D3-C256-4132-9022-0BAA84094840_1_105_c.jpeg

Then begin to attach the short arms, stopping to insert the yatoi hozo into their mortices at the corners.

BEE290FC-E58D-4B1B-B3A7-348890DD9CE0_1_105_c.jpeg


Then lock the corner miters with their shachi sen pins, and peg the tenons of the battens.
F9136A28-4AA8-4C01-9E06-F169A5ED6F0F_1_105_c.jpeg


Then turn the top over and insert the yatoi hozo into their mortices in the legs.

CB7C51F4-F5E5-4FC3-B759-602FA173EFA0_1_105_c.jpeg

Done.

47A5431F-1BE9-489B-9386-29FF7E998952_1_105_c.jpeg
 
Sometimes complexity is there for its own sake and there is nothing wrong with it. Watches are an example perhaps: you pay a lot for multiple complications and a lot more for very fine engineering and finish of them even though they are inside a waterproof case and will be seen by very few. Function isn't everything for everyone.
 
A very nice piece of very complex woodwork and I absolutly love the bead detail which seems to visually take this piece to the next level. Well done.
 
Thank you. Here is a similar but lighter tiaozhuo but without the beading and with a simpler top panel captured in a mitred frame. From two centuries later than the model I worked from. In the collection of the Minneapolis Institute of Art.


Two details I copied from this piece are that the lift of the humpback stretchers begins at a distance of about the width of the leg, and rises about 1/3 the height of the stretcher. And the stretcher is placed below the apron at a level so that the negative space is the same as the positive space of the apron plus top.


tiaozhuo.jpg
 
Here is an unfortunate update. I was walking by the table a couple of days ago and happened to notice this:
5D758BFA-76B0-42F9-A72F-CA4DD134ADC2_1_201_a.jpeg

and a bit of sawdust on the stretcher below. I immediately knew it was an exit hole of some kind of insect. After a few frantic minutes of research I think I have narrowed it down to a kind of buprestid beetle, based on the size of the hole and that a couple of days earlier I had seen an unusual blackish beetle about an inch long sitting on a window ledge in the house. Didn't think much of it at the time since critters show up in the house from time to time and the weather has been warm enough for them to fly about.

The wood for this table had been vacuum kiln dried and shipped to me where I stored it in my shop for a few weeks it took to build the table. Since finishing it the piece has been in my house for over three years. It certainly must have been infested before I made the piece, now over three years ago.

I have packed up my shop anticipating a move in a few weeks so there isn't much to be done for now except turn the piece around so the hole faces the wall.

I'm not happy about this at all, but I am very impressed by the beetle's survival skills.
 
That's an impressively neat hole.

So, do you fill it and try to hide it, or do you drill holes like it adjacent to all the joints, and put raised plugs in? (I'm joking........... :) )
 
Back
Top