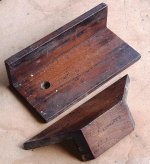
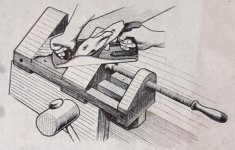
In his recent excellent posts: "A Walnut workout - with added box - finished!", AndyT mentions and shows the use of a mitre shooting block. This reminded me that I had seen a design for such a device in an old book: "How to Make Woodwork Tools" by Charles Hayward. I looked it up and decided to make a half scale version, with jaws opening to 4". WIP photos and description to follow.

-
Hi all and welcome to TheWoodHaven2 brought into the 21st Century, kicking and screaming! We all have Alasdair to thank for the vast bulk of the heavy lifting to get us here, no more so than me because he's taken away a huge burden of responsibility from my shoulders and brought us to this new shiny home, with all your previous content (hopefully) still intact! Please peruse and feed back. There is still plenty to do, like changing the colour scheme, adding the banner graphic, tweaking the odd setting here and there so I have added a new thread in the 'Technical Issues, Bugs and Feature Requests' forum for you to add any issues you find, any missing settings or just anything you'd like to see added/removed from the feature set that Xenforo offers. We will get to everything over the coming weeks so please be patient, but add anything at all to the thread I mention above and we promise to get to them over the next few days/weeks/months. In the meantime, please enjoy!
You are using an out of date browser. It may not display this or other websites correctly.
You should upgrade or use an alternative browser.
You should upgrade or use an alternative browser.
A Mitre Shooting Block
- Thread starter rxh
- Start date
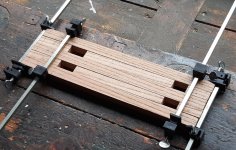
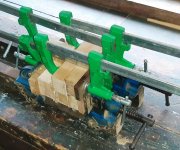
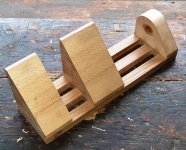
I began with a piece of elm, cut into strips and carefully planed to make the base frame and the runners for the moving jaw. Mr. Hayward writes: "Made in this way the grain of all the parts runs in the same direction, and if any shrinkage takes place it will affect all in the same way so there will not be any danger of the block either binding or working loose.". I glued the parts together and added screws for reinforcement.
Attachments
NickM
Old Oak
These do look like a useful tool. I’ll be following with interest.
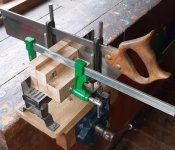
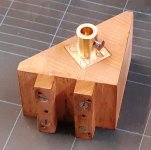
The fixed jaw is attached to the base frame with glue and screws. I drilled small holes in the base frame in the desired positions of the screws. It was a bit of a challenge to hold the jaw firmly and accurately in position against the base frame to allow the holes to be "spotted" through. I came up with a strange arrangement of cramps and ty-raps  I enlarged the holes to accept the screws. The runners for the moving jaw were attached in a similar way.
I enlarged the holes to accept the screws. The runners for the moving jaw were attached in a similar way.Attachments
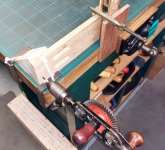
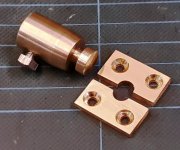
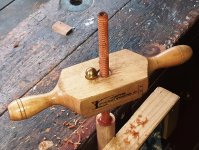
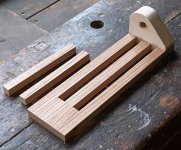
Here it is completed. There are spacer pieces under the ends of the base frame and a "keeper" piece is attached from underneath to the runners of the moving jaw to prevent it from lifting in use. Finally a piece of oak was attached by screws underneath to allow it to be held in the vice.
Attachments
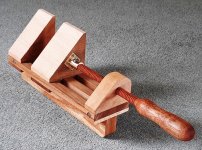
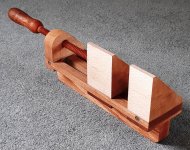
MattS
Nordic Pine
It’s a beautiful thing, how do you use it without planing the jaws?

Blackswanwood
Old Oak
Thanks for posting this. I was intrigued when I saw it on AndyT’s post.


Brilliant! And you've gone to the best source for the instructions. I'm sure yours will be bang on 45° and 90° and be really useful.
There's another feature of the 90° side that I didn't mention, using it to saw tenon shoulders. There used to be a special vice used by chairmakers, in conjunction with a saw with the blade attached to a flat block. A chair leg or frame side is clamped in the vice and the saw is run round it, cutting even shoulders to define a tenon. This is especially useful on curved pieces that need a square tenon.
I think there's a diagram in Salaman or maybe in Roubo. Anyway, you can use the square side to do something similar. Or you could use that mitre saw - is it an old American one?
Edited to add pic of armchair saw
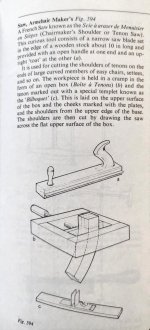
There's another feature of the 90° side that I didn't mention, using it to saw tenon shoulders. There used to be a special vice used by chairmakers, in conjunction with a saw with the blade attached to a flat block. A chair leg or frame side is clamped in the vice and the saw is run round it, cutting even shoulders to define a tenon. This is especially useful on curved pieces that need a square tenon.
I think there's a diagram in Salaman or maybe in Roubo. Anyway, you can use the square side to do something similar. Or you could use that mitre saw - is it an old American one?
Edited to add pic of armchair saw

I am sure my father has a couple of those in the garage. Not sure if my grandfather would have made them or bought them. I’ll try and remember to take some photos next month if I get over there.

Woodbloke
Sequoia
A slightly different version of the same thing, but this one is able to shoot a very wide board:
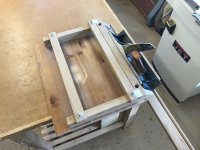
I pinched this particular design off Mitch Peacock, an Instagrammer and UToober. Very useful for making mitred boxes etc - Rob
Edit - I’ve cunningly made this one adjustable, so the angle shot can be plus or minus 45deg by a smidge - Rob
I pinched this particular design off Mitch Peacock, an Instagrammer and UToober. Very useful for making mitred boxes etc - Rob
Edit - I’ve cunningly made this one adjustable, so the angle shot can be plus or minus 45deg by a smidge - Rob
rxh: very nicely done :eusa-clap:
I managed to acquire one - identical to AndyT's - from the well-known auction site years ago, when old tools were still affordable.
A while back I came across the Matt Estlea woodworking videos (recommended) and he has a simpler device for smaller, chisel-sized work. All explained here:
https://freeonlinewoodworkingschool.com/cutting-mitres/
I managed to acquire one - identical to AndyT's - from the well-known auction site years ago, when old tools were still affordable.
A while back I came across the Matt Estlea woodworking videos (recommended) and he has a simpler device for smaller, chisel-sized work. All explained here:
https://freeonlinewoodworkingschool.com/cutting-mitres/
AndyT":1szr0h32 said:Brilliant! And you've gone to the best source for the instructions. I'm sure yours will be bang on 45° and 90° and be really useful.
There's another feature of the 90° side that I didn't mention, using it to saw tenon shoulders. There used to be a special vice used by chairmakers, in conjunction with a saw with the blade attached to a flat block. A chair leg or frame side is clamped in the vice and the saw is run round it, cutting even shoulders to define a tenon. This is especially useful on curved pieces that need a square tenon.
I think there's a diagram in Salaman or maybe in Roubo. Anyway, you can use the square side to do something similar. Or you could use that mitre saw - is it an old American one?
Edited to add pic of armchair saw
Thanks Andy - I have never heard of an armchair saw. I may have to make one now
The mitre saw is a Nobex, from Sweden, dating from the 1970s (I think). The saw can be re-sharpened but its plastic handle disintegrated and so I made a wooden replacement.
Andyp":9bqk4zhj said:I am sure my father has a couple of those in the garage. Not sure if my grandfather would have made them or bought them. I’ll try and remember to take some photos next month if I get over there.
Thanks Andy - I would be interested to see some photos.
Stuart":3utf173m said:Nice work. I was offered one of these a while ago but thought no thanks.
Now I can't find one for love or money! I have neither the skills nor the equipment to make my own.
Thanks Stuart - it is not that difficult and most of the work can be done with common woodwork tools. A threaded steel rod and nut can be used instead of the wooden screw, thus avoiding the need for a thread box and tap.
Woodbloke":1z3btf5q said:A slightly different version of the same thing, but this one is able to shoot a very wide board:
I pinched this particular design off Mitch Peacock, an Instagrammer and UToober. Very useful for making mitred boxes etc - Rob
Edit - I’ve cunningly made this one adjustable, so the angle shot can be plus or minus 45deg by a smidge - Rob
Thanks Rob. That's and interesting design - I shall study it carefully.
PeteW":2we4lhwt said:rxh: very nicely done :eusa-clap:
I managed to acquire one - identical to AndyT's - from the well-known auction site years ago, when old tools were still affordable.
A while back I came across the Matt Estlea woodworking videos (recommended) and he has a simpler device for smaller, chisel-sized work. All explained here:
https://freeonlinewoodworkingschool.com/cutting-mitres/
Thanks Pete. I have this mitre chiselling guide which came an unexpected extra in a job lot of moulding planes: