
mjdewet
Seedling
My nephew asked my opinion on a small table he got from his mother-in-law, who got it from her mother, so it's been around for some time.
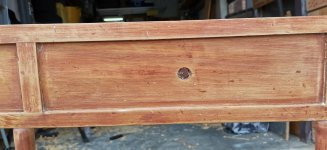
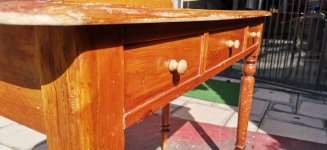
It is a small table, probably make as a writing table, with 4 daintily turned legs, and a yellow wood table top. The legs usually was made from stinkwood (Celtis Africana), and the sides would have been yellow wood (Afrocarpus Falcatus) too. That was the assumption.
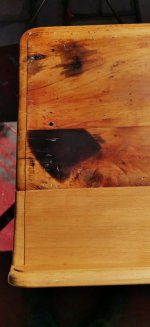
I'll cut to the chase: Some time in it's life, it was repurposed as an ironing table, with some or other method to keep the clothes iron heated. Lo and behold, the heating instrument was 'forgotten' on the table, and it was discovered just time to prevent a fire from taking hold, leaving a nice big chunk of charred table top..
As a table was a scarce and expensive item, so 'a plan was made': As the top was only charred through in one spot, it was flipped upside down, the badly burnt piece cut out and replaced with a rough piece of oregon pine, and more or less nailed it place on top of the table frame.. Clobbered, bodged, cobbled come to mind as the more correct term for the fix..
The table ''top' was then covered with white 'Formica', a water proof and durable, easily cleaned covering.
So now back to the present:
My suspicion of the yellow wood (Afrocarpus Falcatus), was confirmed, as a thin sliver cut from the underside revealed that golden yellow colour and soft texture of yellow wood. The frame was yellow wood too, but the legs I do not know. Could also be yellow wood, but also stained..
I had some yellow wood planks left over from an earlier project of some 20 years ago. A table with stinkwood and yellow wood table was 'remade', with only the 4 legs salvageable due to borer beetle in the yellow wood.
(Apparently, if the yellow wood tree was cut in the 'wrong time' of the year, it was prone to borer beetle infestation.)
Thusly the table landed in my garage. Only upon disassembly, did the true nature of the table top reveal itself. Some wood of the table top was still in very good nick, with a lot of history contained in the nicks, scratches and water and burn marks. Only on plank was beyond use. So an old-with-new restore was decided on.
It is a small table, probably make as a writing table, with 4 daintily turned legs, and a yellow wood table top. The legs usually was made from stinkwood (Celtis Africana), and the sides would have been yellow wood (Afrocarpus Falcatus) too. That was the assumption.
I'll cut to the chase: Some time in it's life, it was repurposed as an ironing table, with some or other method to keep the clothes iron heated. Lo and behold, the heating instrument was 'forgotten' on the table, and it was discovered just time to prevent a fire from taking hold, leaving a nice big chunk of charred table top..
As a table was a scarce and expensive item, so 'a plan was made': As the top was only charred through in one spot, it was flipped upside down, the badly burnt piece cut out and replaced with a rough piece of oregon pine, and more or less nailed it place on top of the table frame.. Clobbered, bodged, cobbled come to mind as the more correct term for the fix..
The table ''top' was then covered with white 'Formica', a water proof and durable, easily cleaned covering.
So now back to the present:
My suspicion of the yellow wood (Afrocarpus Falcatus), was confirmed, as a thin sliver cut from the underside revealed that golden yellow colour and soft texture of yellow wood. The frame was yellow wood too, but the legs I do not know. Could also be yellow wood, but also stained..
I had some yellow wood planks left over from an earlier project of some 20 years ago. A table with stinkwood and yellow wood table was 'remade', with only the 4 legs salvageable due to borer beetle in the yellow wood.
(Apparently, if the yellow wood tree was cut in the 'wrong time' of the year, it was prone to borer beetle infestation.)
Thusly the table landed in my garage. Only upon disassembly, did the true nature of the table top reveal itself. Some wood of the table top was still in very good nick, with a lot of history contained in the nicks, scratches and water and burn marks. Only on plank was beyond use. So an old-with-new restore was decided on.






 )
)