-
Hi all and welcome to TheWoodHaven2 brought into the 21st Century, kicking and screaming! We all have Alasdair to thank for the vast bulk of the heavy lifting to get us here, no more so than me because he's taken away a huge burden of responsibility from my shoulders and brought us to this new shiny home, with all your previous content (hopefully) still intact! Please peruse and feed back. There is still plenty to do, like changing the colour scheme, adding the banner graphic, tweaking the odd setting here and there so I have added a new thread in the 'Technical Issues, Bugs and Feature Requests' forum for you to add any issues you find, any missing settings or just anything you'd like to see added/removed from the feature set that Xenforo offers. We will get to everything over the coming weeks so please be patient, but add anything at all to the thread I mention above and we promise to get to them over the next few days/weeks/months. In the meantime, please enjoy!
You are using an out of date browser. It may not display this or other websites correctly.
You should upgrade or use an alternative browser.
You should upgrade or use an alternative browser.
Building your own kitchen cabinets?
- Thread starter JamesHow
- Start date
Steve Maskery
Old Oak
Hi James,
Yes and no.
I have made kitchen cabinets before now. And I have fitted a couple, too. I need a new kitchen now and I have every intention of getting someone else to do it all.
Making a kitchen is A LOT OF WORK. It also takes up A LOT OF SPACE.
OK, it's not actually difficult, it's just a load of boxes, after all. But it is a long and laborious project.
Biscuits and screws, good.
Good luck with your project.
Steve
I was thinking of putting up a lean too.. gates either end as a workspace.
Take old kitchen out put back to back for wider workbench sheet if osb ontop. Build cabinets and put in space of old one.
Would you use full height cabinets or put it on 4x2 possibly treated in case if flood / water damage?
Take old kitchen out put back to back for wider workbench sheet if osb ontop. Build cabinets and put in space of old one.
Would you use full height cabinets or put it on 4x2 possibly treated in case if flood / water damage?
duke
Old Oak
If you are worried about water damage then using a 2x4 riser is a good idea.
duke
Old Oak
Or build your base cabinet and attach adjustable feet screwed to the underside . BLUM supplies them and they come with clips to screw to your kick plate which locks onto the feet.
Last edited:
duke
Old Oak
meccarroll has a good WIP for a kitchen he built, check it out!
Mike G
Petrified Pine
I made my own kitchen. I used pine (redwood) and ply for the carcases, and for the doors. I made joints, rather than using biscuits or pocket screws. I remember well that I had a functioning kitchen within a week, albeit without doors, and with temporary worktops.
The big advantage of making it yourself is that you can avoid chipboard, and that you can make non-standard sized units. I'm sure if you want to wade though my long renovation thread you'll be able to see how it happened. Start here, if you want to see how I did mine.
The big advantage of making it yourself is that you can avoid chipboard, and that you can make non-standard sized units. I'm sure if you want to wade though my long renovation thread you'll be able to see how it happened. Start here, if you want to see how I did mine.
meccarroll has a good WIP for a kitchen he built, check it out!
Daughters Kitchen final stages Handles and floor now done.
Hi all I have started drawing the basic layout of my daughters proposed kitchen using TurboCad Delux. The drawings are not the clearest to read but I need the dimensions for when I upload them the the Blum cabinet configurator. Please take a look and if you feel there is anything worth...
Thanks just had a read.
Nice job but I would like to make something more wooden?
So face frames and butt hinged. The existing kitchen is in three sections so I could make one at a time?
Oh I need a cuppa for this!!I made my own kitchen. I used pine (redwood) and ply for the carcases, and for the doors. I made joints, rather than using biscuits or pocket screws. I remember well that I had a functioning kitchen within a week, albeit without doors, and with temporary worktops.
The big advantage of making it yourself is that you can avoid chipboard, and that you can make non-standard sized units. I'm sure if you want to wade though my long renovation thread you'll be able to see how it happened. Start here, if you want to see how I did mine.
James, making kitchens is not complicated.
Ive been making them on and off for 40 years.
Basically I make a box without a front out of 18/19mm MFC or marine ply, screw it together with the modern spax type board screw.
Set the box on adjustable feet.
I now use dominos for fitting the face frame to the box, simply because this way I can spray finish the face frame and fit at my convenience.
Biscuits also work, I found they needed lots of cramping, a domino can be secured with a screw through the side of the cabinet.
Some designs like to take the face frame to the floor, this naturally make handling them and fitting a little more difficult.
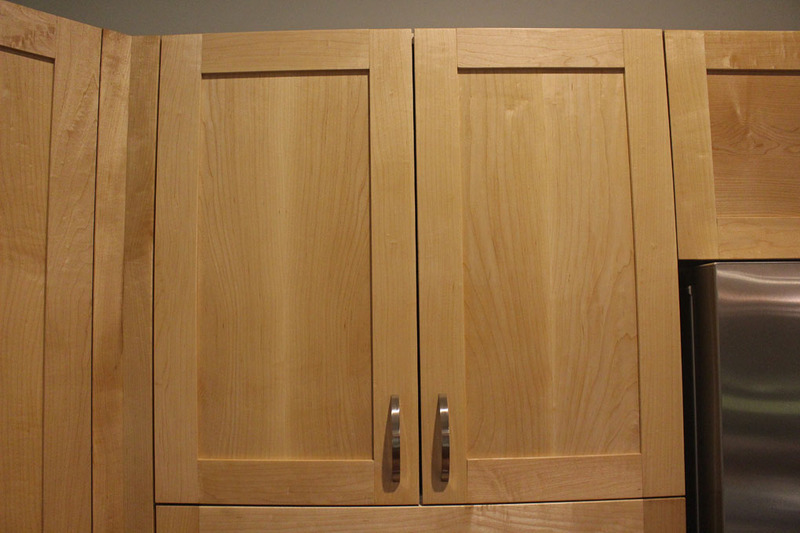
The face frame is what gives the kitchen its personality, it can be super plain or super fancy, whatever the end design looks like its just a simple box with a frame attached. I will try and attach images of a fancy face frame that is fitted to a simple box.
If a painted finish is required I generally use popular for the face frame and MR MDF for the doors. If you are looking for the solid wood look make sure your timber is dry and that the kitchen has a stable temperature, as any fluctuation in temperature will show up in the gaps between door and face frame.
Good luck and enjoy the ride
Ive been making them on and off for 40 years.
Basically I make a box without a front out of 18/19mm MFC or marine ply, screw it together with the modern spax type board screw.
Set the box on adjustable feet.
I now use dominos for fitting the face frame to the box, simply because this way I can spray finish the face frame and fit at my convenience.
Biscuits also work, I found they needed lots of cramping, a domino can be secured with a screw through the side of the cabinet.
Some designs like to take the face frame to the floor, this naturally make handling them and fitting a little more difficult.
The face frame is what gives the kitchen its personality, it can be super plain or super fancy, whatever the end design looks like its just a simple box with a frame attached. I will try and attach images of a fancy face frame that is fitted to a simple box.
If a painted finish is required I generally use popular for the face frame and MR MDF for the doors. If you are looking for the solid wood look make sure your timber is dry and that the kitchen has a stable temperature, as any fluctuation in temperature will show up in the gaps between door and face frame.
Good luck and enjoy the ride
Attachments


AJB Temple
Sequoia
- Joined
- Apr 15, 2019
- Messages
- 7,560
- Reaction score
- 1,068
Yes. It's a lot of work. In my case I find cupboards much less useful than drawers, so mine, which is a heavy use kitchen, is full of large drawers on Blum sliders. Mike is a fast worker and works hard. I am slower and lazier so it took me more than a couple of months. Just doing the finishes took a month (all cabinets inside and out, panelled walls, new ceiling, quite a lot of tiling etc. I had the advantage of building from scratch in a new room, so the old kitchen stayed functional in a different room. Handling full sheet good without damage meant my wife had to help shifting stuff around as 18mm and 24mm baltic birch ply sheets are awkward.
Used Dominos a lot and a great deal of oak (prepped from rough sawn) and had to buy extra clamps. Blum gear is great but invest in the fitting templates and a laser. Plus a mini drill/screwdriver for awkward places (eg fitting runners deep inside cabinets).
Used Dominos a lot and a great deal of oak (prepped from rough sawn) and had to buy extra clamps. Blum gear is great but invest in the fitting templates and a laser. Plus a mini drill/screwdriver for awkward places (eg fitting runners deep inside cabinets).
Never made a kitchen but I would never go back to a kitchen without detachable kick plates set back from the cupboard fronts. Our current kitchen has metal kick plates, with a rubber seal to the floor, that clip to the cupboard legs. Easy to clean and on a tiled floor that gets mopped often there is no problem with them getting wet.
Steve Maskery
Old Oak
I've got a little list of things I think you might want to consider.
1. Where are you going to store your sheets before you cut them up and what are you going to store them on? They really need to be kept flat. And where are you going to put your assembled units before fitting? They will take up a lot of space.
2. Where are you going to cut them up? Remember that you will need to get access all round.
3. How are you going to cut them up? I have a mini-series on YT which you might find helpful. There is a Knock-Down cutting table, a setting guage for a tracksaw and a length stop for use on a MFT.
Start here: https://www.youtube.com/playlist?list=PLAnhBH_gHta2dQ5sN6srVVoewgos0TdPl
If you don't have a MFT then you can set your track square with a Square of Thales, but you will find a MFT is a fantastic investment.
4. What saw are you going to use? Assuming you don't have access to a dirty great big panel saw, a tracksaw with a splinter-free blade is a good investment. I have the Fessy TS55. It's very good but I still get a bit of chip-out on melamine. They have a later model with a scoring blade, which I imagine will give perfect results. Yes, it's expensive, but you could always sell it on afterwards if you didn't have any further use for it. You would probably get almost all your money back.
5. How are you going to assemble them? You've already mentioned biscuits and screws. Or Dominoes. Both good options. If you built the Knock-Down table, you can use it as an assembly table. It will save your back. Have you got enough clamps? (Rhetorical question...)
I'm sure that others with more experience than I have will be able to add to the list.
S
Last edited:
I will store sheet timber and 1" timber in the dinning room probably where the moisture/ temp is same as the kitchen.
I'll built it in a carport I plan on building.
Take the 8x6' shed down
Use the two sides side by side with a 4" post each end and in between. With a 6" joist over the top.
Lean to steel roof to over purlins. Door and wall each end.
I can do the kitchen in three sections as it's a gallery kitchen with a bay window...
Additional tools required....
Track saw and planer thicknesser could borrow my son's baby one but I would like a 260 machine.
derekcohen
New Shoots
Has anyone built there own kitchen cabinets and how was it?
Thinking 18mm carcasses face frames and shaker style doors and flat drawers.
I was thinking biscuit joints and confirmat screws?
I built this kitchen out of Maple about 10 years ago ...
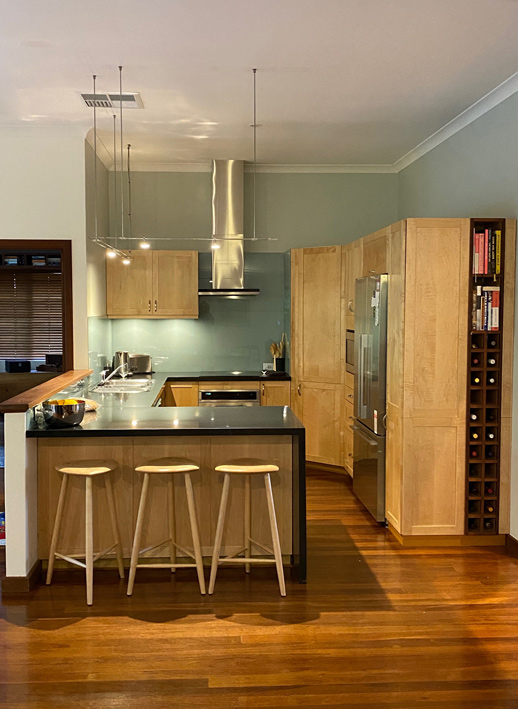
Frame-and-Panel (solid wood throughout) ...
The backsplash is green-tined glass ..

Mortise-and-tenon joinery using a Domino (purchased for this occasion).
Regards from Perth
Derek
I built this kitchen out of Maple about 10 years ago ...
Frame-and-Panel (solid wood throughout) ...
The backsplash is green-tined glass ..
Mortise-and-tenon joinery using a Domino (purchased for this occasion).
Regards from Perth
Derek
How did you make the cabinets?
Mike G cabinets look nice but I think a bit too much work for me..I'm thinking 18mm ply for strength...
12mm ply drawers.
Is 18mm a bit thin for doors if so 20-22mm might be better. I can get some par at that size easily enough. 5-6" width / shallow drawers 12" deep drawers.
Do drawers look funny in face frame kitchens?
AJB Temple
Sequoia
- Joined
- Apr 15, 2019
- Messages
- 7,560
- Reaction score
- 1,068
It's perhaps worth pointing out (as Steve has also mentioned) that tracksaws are not created equal. Even high quality B/BB ply will chip badly on one side or both if you don't score it first and use a high quality blade. I use a Mafell tracksaw which scores perfectly at the push of a button and very quickly and this makes a massive difference to cabinet quality. Having good accurate depth setting control helps a lot with chip out and some saws are easier to adjust than others.
You will need at least two tracks as one is not long enough for an 8 foot sheet, and if you are doing a lot you will find that three tracks plus a short one makes life a lot easier, as you don't have to keep disassembling the long track to cut the four foot side. Short tracks are really handy for doing small cross cuts when making drawers, shelves etc.
I know some people work on the floor with a sheet of foam beneath the ply, but it is much easier to do accurate work on sheet goods if you set up a work bench the same size as full size sheets on three trestles (no centre dip) with sacrificial boards on top for the tracksaw. Tracksaws must have at least basic dust extraction if you want to get a decent cut. A good one will produce almost no dust at all when cutting.
The Blum templates are expensive, but if you are using their runners the template is pretty much essential if you want to get professional alignment.
AJB Temple
Sequoia
- Joined
- Apr 15, 2019
- Messages
- 7,560
- Reaction score
- 1,068
James - Derek Cohen is an excellent cabinetmaker who has very high skill levels and a lot of experience. I'm not sure how experienced and well equipped you are, but if this is your first venture into using expensive sheet goods (BB ply is far from cheap now) then I would plan it very carefully with accurate drawings and very careful use of the sheets to get the most out of them. Dominos in 12mm ply work fine, but you need to be super careful with layout accuracy and marking of face edge as it is very easy to get confused. Not really a fan of confirmat screws to be honest. They suggest a chipboard cabinet and so I prefer Dominos and TB 2 or 3 (or similar glue such as D4). I would not be wanting to rely on biscuits in ply, but I have a Domino and so I guess we use what we have. Domino helps a lot with getting everything nicely lined up for clamping, with a bit of leeway during assembly if you take account of the tool features.
Despite having a bit of experience I found it quite a challenge to make, assemble and glue large drawers perfectly square without quite a lot of clamps including buying corner clamps. You do not want to be doing this outside unless it is pretty dry and warm as glue setting may be compromised.
If you are making a number of drawers, you will want to cut slots to fit the (probably) thinner bottoms. This can be a bit of a challenge in ply as well as routers can make a real mess of plywood. Do you have a router table and router? Buy top quality bits for the drawer base slots - Wealdon are a great deal better than Trend.
Last edited:
I'm one of the 'sheet of insulation on the floor' brigade and find it works very well for me, mainly because I don't like humping bloody heavy sheets of plywood or chipboard up into the air.
All good advice im away off all this tbh until I actually have possession of the house but it's only me living there and the kitchen is the one room that needs replacing. Problem is replacing it will probably cost £5k cheaply or £10k lower mid level.... 16 x 8 double sided galley kitchen.
AJB Temple
Sequoia
- Joined
- Apr 15, 2019
- Messages
- 7,560
- Reaction score
- 1,068
Live there for a bit first. You may well change your mind a couple of times on room layout, knock throughs and kitchen plan. I certainly did.
If it's just you.....the lounge or dining room might make an ideal workshop for the duration of the kitchen build.
If it's just you.....the lounge or dining room might make an ideal workshop for the duration of the kitchen build.
Lots of good advice you've been given so far. I've never built one but I might have a utility or boot room build in the future. If it were me I wouldn't buy sheet goods and deal with them myself I'd go to cutwrights and get them to do all the cutting for me. I'd still be able to get completely bespoke sizes etc and I'd put them together myself. However manhandling sheets (remember some sheets only come in jumbo sizes depanding what you choose), worrying about splinters etc is dealt with for you. And I think they are 0.1 mm accurate from memory so no issues with repeatable cutting. I have used them for fitted wardrobe carcasses so have first hand experience and highly recommend them. Well worth the money. If you're no where near cutwrights I presume there are other companies all over the country doing the same thing.
Mark
Mark
Mike G
Petrified Pine
Well, if it's any help, the materials for my kitchen cost around £400. The worktop was about £2400. ..........and my kitchen is a great deal bigger than yours.All good advice im away off all this tbh until I actually have possession of the house but it's only me living there and the kitchen is the one room that needs replacing. Problem is replacing it will probably cost £5k cheaply or £10k lower mid level.... 16 x 8 double sided galley kitchen.
I'm an architect. I often get approached by people as they are about to move into a new house........and I tell them pretty much what Adrian (AJBT) has just said: unless it is falling down, live there for at least one heating season before you start talking about changing things. Almost everyone always has a very different idea of what needs doing after living in it for 6 months.
Scott Brown built a kitchen last year
which you'll probably find an interesting watch. He just screwed cabinets together, and inspiredby that, I did the same when I built ours last year. Easy, and plenty strong enough.
I used 18 mm birch ply, but that was abit of an indulgence tbh, MRMDF would be just as good I think.
Agree with all the others that you'll want a tracksaw; get one with a decent blade. I have the Mafell which cuts beautifully, and although its top price gear, as others have said you could always buy and resell without suffering too much depreciation. I don't have an MFT top, I found a rail square worked well enough.
I got the ply cut down to car sized bits at the timber merchants (full sheets of 18mm birch ply are very very heavy!) and so did all the final cutting on my usual bench. You'll see lots of different variations of sacrificial surfaces for cutting on, but inspired by https://www.youtube.com/@CAVjoinery I just use a couple of thicknesses of corrugated cardboard (you only want the blade extending a couple of mm below the sheet you're cutting, so you dont need anything very thick).
Raymedullary
Sapling
- Joined
- Jan 20, 2020
- Messages
- 307
- Reaction score
- 70
I have part made my own, I did compromise by buying the carcasses. I then made frames biscuit jointed that were planted on the front with a cock bead around apertures. I would do it again, I don't see anything particularly wrong with using chipboard carcasses so long as they are put in well enough and dry. Just depends on time and what else is going on. You do have to stick to standard sizes though.
These photos are a bit old now and the kitchen has been changed due to an extension build but give you an idea. The frames are screwed onto the front of the carcass and the holes plugged.
The small door on the right is actually a bin made with the door fixed into the frame, it all slides out in one so the hinges don't operate.
Last edited:
MattS
Nordic Pine
I'm in the process of doing our kitchen, not shared any photos as I don't think it will interest people. I have used a combination of bought and home made units. The ones I made have been to fit awkward spaces as well as framing around built in appliances. Biggest issue is dealing with the materials! My workshop / garage would become unusable with sheets in there and so last week we had 3 sheets of oak faced ply on the living room floor until I could cut down into rough pieces and stack in the workshop.
I found cabinet carcases pretty straightforward and quick to make and using a quick drying water based varnish I made them as I went along. But could see how you could make your own kits in advance and glue and screw together as if you'd bought them. Mine were made using track saw, table saw and domino out of birch plywood. One thing I've done which has worked well for me is broken the project into phases, leaving existing lino down I've nearly finished first "side" which had sink, dishwasher and washing machine before moving to other side with oven. Kept disruption down.
I found cabinet carcases pretty straightforward and quick to make and using a quick drying water based varnish I made them as I went along. But could see how you could make your own kits in advance and glue and screw together as if you'd bought them. Mine were made using track saw, table saw and domino out of birch plywood. One thing I've done which has worked well for me is broken the project into phases, leaving existing lino down I've nearly finished first "side" which had sink, dishwasher and washing machine before moving to other side with oven. Kept disruption down.
That's the style I want just out of ply rather than chipboard.I have part made my own, I did compromise by buying the carcasses. I then made frames biscuit jointed that were planted on the front with a cock bead around apertures. I would do it again, I don't see anything particularly wrong with using chipboard carcasses so long as they are put in well enough and dry. Just depends on time and what else is going on. You do have to stick to standard sizes though.
These photos are a bit old now and the kitchen has been changed due to an extension build but give you an idea. The frames are screwed onto the front of the carcass and the holes plugged.
The small door on the right is actually a bin made with the door fixed into the frame, it all slides out in one so the hinges don't operate.
View attachment 32326View attachment 32327
It is a little while since I have made many cabinets, but a few points about how I have gone about it. I really need to get round to a long overdue kitchen.
- I get all the panels cut to size with a panel cutting service - I am not sure it adds much cost and it saves a huge amount of effort. You send a spreadsheet with all the details and you get back everything accurately cut to size with scoring saw so no chips, edge banded if you choose, every panel has a sticker identifying it. The cutting is optimised for you and you get all the offcuts. Storage of the cut panels is obviously much easier than full sheets.
- I join my face frames with dominoes and pocket hole screws which avoids clamping. I always plan for a single face frame along each run (I really dislike separate face frames butted up together. I fix them to the carcase edges with a loose spline of 6mm birch ply with the slot cut with a variable width slot router cutter - the position of the face frame relative to the carcase edge obviously varying depending on where it is in the run. I make my face frames 40mm wide (usually poplar, but I may use Accoya in future as I plan to use that for door frames - for stability - not an issue with the face frames that are held fixed tight, but it would be easiest to use one timber).
- where tall cabinets abut worktop height cabinets, that is done as two separate face frames with the tall cabinet face frame projecting which picks up the overhang of the worktop.
- I prefer to make drawer boxes out of oak (dovetailed on the Woodrat). Or 12mm birch ply for utility spaces, comb jointed on the table saw.
Just a few points re my own preferences.
Cheers
Lurker
Old Oak
I have built three kitchens over a period of 30 years.
All using common or garden stuff from Magnet ( years ago when it was quite decent) , IKEA, and most recently Howdens (via a trade account) . All these are likely to outlast me.
I don’t understand the dislike for melamine covered chipboard. Being a box it’s perfectly strong enough, no painting required and easily wipe clean.
Design in deep drawers as they are far more ergonomic than cupboards. Particularly if you are hoping that the kitchen will still be available when you reach your dotage!
Phil
Old Oak
Chipboard and MDF - just keep far away from water.
(I did contract work for a company that made the board)
(I did contract work for a company that made the board)
Lurker
Old Oak
Obviously!Chipboard and MDF - just keep far away from water.
(I did contract work for a company that made the board)
But, in the event of a leak, other stuff isn’t going to fare much better, certainly not ply.
If the units are fitted together with a bit of thought, it’s fairly easy to remove a carcass and replace.
I've built half a dozen kitchens myself so am apt at building them from flat pack.I have built three kitchens over a period of 30 years.
All using common or garden stuff from Magnet ( years ago when it was quite decent) , IKEA, and most recently Howdens (via a trade account) . All these are likely to outlast me.
I don’t understand the dislike for melamine covered chipboard. Being a box it’s perfectly strong enough, no painting required and easily wipe clean.
Design in deep drawers as they are far more ergonomic than cupboards. Particularly if you are hoping that the kitchen will still be available when you reach your dotage!
It's just the appeal of building from scratch appeals to me..
I could build it in a couple of weekends done...
Or I could build it over a year from ply and solid wood and come back to it each day and say to myself I built this....
I'm time rich, money poor too....
AJB Temple
Sequoia
- Joined
- Apr 15, 2019
- Messages
- 7,560
- Reaction score
- 1,068
The "I made that" is a powerful motivator. Our kitchen is used as a restaurant now, seating at least 14. It was made with that in mind and people are always amazed that it is home made.
What is worth doing I found, is collecting appliances well ahead of time, by looking deals on-line when kitchen showrooms change their displays. I have a mix of commercial (Rationale) and top end domestic Miele and Gaggenau none of which I paid anything like retail price for. Same applies to my wine fridges and chiller - collected a year before the build was finished.
What is worth doing I found, is collecting appliances well ahead of time, by looking deals on-line when kitchen showrooms change their displays. I have a mix of commercial (Rationale) and top end domestic Miele and Gaggenau none of which I paid anything like retail price for. Same applies to my wine fridges and chiller - collected a year before the build was finished.
MattS
Nordic Pine
My biggest dislike of laminated chipboard is once edges are damaged on cupboards it looks awful and is then susceptible to water ingress. This isn't the case with plywood or solid wood. It might mark but doesn't look so bad or impact performance. I've also noticed, as with everything even laminated chipboard isn't what it was. I've removed a kitchen which I guess is 15 years old and is knackered! I'm installing part homemade and part vintage kitchen the cupboards are laminated chipboard but so much thicker and better quality than the modern stuff!
Not all chipboard is created equally. That used on high end kitchens ( yes it is used on high end bespoke kitchens) ain’t the same stuff used by wickes for example.
Cutwrights that I suggested above will also edge band it professionally and have a variety of edge thicknesses and material to choose from
However if it’s a face frame surely hardly any edges will be exposed as the frame will cover them and I’d edge any shelves etc in 20mm hardwood lipping
Good look wTeverwY you feel you want to go
Mark
Raymedullary
Sapling
- Joined
- Jan 20, 2020
- Messages
- 307
- Reaction score
- 70
I would probably choose laminated chipboard for a kitchen carcase over the pathetic offerings of plywood from all but the best suppliers.
I really do not see why you wouldn't use it especially if you know what is what with it.
I really do not see why you wouldn't use it especially if you know what is what with it.
RogerM
Nordic Pine
How's the kitchen build going James? I only just picked this one up after a long lay-off doing other things. I made this kitchen about 11 years ago using MFC and dominoes, plus face frames attached with dominoes. https://www.thewoodhaven2.co.uk/threads/kitchen-extension-mega-build-photo-heavy.581/ You might find something useful in there. It's holding up well, and my only regret is that where I used painted doors I also used painted faceframes. With the benefit of hindsight I wish I had used oak faceframes thoughout which I think not only looks better, but makes repainting the doors which will soon need doing, a doddle.
I haven't yet..
I'd gone off the idea...
Then my car died so that needs replacing first....
But that wipes out the kitchen fund, so maybeaking one is back on the cards. Also my workshop roof isn't on so I cain't get a floor down either.
Then I reclaim my tools and let work begin!
Wil read you wip!
I'd gone off the idea...
Then my car died so that needs replacing first....
But that wipes out the kitchen fund, so maybeaking one is back on the cards. Also my workshop roof isn't on so I cain't get a floor down either.
Then I reclaim my tools and let work begin!
Wil read you wip!
Steve Maskery
Old Oak
Apart from that everything is hunky-dory, eh?Then my car died so that needs replacing first....
But that wipes out the kitchen fund, so maybe making one is back on the cards. Also my workshop roof isn't on so I cain't get a floor down either.
Then I reclaim my tools and let work begin!

S