

Dr.Al
Old Oak
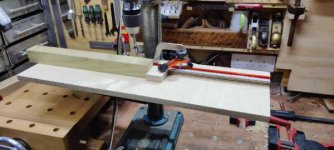
I've got a project coming up that's going to involve lots of holes drilled at even spacing in a straight line. To make this quick, easy and accurate, this evening I made a chain drilling jig, based on an idea I saw in a Stumpy Nubs video for a table saw jig (but using civilised metric threads rather than imperial nonsense).
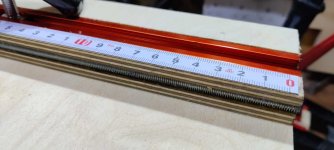
This photo shows a close-up of the fence, which has a length of M6 (1 mm pitch) threaded rod epoxied in, very slightly sub-flush:
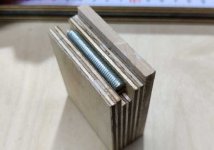
The stop block has another piece of threaded rod (actually a set screw with the hex head cut off as I didn't have any more threaded rod) glued in, but protruding slightly (with some wedges underneath to help me set the amount of protrusion just right when I epoxied it in place) so that it engages with the threaded rod in the fence and hence can only be positioned at increments of exactly 1 mm.
It (and the maple stuck on top to overlap the scale on the fence) are exactly 50 mm wide (planed to size on a shooting board) so that both sides line up with the marks on the ruler.
The T-track is unnecessary to be honest, I fitted it so I could clamp the stop and the work piece in place, but the positive engagement of the two threads means that the stop doesn't try to move and it's easy to hold the work piece up against the fence and the stop.
First test:
This photo shows a close-up of the fence, which has a length of M6 (1 mm pitch) threaded rod epoxied in, very slightly sub-flush:
The stop block has another piece of threaded rod (actually a set screw with the hex head cut off as I didn't have any more threaded rod) glued in, but protruding slightly (with some wedges underneath to help me set the amount of protrusion just right when I epoxied it in place) so that it engages with the threaded rod in the fence and hence can only be positioned at increments of exactly 1 mm.
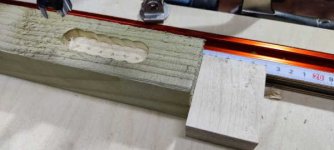
It (and the maple stuck on top to overlap the scale on the fence) are exactly 50 mm wide (planed to size on a shooting board) so that both sides line up with the marks on the ruler.
The T-track is unnecessary to be honest, I fitted it so I could clamp the stop and the work piece in place, but the positive engagement of the two threads means that the stop doesn't try to move and it's easy to hold the work piece up against the fence and the stop.
First test:


