• Hi all and welcome to TheWoodHaven2 brought into the 21st Century, kicking and screaming! We all have Alasdair to thank for the vast bulk of the heavy lifting to get us here, no more so than me because he's taken away a huge burden of responsibility from my shoulders and brought us to this new shiny home, with all your previous content (hopefully) still intact! Please peruse and feed back. There is still plenty to do, like changing the colour scheme, adding the banner graphic, tweaking the odd setting here and there so I have added a new thread in the 'Technical Issues, Bugs and Feature Requests' forum for you to add any issues you find, any missing settings or just anything you'd like to see added/removed from the feature set that Xenforo offers. We will get to everything over the coming weeks so please be patient, but add anything at all to the thread I mention above and we promise to get to them over the next few days/weeks/months. In the meantime, please enjoy!

Diminished stile door in cherry (glazing & polishing)

David_A14

Seedling
Joined
Jan 7, 2021
Messages
22
Reaction score
4
Location
Sheffield UK
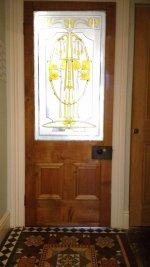
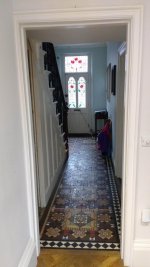
I need to make a door for this doorway.
Doorway.jpg

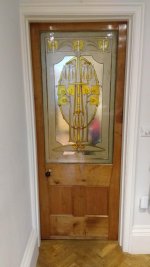
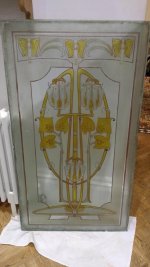
It's the doorway from the hall to the kitchen, and links the original (1867) part of the house to a more recent (2015) addition. We've lived without a door here for the last 5 freezing winters and the project has finally risen to the top of my to-do list. It's also an opportunity to use a piece of handpainted glass that we've been lugging round various homes for the last 17 years that was a purchase from a Glasgow salvage yard:
Glass panel.jpg

I've made a couple of doors before, including the front door that you can just about make out in the 1st photo, but all have been painted softwood. I fancy seeing if my (rudimentary) skills are up to something more high-brow and I also wanted to have a go at French polishing for the finish - so no pressure there then !

A few apologies first: I have only limited facilities (a 10' x 12' cellar room) with no space for machinery, so everything is made with handtools and I only have a workmate for holding stuff. My last 'formal' training in woodwork was in 1985, although I do have a couple of excellent books, in particular Cassel's Carpentry and Joinery, which is brilliant. Finally, my rate of production is best described as glacial as I've got quite a busy job as an NHS Consultant, so I'm showing this as a WIP only because I've finished.

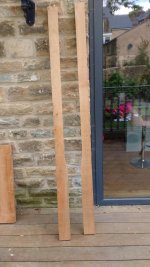
Anyway, the timber was supplied by a local company from a cutting list as PAR stock and a full-size rod prepared from a piece of MFC from the local DIY-shed. Therein lay the 1st error, which we'll return to later. Once this thread has been approved by the Moderators I'll get on with the framing.

Cheers,

David
 
Welcome, David. What a great start to your time on the forum, and what a fabulous project. That piece of glass looks very Arts and Crafts.....1920s, perhaps, and I can't wait to see the door you've made for it. You're a brave chap taking on a large-sized project on just a Workmate. I started on a Workmate 40-odd years ago, and I can't tell you how much better your woodworking life will be when you get yourself a bench! Will that be your next project? It's an esier task than making a door with handtools on a Workmate, I promise!
 
There's never any appreciation for old glass like that anymore, good on you for incorporating it! I'm looking forward to the build, you rarely see diminished/gunstock stiles being made anymore, especially by hand.

If you ever want any more reference material I can have a look through my library and take some photos for you if you wish, in particular, "Joinery and Carpentry Volume 2" by Richard Greenhalgh is a great book that covers windows and doors very consisely.
 
Looking forward to this.

Mind you, two workmates can convert to a bench with an old door across them.
 
I need a "words of one syllable" explanation of a diminished gunstock door please :shock:
 
sunnybob":dtk7tjtb said:
I need a "words of one syllable" explanation of a diminished gunstock door please :shock:

The vertical outside-edge pieces of a door.....the stiles.....are, say, 5" wide at the bottom, but at the point where a horizontal rail below the glazing joins it, it narrows to, say, 4", and stays that narrow up to the top. It could be 4" and 3", or whatever you want it to be, depending on the size of the door.
 
well there were a couple of three syllable words Mike, but I do now understand, thanks.
I must say, having looked up some pictures, it doesnt sit well with me, I must be more OCD than I thought I was :lol:
I do love half glazed doors though, and that victorian tiled hall floor is beautiful. I would love to have a house built like that.
 
Welcome! Great to see a project on this scale being done the old ways. You're not the only one using hand tools only in a basement, but your door sounds interestingly ambitious.
 
Yes welcome, that is an ambitious project! I am just a little concerned that the door frame rebate appears to show that the door opens into the new section of the house, won’t that skirting board be in the way? Ian
 
Thanks for everyone's interest. A quick response to the questions you've asked before I post the next steps.

MikeG: 1920s I think for the glass, looks a bit Art Nouveau to me
Trevanion: I have the Greenhalgh series as well as Ellis's Modern Practical Joinery (impenetrable) but prefer Cassel as he shows you step-by-step images of the execution as well as being more readable.
sunnybob: as Mike says, in this case the stiles below the lock rail are 4" and are 3" above. You'll see what I mean when I update the thread tonight.
cabinetman: you are correct about the skirting Ian, which mean't I had to put the door on the other side of the frame rebate. This showed up another error, which I'll get to later.

The tiling in the hallway is 'old-new' - new to us but old (reclaimed). Its my design but done by a couple of tilers from Barnsley, who I think you'll agree did a fantastic job. I'm equally proud of the staircase, which looked nothing like it does now when we first moved in.

David
 
David, not taking anything away from your work at all, I wouldnt attempt any kind of door and I have a garage full of machines. :shock:
It just seems wrong to my eyes to have unequal angles on the door panel. I grew up in South London through the 60's and there were whole streets of houses with that kind of tiled flooring and coloured glass and I loved going in them (my home was a very low quality worker terrace that didnt have a tile in sight, just wonky floorboards 8-) )
I suspect I saw many diminished doors back then but knew nothing about them at the time.
 
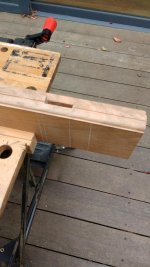
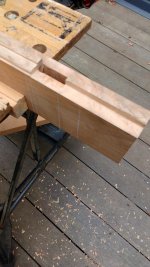
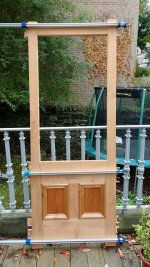
The joinery here is standard mortise and tennon, and I'm sure that you don't need a blow-by-blow account of how to do that, but there is a small wrinkle to the top rail that I've shown, so on with the show:

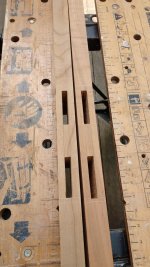
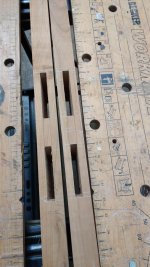
Mortices chopped
Motices.jpg

with room for wedges on the outside edge
Motice wedging.jpg

The mortices for the muntin were stubbed into the bottom and lock rails.

Tenon cheeks sawn down leaving the shoulders knifed but not cut off at this stage
Tenons.jpg

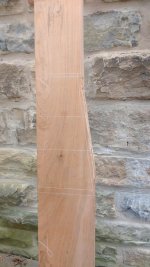
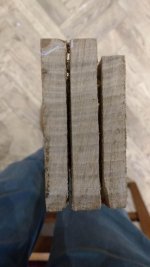
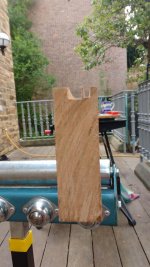
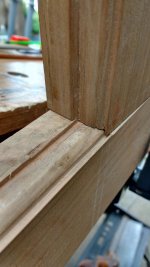
Stiles diminished, the diminish is only 1" above the lock rail, so it doesn't show well on the wide-angle shot, but the close-up is better. The stile shoulders were left deliberately long as the books advise cutting the tennon shoulders on the lock rail to the correct size and then adjusting the stile shoulders to fit the lock rail. This was of mixed success in my hands, and involved endless fiddling that became a real PITA in the end.
Diminish-whole.jpgDiminish-close up.jpg

Diminish cleaned-up and rebated for the glass
Rebate2.jpg

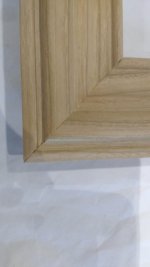
The framing below the lock rail was grooved for the panels with a plough, but I also added a second narrower shallower groove next to it. I'll leave you to guess why, although there's a clue in my 1st post
Groove2.jpg

Stiles above lock rail, top rail and top edge of lock rail moulded with a 1/2" sash ovolo just like AndyT (Marples if you're interested Andy and made within a mile or so of the house, see the YouTube movies from the Ken Hawley Trust). Because the rebate in the stiles stopped at the top of the lock rail, along with the sash mould, these couldn't be run through with planes so had to be finished for the last few inches by hand, with chisels.
Moulding.jpg

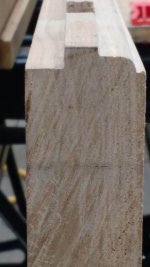
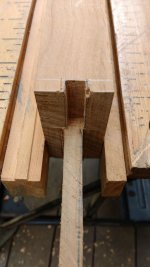
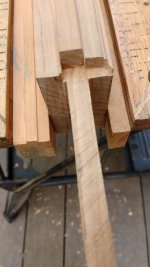
The joint between the top rail and stiles was M&T, but with a minor change that I have seen in old joinery books referred to as 'cogging' or 'franking'. The justification is to stop the top rail from twisting when assembled, although I'm not convinced that a haunched tennon would provide any less resistance to twisting. I'd never done one before, so in for a penny, in for a pound.
Starting point:
Cogging1.jpg

Moulding removed
Cogging2.jpg

End of top rail 'cogged' over bar on stile left when the moulding was removed (does it have a name ?)
Cogging3.jpg

End of top rail scribed over sash mould and bar
Cogging4.jpg

et voila
Cogging5.jpg

The panels were jointed up from 1/2" stock and were cut to 1/8" short of the grooves to accomodate future movement.
Dry fit:
Dry fit.jpg

As you can see, the joint at the nearside lock rail shoulder could be better, but to be honest it was good enough, and as I've learned from the day job, perfect is the enemy of good.
There then ensued an extended period of what I euphemistically refer to as '2nd seasoning', to allow the frame to acclimatize to the environment to door was to stay in. Well that's my story, and I'm sticking to it.

David
 
Excellent stuff, David, and a hell of an achievement without a proper bench.

I notice your white pencil markings. Do you know what you've got and where it came from? I have some particularly dark wood and marking out is a real trial.
 
Lovely job!
Could you say a bit more about the wood, what sizes you bought and how you sawed and planed it to size?
 
Mike G":3v24byt6 said:
I notice your white pencil markings. Do you know what you've got and where it came from? I have some particularly dark wood and marking out is a real trial.

Its the same brand as Malcolm mentioned, Faber-Castell, in my case purloined from a child's colouring box.

David
 
Oh, right. I find them too soft and crumbly to be any use. I know engineers use a white pencil now and then, so I'll keep asking....
 
AndyT":3et7lw3f said:
Lovely job!
Could you say a bit more about the wood, what sizes you bought and how you sawed and planed it to size?

Its English cherry Andy, all 36mm (1 1/2") thick, as that was the depth of the door frame rebate.
Timber is something I cannot convert from sawn boards to dimensioned stock as I don't have the time, machinery or the inclination to do, so I buy it dimensioned to size and planed all round, which means I can only buy what the timber merchant sells as PAR.
In this case the stiles and top rail were 4" wide, the muntin 3" and the lock and bottom rail 10", which seems to fit with sizes I've seen in joinery books from the 19th century.

David
 
I don't think I've ever seen a franked/relished joint on a door before, as a matter of fact, I don't think I've ever actually seen one on a physical piece of joinery first-hand before, only ever haunched work. Very impressive work nonetheless, it's not easy doing all that by hand, let alone with only a workmate as a work surface! :lol:

Mike G":1gxx7fu4 said:
Oh, right. I find them too soft and crumbly to be any use. I know engineers use a white pencil now and then, so I'll keep asking....

Have you tried french chalk sharpened to an edge, Mike?
 
David, I've been reading several old books on this design myself, probably the same ones you consulted. Definitely harder than an ordinary door!

I noticed that you wrote

"There then ensued an extended period of what I euphemistically refer to as '2nd seasoning', to allow the frame to acclimatize to the environment the door was to stay in. Well that's my story, and I'm sticking to it."

But Paul Hasluck says the same in Cassell's Carpentry and Joinery:

"...put the framing temporarily together, and let it stand while the panels are prepared. It might be left for several months with advantage, and, if kept dry, all shrinkage would take place while all the shoulders were free. On wedging up, it would be thoroughly seasoned and would remain a good job throughout its ordinary life as a door."

So your pace of work needs no apology!
 
Mike G":2r0k8tb1 said:
Oh, right. I find them too soft and crumbly to be any use. I know engineers use a white pencil now and then, so I'll keep asking....

Have you considered white lead for a propelling pencil, I've not used them but you can get them in white. I thought you could get them for the standard fairly thin leaded ones but in searching it appears maybe only the bigger type that take around a 3mm lead. I imagine the thicker ones would be softer so maybe no good?

https://www.cultpens.com/i/q/WR12162/wo ... rty-pencil

https://www.cultpens.com/i/q/WR12141/wo ... ead-refill

There are other brands but ones like this
 
Thanks Matt. One of the Youtbers I follow has a propelling pencil with a white lead, so I've had a quick but fruitless search for similar. I'm not sure a 3mm lead is going to be much use to me.
 
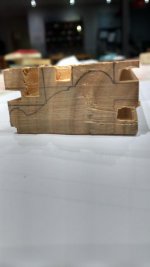
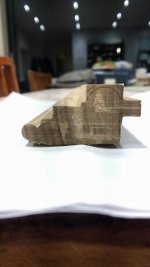
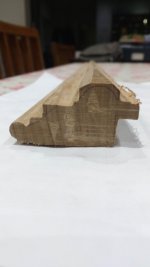
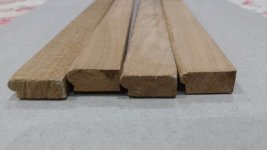
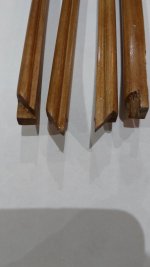
I wanted to use a bolection moulding for the face side, which entailed making up a sticking board from 12mm ply to enable lengths to be made up using my weedy workmate. I didn't want any visible fixings so decided to slot screw the bolection through the panels, the screw heads would be hidden with a panel mould on the other side. The method that I used to make the mouldings followed Ellis's description in "Modern Parctical Joinery" and started out with 1 x 2" stock with the moulding profile drawn on the stock ends and a series of parallel lines marked on the face side and face edge that were used to mark the position of grooves, which were run in with a plough plane and 1/8" iron:
Bolection 1.jpg

The waste between the grooves was chopped out and a series of rebates formed:
Bolection 2.jpg

The individual elements of the moulding were then formed with hollows, rounds and rebate planes.
Staff bead worked on edge:
Bolection 3.jpg

Corners knocked off the astragal:
Bolection 4.jpg

Fillet and astragal completed. With hindsight the fillet was too small, it is 1/16th but would have been better at 3/32":
Bolection extra.jpg

Ogee worked:
Bolection 6.jpg

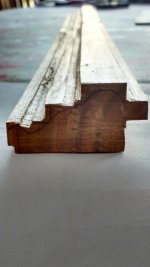
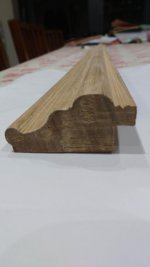
Bolection moulding completed with a slipped ogee, to enable it to be worked right up to the astragal:
Bolection 7.jpg

Rinse, repeat etc. This image is the completed mouldings 'off the planes' and further fettling with scrapers, fine grit paper etc. was needed:
Bolection group.jpg

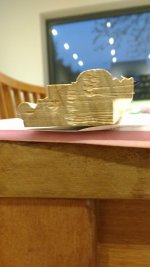
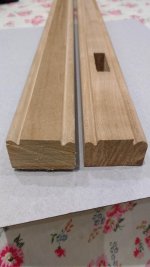
Panel moulds were made for the back side the same way. These were formed with a tongue that enabled them to be glued into the 2nd groove in the framework and therefore cover the screwheads used to hold the bolection mouldings:
Panel mould.jpg

To make the glue-up easier I decided to frame-up the bolection mouldings. The mitres were sawn and shot to length with a mitre shoot. Grooves 1/8" wide were sawn into the mitres and the mouldings framed up with cross-feather oak tongues glued into the grooves:
Framed up bolection.jpg

As MikeG has mentioned previously, a good mitre is really hard to make, and even with a mitre shoot I still had my share of troubles. This is the best one, others are worse:
Bolection mitre closeup.jpg

The framework was cleaned up as I didn't want to have to try and plane around the bolection mouldings after fitting. Because of that I decided to stain and polish the panels and mouldings before the glue-up. I've never done French polishing before but have a copy of Charles Heyward's book " Staining and Polishing". Once I managed to decode the 1940's vernacular it proved quite helpful. I used a water-based 'Old Pine' stain to take the orange out of the cherry and then sealed it with a shellac-based sanding sealer. All in all I think I did 7 or 8 coats of polish, with cutting back to 400 grit in between coats and a bit of linseed oil during the bodying-up phase. A dash of rottenstone on the rubber helped bring the mouldings up to a decent finish.

The whole thing was glued up, clamped and wedged:
Glueup.jpg

which caused much swearing and gnashing of teeth. Does anyone else find this the worst bit ?

David
 
David, this is seriously impressive.

Planing mouldings in the way you describe was standard practise, and some of us still do it. However, it's hard enough when the entire length of the work is supported solidly on a bench. I can't imagine how you did it with only a Workmate.

I've never French polished, so my only comment on that is that you are a brave chap trying it out when you had so much to lose if you stuffed it up. But it looks great. It also makes me think I must try cherry. I've never used it in god-knows-how-many years of faffing about with wood.

As for glue ups.....well, they get a little (only a little) easier with experience. I suggest Hide glue to reduce your stress levels. But even now, my wife knows not to come anywhere near the workshop when I'm gluing.

Please, please make your next project a bench. I'm thinking back to my early days, hooking a leg over the Workmate to stabilise it as it wandered around the floor of my first flat. When I got my first bench (it was a reward, believe it or not, for getting my first first class hundred!), my woodworking life was utterly transformed. It's a complete revelation, and your obvious talents will burst forth unfettered once you've got one.
 
Brilliant!
I'm envious of you having the need to do such an enjoyable project. I hope you had fun making it.

On the glue-up, I think it's probably Cassell's that describes a method in detail, where you get the door assembled, but with the tenons pulled back. Still located in the mortises but 2/3 out. You can then apply glue to the backs of the mortises and tenon faces and knock the whole door together. It sounds a good way to avoid trying to get wet, slippery joints together.

And Mike is right about the bench.
 
Mike G":1yhf7q19 said:
David, this is seriously impressive.

Planing mouldings in the way you describe was standard practise, and some of us still do it. However, it's hard enough when the entire length of the work is supported solidly on a bench. I can't imagine how you did it with only a Workmate.

It mean't I had to make them in short lengths of 800mm Mike (length of the sticking board) which was enough for one long edge and one short edge of the panel.

Mike G":1yhf7q19 said:
Please, please make your next project a bench. I'm thinking back to my early days, hooking a leg over the Workmate to stabilise it as it wandered around the floor of my first flat. When I got my first bench (it was a reward, believe it or not, for getting my first first class hundred!), my woodworking life was utterly transformed. It's a complete revelation, and your obvious talents will burst forth unfettered once you've got one.

I've been thinking about a bench based on Schwartz's Anarchist workbench design, but the stair down to my basement workshop is so steep and so narrow that I'd have to build it down there and it would never come out. I've been flirting with an outbuilding as a workshop, as I really want to do a roof with a 'north country' dormer, but as we live in a cat. 4 conservation area it would involve plans, BC etc. and I'm not sure I've got the time.

AndyT":1yhf7q19 said:
Brilliant!
I'm envious of you having the need to do such an enjoyable project. I hope you had fun making it.

On the glue-up, I think it's probably Cassell's that describes a method in detail, where you get the door assembled, but with the tenons pulled back. Still located in the mortises but 2/3 out. You can then apply glue to the backs of the mortises and tenon faces and knock the whole door together. It sounds a good way to avoid trying to get wet, slippery joints together.

I read that too in Cassel Andy, but I think I must have misread it, as I thought he said only to pull the tennons out by a third of their length and give the shoulders a 'lick' of glue. I thought that was too little to hold everything together, but with hindisght would have saved me from wielding the lump hammer and beating block !

We're onto the home stretch now, when all my mistakes will become obvious.

David
 
David_A14":3btgn9d9 said:
I've been thinking about a bench based on Schwartz's Anarchist workbench design, but the stair down to my basement workshop is so steep and so narrow that I'd have to build it down there and it would never come out. I've been flirting with an outbuilding as a workshop, as I really want to do a roof with a 'north country' dormer, but as we live in a cat. 4 conservation area it would involve plans, BC etc. and I'm not sure I've got the time.
It may not be as pleasing as a project in its own right, but a workbench held together with screws and steel brackets can be just as effective in use, and will come apart again if it needs to. Mine has a top and two trestles, each M&Ted and glued together, but they're attached to each other, the stretchers and the diagonal bracing with metal fixings. While it's far from perfect it's a huge improvement over the Workmate, even if I did end up bolting it to the wall to stop it walking around when planing.
 
I find it quite incredible that you can make mouldings like that by hand on a workmate, super work.
It would be relatively easy to make a KD bench for in your basement David, probably screw it to one of the walls to give it less chance of moving, it only needs to be made out of CLS for the frame, you can even use CLS's on edge to form a top and cover it with 18mm ply.
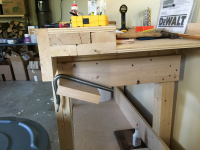
This is one I knocked up (too quickly and not very well to be honest) when I needed one in a hurry last time I was in the US. Ian
C51B0656-07F8-4688-94BF-890805815C91.png
 
In the circumstances I'd probably do a variation on the Moravian knock-down bench, I think, which relies on wedged tusk tenons:

[youtube]9vKPpp5_bbE[/youtube]

Or here, if you can't see the above:

https://www.youtube.com/watch?v=9vKPpp5_bbE

(But I'd fit a proper vice!!).
 
Mike G":q3p6qcif said:
In the circumstances I'd probably do a variation on the Moravian knock-down bench, I think, which relies on wedged tusk tenons:

I do like the look of that Mike, even the leg vice, so that might be an option for me.
Is Moravia a place or a person ?

David
 
I think it originates from Moravia in the Czech Republic.

Lovely work by the way — following along with interest!
 
Nice work! :D

Stuff the mitre joints, always a CUF job (personal opinion) :lol:

I have then moved to half-laps (mirror frames) and bridle joints window frames)
 
I used the waste from diminishing the stiles to form the glass beads
Diminish waste.jpg

which were then sawn off and cleaned up
Glass beads.jpg

At this point I was able to fit the glass to the frame rebate, but discovered that my endless fiddling with the lock rail joint had lost me a couple of millimeteres from the rebate width, which needed a bit of planing to get the glass in. This lead to a 2nd error, when I realized that the glass wasn't flat, it had a curve along its length !. The upshot of this was that if it went in the frame face side down, all the depth of the rebate was taken up by the curve, with no room for the glazing beads. So it had to go into the frame face side up and only after I'd deepend the rebates to give a bit of room for the beads, which required more planing down :evil:

The glass beadwere cut to size, jointed then stained, sealed and polished.
Finished beads.jpg

I thought I was on the home stretch here and started fitting the door to the frame, planing to width and sawing the top rail to the shape of the head of the door frame. Checking the height of the door against the frame showed me that the damn thing was 50mm short of the frame height :shock:
The rod matched the door size, but the rod didn't match the frame size. Then I realised that 50mm is the height of my tape measure when its stood on the floor -I assume I mustn't have realized this when I was measuring up to begin with :oops:

Fortunately I hadn't cut the horns off the door yet, so I glued in a softwood filler into the gap and veneered both sides of it with two pieces of 1.5mm constructional European cherry. The grain match wasn't great, as you can see from the inside face photo, but I'd run out of solid timber of the correct size. :twisted:
The glass was bedded on low modulus silicone and the beads nailed into the rebates. The nails were the only visible fixings and I will use a bit of wax filler to cover them once non-essential retail opens up.

Not quite ready to burn it yet I carried on with staining, sealing and polishing and hung it with two 3 1/2" cast iron butt hinges that used exisiting hinge mortices in the frame. A rimlock completed the job.
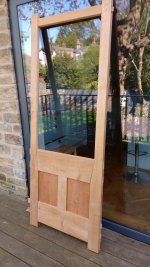
'Show' face
Face side.jpg

Inside face
Inside.jpg

Feedback appreciated.
David
 
Wow, that does look very special, I think you should be pleased with yourself.
I know how it feels when you are deep into a job, you have to focus on the things that go wrong, but only another woodworker will appreciate what was involved.

As for the glass being curved, that's just not fair!
 
Back
Top