• Hi all and welcome to TheWoodHaven2 brought into the 21st Century, kicking and screaming! We all have Alasdair to thank for the vast bulk of the heavy lifting to get us here, no more so than me because he's taken away a huge burden of responsibility from my shoulders and brought us to this new shiny home, with all your previous content (hopefully) still intact! Please peruse and feed back. There is still plenty to do, like changing the colour scheme, adding the banner graphic, tweaking the odd setting here and there so I have added a new thread in the 'Technical Issues, Bugs and Feature Requests' forum for you to add any issues you find, any missing settings or just anything you'd like to see added/removed from the feature set that Xenforo offers. We will get to everything over the coming weeks so please be patient, but add anything at all to the thread I mention above and we promise to get to them over the next few days/weeks/months. In the meantime, please enjoy!

Epoxy questions for a slowing things down hack?

TomTrees

Sapling
Joined
Aug 19, 2014
Messages
380
Reaction score
98
Hello folks
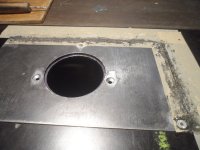
I'm needing to fill the terrible gaps around a router table insert plate, which I failed miserably at installing yesterday.
Hoping I could use a dust and epoxy mix of the same horrible but good material for the job.
I'll have to clean things up yet, and get the plate leveled and bolted down.
Will be taping up around the edges and packing down the putty thereafter,
so what I'm thinking this might not need be a one shot type deal.

Only having this five min mix what comes in a double syringe at hand, and not keen on going shopping for glue...

I question if there might be way to have better success with this, or perhaps should I ask...
What stands the best chance of achieving this, seeing as I've got a few packs of these 2 part glues, which will likely go off soon anyway,
seems its worth trying.


Would it be worth attempting to cut open one tube, in order to mix dust with whichever might give a better open time?
Not knowing anything about epoxy, I'm unsure how to identify either component, and indeed which one the dust should be mixed with,
or infact how much time should be expected, hopefully not instant, and enough time to get all three parts mixed together and applied.

Perhaps I might try something else like a filler strips yet, but nice to have options I suppose.

Thanks
Tom
 
The easiest two part epoxy to apply that I've ever come across is this 30min stuff from Axminster. It's not an 'el cheapo' option but it's really dead easy to use with none that ghastly faffing around with tubes, where inevitably you end up with a smear of sticky gloop on yer fingertips and then somehow you've got to re-fit the caps. A little goes a long way and it's highly recommended; also sold at Workshop Heaven I believe - Rob
 
Wouldn’t plastic padding ( or whatever it’s called these days) be a better option.

Car body filler.
 
I'd suggest wrapping the edges of your steel plate with sellotape or better still packaging tape and filling your gap with the plate in situ. The tape will not stick to epoxy. Only do one side at a time not all at once. That way you can get the plate out and sand the epoxy so there is no ridge to stop the plate coming out. do that 4 times. One side should be easy enough in 5 minutes of work time.

Good luck. love the way you just go for it :)
 
Put the resin in the fridge an hour or so before you plan to mix it, it will cool it down which slows down the reaction time and gives you more time to do your mixing and filling before it goes off.
 
The easiest two part epoxy to apply that I've ever come across is this 30min stuff from Axminster. It's not an 'el cheapo' option but it's really dead easy to use with none that ghastly faffing around with tubes, where inevitably you end up with a smear of sticky gloop on yer fingertips and then somehow you've got to re-fit the caps. A little goes a long way and it's highly recommended; also sold at Workshop Heaven I believe - Rob
Good for others to know Rob, though I've spent my glue sniffin funds on a half price infrared thermometer
which might actually come in handy today, re-Trevanion's post.
My older gun got confiscated, and been waiting for them in the bargain section.
Wouldn’t plastic padding ( or whatever it’s called these days) be a better option.

Car body filler.
Indeed Jim, plastic strips might be a solution, or a fillet of this stuff I'm using, not decided as this composite stuff stinks real bad,
so mask will have to be on tonight due to the dust, so haven't really made a plan yet.
I'd suggest wrapping the edges of your steel plate with sellotape or better still packaging tape and filling your gap with the plate in situ. The tape will not stick to epoxy. Only do one side at a time not all at once. That way you can get the plate out and sand the epoxy so there is no ridge to stop the plate coming out. do that 4 times. One side should be easy enough in 5 minutes of work time.

Good luck. love the way you just go for it :)
That seems very sensible regarding doing one side at a time due to squeeze out/removal.
Cheers Robert
Put the resin in the fridge an hour or so before you plan to mix it, it will cool it down which slows down the reaction time and gives you more time to do your mixing and filling before it goes off.
Cheers for the suggestion Dan, I had seen it briefly mentioned, but hard to know if that's the same case as with all epoxies,
Good to get an estimate on cooling the stuff, something which I've only brought up to herself with a passing whisper!
"Tis only for an hour he says"


Some light googling I've tried since, "mixing pigment into two part epoxy"
after changing one keyword "dust" with the word "pigment", and it seems the hardener is the one which is suggested
mixing pigments with prior...
i.e...

How to color epoxy with epoxy powder pigments
  1. Pour the epoxy hardener component into your mixing container. ...
  2. Add the powder pigment to your hardener. ...
  3. Add the resin component and mix the epoxy batch thoroughly. ...
  4. Apply the epoxy to your substrate or mold (if you're casting).
Though once again is this the same deal as with my stuff?
and will it be possible to tell the difference between, I haven't googled that yet,
as I might change my mind once I get out there.

Cheers folks
Tom
 
Hello folks
Had another go at trying to find information on tinting two part epoxy, just to see if there's mention
of mixing pigments with the hardener, and all I can find is Totalboat or West systems slow setting stuff,
which looks very different to what I have.

The only info I've seen regarding the cheap stuff was suggesting a mix of dust or whatever with both,
that being a stretch to call some youtubes "info",
so it looks like more research will be required, as I'm not keen on doing wasteful testing.
Surely the answer from google must have some truth to it?

There must be plenty doing this who know their onions, perhaps the auto industry, motorbike fairings perhaps,
or some other craft, who require more than just aesthetics.

As of yet, not even found out which gunk is which, so that tells me I'm not even trying...

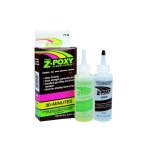
Edit: From the looks of things, looking at some from a long standing brand, seems I've found the answer
that would be the epoxy is the clear stuff, and the hardener or "catalyst" is the opaque one.
Not found anything else helpful though.
zap-pt-39-z-poxy-30-minute-epoxy-glue-dublin-ireland-hobby-shop-8oz-5525785-1.jpg
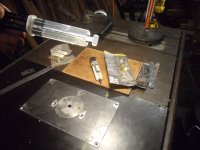
and after tidying things up a wee bit, it certainly seems I can get away it,
plus it would sort out the obligatory oops marks aswell.:sleep::ROFLMAO:


SAM_9363.JPG


All the best
Tom
 
Last edited:
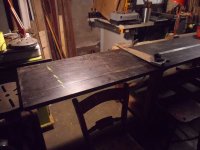
Tom, I admire your positivism but have a little concern and I sincerely hope that someone will say I am talking tosh but.....

isn't that centre hole a bit small ?
 
Tom, I admire your positivism but have a little concern and I sincerely hope that someone will say I am talking tosh but.....

isn't that centre hole a bit small ?
Woz kinda waiting for Rob to share his thoughts on that, as I'm not very knowledgeable about routers.
i.e.. https://www.thewoodhaven2.co.uk/threads/cosman-boxes.9032/
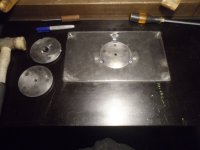
and have another pair of them what'll get bored out to other sizes aswell.

Not too rushed about using the router table, as it's just part of my tablesaw WIP, and as such
other things like making it as safe as possible whilst more user friendly, being of far greater importance.
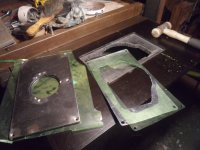
Had to use up some of the best material I had for this job, to see what I had left for the rest of what needs doing.

Cheers for "bumping" the question Roger! :)

All the best
Tom
 
Hi Tom
I'm not sure why you feel the need to colour the filler, epoxy or otherwise. It's only a tool not an ornament is it not and will get marked anyway during normal use. I may be wrong but function over form would be my approach and I wouldn't much care what it looked like if it did the job.

I'm all in favour of using what you have wherever possible though sometimes you have to put your hand in your pocket to do a job properly.
I've found your thread interesting BTW even though I haven't commented previously

Bob
 
Hi Bob, using the material to make a putty, what's hopefully the same colour, and hopefully still retaining the characteristics
of the composite material seems worth it to me, as I don't like nooks and crannies for grit to hide in.
Having done some plastic repairs with the stuff before, it just seems a go to, granted I used superglue rather than epoxy.

Regarding any aesthetics, yes that probably would bother me, since I regard this saw as a forever machine...
so I suppose I agree with your argument regarding putting my hand in my pocket,
but I must mention I've got a fair bit of this composite material left, so it makes a good excuse to experiment with repairing dings scrapes and whatnot.SAM_8496.JPG

Besides I can try again with some superglue if the putty doesn't cure, not the end of the world.
Rightly or wrongly, I had a bash anyways at filling two sides, not sure if it will cure though?

Stuck the epoxy packs in the fridge for about an hour and a half, and decided to try up the half full one first...
with about half the volume of dust to both components of adhesive.
The junior hacksaw was the tool for the job of separating the tubes, and I mixed the hardener up with the dust first,
which seemed to remain workable for the 2 mins I stirred up, seemed like I could have took my time here..
Mixed in the resin thereafter for about 40 seconds if even that,
Having this stuff near gel solid before within that time, I was overly cautious of the stuff getting too thick to fit into the gaps.

I prepared two soft plastic spatulas from some "shop rack screwdriver holster?" material, which was stiff enough to press the stuff well down, these came in handy.
After a half hour the stuff was only starting to become something stiffer than bitumen trowel mastic,
and I don't think shoving in a card into the slot a few mins before that happened did things any good, as it pulled the stuff out,
so after some frantic pressing down sticky snot back into the slot, lots of scraping and packing in again was resumed.

Its likely a safe bet that I used far too much dust, and reading some stuff from google, seems it could be a week until one could even get half an idea.
Hopefully not, lol.

All the best
Tom
 
Fully understand Tom, we're all different and it would bug you that filler didn't match then it's worth the effort. I wasn't intending to criticise in any way though I think you know that.

You can speed up the hardening process when needed with some gentle heat. I acquired my wife's old hair dryer years ago for the workshop and it's used on a regular basis for everything except drying hair.
 
Fully understand Tom, we're all different and it would bug you that filler didn't match then it's worth the effort. I wasn't intending to criticise in any way though I think you know that.

You can speed up the hardening process when needed with some gentle heat. I acquired my wife's old hair dryer years ago for the workshop and it's used on a regular basis for everything except drying hair.
I was reading some on the subject since, and there's lots of if's and buts regarding various curing methods,
some articles mentioning without constant heat, possible chance of slowing the mix under the surface layer down!
and for starters things should be about 10 degrees warmer in my shed for the suggested temperature, somewhere around 22-24c being the reference regarding curing rates.
I guess this matters in my case, seeing as the mix is far from optimal, though seemingly epoxy never stops getting harder,
so perhaps there's a chance of it working.
Might see what an oil rad underneath does, with some hefty blankets, as I would like to get to the second half of this job, so I can go do something else whilst it cures.

Cheers
Tom
 
Never posted a pic of the first application as the camera was out in the shed.
SAM_9365.JPG

SAM_9366.JPGHad another go with the epoxy, this time I didn't mix the hardener with the dust prior,
and mixed the chilled epoxy with the dust after the mix was done.
Aiming to get the same amount done with about the same amount of adhesive mixed,
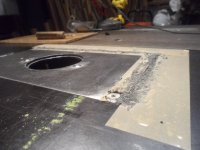
it turns out I should have only aimed for a third of the work at a time, as when mixed with the dust gave just about enough
time to smear on the layer like so, and no more!
It took smudging the putty into the tiny gap using the bottom of an awl, and didn't properly bond in the end.

I used some super glue mixed up with the dust for some other bits like the oops mark, which worked well,
and cheekily tried filling some spots without the packing tape trick, which wasn't a good idea...
as it likely helped turn the filler go all crumbly when I inevitably removed the plate again.

So I might have another go with the epoxy sometime, but that'll be for another day
should I need to fettle the wing/plate/inserts.SAM_9382.JPG
SAM_9384.JPG
 
Last edited:
Back
Top