• Hi all and welcome to TheWoodHaven2 brought into the 21st Century, kicking and screaming! We all have Alasdair to thank for the vast bulk of the heavy lifting to get us here, no more so than me because he's taken away a huge burden of responsibility from my shoulders and brought us to this new shiny home, with all your previous content (hopefully) still intact! Please peruse and feed back. There is still plenty to do, like changing the colour scheme, adding the banner graphic, tweaking the odd setting here and there so I have added a new thread in the 'Technical Issues, Bugs and Feature Requests' forum for you to add any issues you find, any missing settings or just anything you'd like to see added/removed from the feature set that Xenforo offers. We will get to everything over the coming weeks so please be patient, but add anything at all to the thread I mention above and we promise to get to them over the next few days/weeks/months. In the meantime, please enjoy!

Exercises in bowl-making

A question for the experts (perhaps @CHJ?)

I've got this bowl blank with a knot in the middle of it. How would you deal with that? Just ignore it and assume it'll be okay? Flood it in thin or ultra thin superglue (I have both)? Something else?

2025-11-06-01-larch-1.jpg

For those of you who haven't watched enough Monty Python to be able to identify it from quite a long way away, it's conveniently identified on the other side of the blank, which also shows that the knot either goes all the way through or (less likely I'd suggest) there are two of them:

2025-11-06-02-larch-2.jpg

I was envisaging that second side to be the open end of the bowl so that end of the knot will disappear but it would seem less-than ideal for the knot on the other side to break out and leave me with a bowl with a hole in the bottom, hence asking my question.
 
I'd just proceed as normal and deal with it/them as necessary when form finishing time nears.

As you say, I would flood with thin CA if it moves or shows signs of breaking loose, suggest you use sanding sealer around the adjacent area before applying glue to reduce unsightly staining on light wood.
 
Those last couple of bowls look excellent Al.
And I thought my puns were bad!;).

In order to disguise knots in the past I have drilled them and plugged them with contrasting wood. If one plug looks odd you can always make more holes and plugs.
 
I'd just proceed as normal and deal with it/them as necessary when form finishing time nears.

As you say, I would flood with thin CA if it moves or shows signs of breaking loose, suggest you use sanding sealer around the adjacent area before applying glue to reduce unsightly staining on light wood.

Thanks, that's really useful.

Those last couple of bowls look excellent Al.

Thanks Andy

And I thought my puns were bad!;).

Believe it or not, it wasn't deliberate: when I read that I had to go back & reread my post to find the pun 🤦‍♂️

In order to disguise knots in the past I have drilled them and plugged them with contrasting wood. If one plug looks odd you can always make more holes and plugs.
Thanks for the advice. I think I'll try @CHJ's suggestion first (as it's easier!) but it's good to know of alternatives. I don't think I would have thought of using contrasting wood: I think I would have tried (probably unsuccessfully) to grain match some of the same stuff.
 
The Knot may be harder than the surrounding wood, come finishing time careful rotary spot sanding may be in order to avoid it standing proud.
 
Turning the larch went remarkably smoothly, with no consideration given to the knot at all. Thanks @CHJ for the advice.

This was the finish straight off the bowl gouge. Not perfect, but miles better than what I was achieving at the start of this thread:

2025-11-07-01-tooled-finish-on-outside.jpg

Sanded:

2025-11-07-02-sanded-outside.jpg

Finish from bowl gouge (near the rim) and scraper (near the middle) on the inside:

2025-11-07-03-tooled-inside.jpg

Sanded:

2025-11-07-04-sanded-inside.jpg

Gouged and sanded bottom:

2025-11-07-05-finished-base.jpg

I then got all excited and got a lovely looking blank out to turn a bowl out of it as I was feeling confident. However, I stupidly decided to use a pocket (instead of tenon) for holding while hollowing but didn't adjust the bit of tape on the drill bit I was using as a depth guide. The drill bit didn't quite go through, so I didn't realise my mistake until the bowl gouge made it down there.

That one went in the bin, but the next one (which also used a pocket or holding while hollowing) was more successful. Here it is next to the Larch one after I'd given them both a coat of Mike's Magic Mix:

2025-11-07-06-two-bowls.jpg

I think the white balance is a bit off in that photo; the oiled larch looks closer to the colour in this one:

2025-11-07-07-two-bowls.jpg

The one on the right is Black Limba (bought on Sunday from Yandles when I was passing through on the way back from motorbiking weekend around Lyme Regis).
 
The character in that larch bowl really makes it, and your workmanship too of course.

You’ll never get the hang of it. There will always be something else to try.
 
I started the day by getting out most† of the bowls I've made and taking a group photo:

2025-11-08-01-group-photo.jpg

† I say "most" as there's a small one at work that I use for catching pencil sharpening shavings and an Elm one I gave to my sister-in-law. Oh, and there's a beech one that we're using as a fruit bowl and I forgot about when taking that photo!

All the bowls with the exception of the ash one in the top-left were made on my lathe. The ash one was made on Paul Hannaby's lathe when I did a day course with him last year.

Having taken the photo, I then went and made three more bowls! I didn't take many in-progress photos as the process was much the same as before for most of them. One was a bit different, made out of Lime and hollowed out with my home-made box hollower/scraper tool rather than a bowl gouge:

2025-11-08-02-lime-hollowing.jpg

I wasn't entirely happy with the hold I had on the straight sides with the Cole jaws for sorting the bottom out, but it worked okay:

2025-11-08-03-lime-base.jpg

All three of this morning's bowls with hard wax oil applied:

2025-11-08-04-new-bowls.jpg

Left-to-right they're Lime, Oak and Tulipwood. Bottoms, just to show off that dark streak on the Tulipwood:

2025-11-08-05-new-bowl-undersides.jpg
 
I'm feeling really happy. I've decided I've done enough bowl turning for now as I feel I've got to the point that I can turn a simple bowl when I want to without worrying too much about whether it'll all go wrong. That's completely different to how I felt a few weeks ago.

I said a while ago that I was going to give up as soon as I'd turned one bowl from start to finish with no major issues and not too much sanding. On Sunday morning (and one last job this evening), I turned five and all went well.

I did them in a bit of a batch mode. This is what they looked like after I'd turned the outside shape (along with some tenons and some pockets) on all five. All used faceplates / screw chucks for the first job; as you can see, I've left a big faceplate attached to the biggest bowl.


2025-11-11-01-outsides-turned.jpg

I didn't take many photos of the process as I was just in the groove of making bowls. However, I did take a few. The big blank was one that came in a box from English Woods and was marked as a "premium" blank. It's "crotch" Sycamore (which I gather means it came from a bit of a Sycamore tree where the trunk is splitting into branches). It's 240 mm diameter. Here's what it looked like after what seemed like a very straightforward bit of hollowing:

2025-11-11-02-hollowing-went-really-well.jpg

After hollowing all the bowls out (three of which I then considered to be finished as I'm leaving the pocket used to hold them for hollowing in place), I fitted the Cole jaws so I could turn the tenons off on the two bowls that had them. Unfortunately, the bowl was too big for the Cole jaws (seen here at their widest setting):

2025-11-11-03-does-not-fit.jpg

That was something I hadn't considered. Early last year I made a Beech bowl (with loads and loads and loads of sanding involved) of the same-ish diameter, so I'd assumed this one would be straightforward, especially since I've increased the lathe centre height a bit since then:

beech_bowl_finished_on_shavings.jpg


However, that one had a pocket on the underside so didn't need remounting.

When I made the Ash bowl on the day course I did with Paul Hannaby, we used what I think might be called a "jam chuck" (although I might be mis-remembering the name as I also think that's the name for a bit of softer wood turned to be a tight fit on something). It was basically a lump of wood with a rounded face held in the chuck with a soft rag between it and the bowl. The tailstock then supported the underside while most of the tenon was turned away and the last bit was sanded off after the bowl came off the lathe.

I didn't fancy trying that for the first (at home) time on a "premium" blank, so I came up with a plan B (that meant I couldn't finish the bowl on the same day).

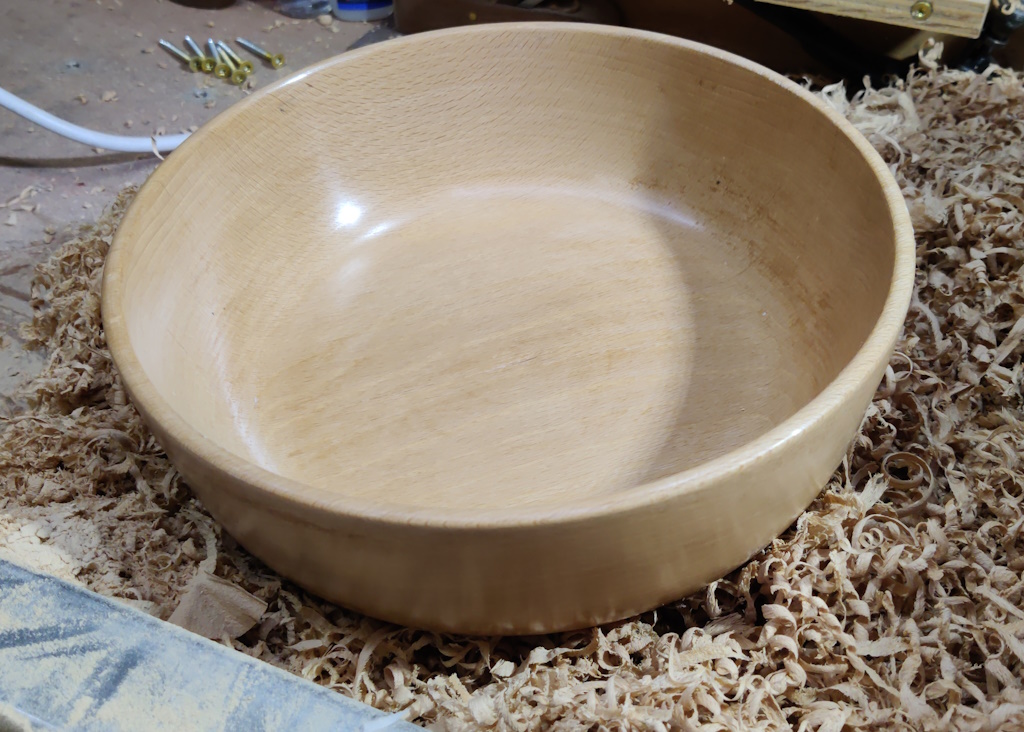
In the meantime, I moved the buttons on the Cole jaws and mounted the Eucalyptus blank, which was much more straightforward:

2025-11-11-04-sort-this-one-out-instead.jpg

The tenon could then be easily turned away:

2025-11-11-05-eucalyptus-bowl-finished.jpg

Overnight on Sunday, I made a request of the 3D-printer. I was busy yesterday evening but tonight I got to go and try the prints out:

2025-11-11-06-3d-printed-jaws-and-leather.jpg

They offset the jaws slightly to allow a slightly increased holding diameter. The taper angle on the sticking up bits matches the big Sycamore bowl. The little pads you can see lying on the jaws are some scraps of leather I cut up as I figured they'd help prevent the jaws marking the bowl.

All fitted nicely...

2025-11-11-07-mounted.jpg

... and the glued-on tenon could be removed and the base turned and sanded smooth:

2025-11-11-08-bowl-finished.jpg

All five bowls after having their first coat of hard wax oil:

2025-11-11-09-five-bowls.jpg

Clockwise from the back right, they're Sweet Chestnut, American Black Walnut, Sycamore, Eucalyptus and something that might be some sort of Mahogany (it was cut off the end of a piece of wood I bought in Ironbridge Antiques that was labelled as "Mahogany Lintel"). Close-up of the grain on the Mahogany one:

2025-11-11-10-close-up-of-mahogany-bowl.jpg
 

@Dr.Al

Eight 7/8 x 1/4" pieces of steel, 48 Holes, 32 of them tapped 6mm.Although I see your Cole Jaws are already near the maximum swing of your lathe when extended, something you might find useful as an accessory are a set of Fixing adapters with button hole fixings at half normal PCD spacing.

DSC02121.jpg

DSC02120.jpg DSC02119.jpg

Mine were Eight 7/8 x 1/4" pieces of steel, (48 Holes, 32 of them tapped 6mm), offsetting the two Countersunk fixing holes by half a Cole Jaw PCD from the button fixing hols can catch those button location/travel annoyances.

Note: I use two fixing screws for each adapter, they serve two functions, 1: holds adaptor on a fixed radial and 2: Allows me to use readily available stainless countersink screws for fixing without worrying about screw tensile strength.


I like the look of your printed 'buttons', what stock and print density did you use, the ones that I have tried (printed for me) have not proved satisfactory as the are neither rigid enough (like metal or hard wood) or resilient enough to flex rebound back like rubber to maintain grip.
 

@Dr.Al

Eight 7/8 x 1/4" pieces of steel, 48 Holes, 32 of them tapped 6mm.Although I see your Cole Jaws are already near the maximum swing of your lathe when extended, something you might find useful as an accessory are a set of Fixing adapters with button hole fixings at half normal PCD spacing.

View attachment 36739

View attachment 36738 View attachment 36737

Mine were Eight 7/8 x 1/4" pieces of steel, (48 Holes, 32 of them tapped 6mm), offsetting the two Countersunk fixing holes by half a Cole Jaw PCD from the button fixing hols can catch those button location/travel annoyances.

They look like a good idea. My lathe's swing is **just** enough for the Cole jaws so I'm not sure they would help me that much though (unless at some point I get a bigger lathe). When I bought the Cole jaws (for £15 from an antique shop) I realised I couldn't fully open the jaws so ended up raising the head & tail stock by 12 mm to make space.

The jaw travel seems to be enough to get across the PCDs, so I don't think I'd need intermediate locations for anything.

Note: I use two fixing screws for each adapter, they serve two functions, 1: holds adaptor on a fixed radial and 2: Allows me to use readily available stainless countersink screws for fixing without worrying about screw tensile strength.

2 screws sounds eminently sensible for something like that.

I like the look of your printed 'buttons', what stock and print density did you use, the ones that I have tried (printed for me) have not proved satisfactory as the are neither rigid enough (like metal or hard wood) or resilient enough to flex rebound back like rubber to maintain grip.
I used PETG filament (the same stuff I use for pretty much everything). I knew there was no chance of the print finishing in time to finish the bowl on the same day, so I printed them with 100% infill for strength. The leather pads were there to add a bit more resilience & improve grip - no idea whether they were necessary. If I could have been bothered I would have glued some small leather pads to the jaws but it was quite easy to just drop them around the perimeter of the bowl (with the chuck flat on the bed).

If you'd like me to print some for you & stick them in the post for you to try I'd be more than happy to.

I've printed some other entire jaws before (for pen drilling & for gripping the inside of peppermills) & they worked very well too.
 
If you'd like me to print some for you & stick them in the post for you to try I'd be more than happy to.

Thanks for the offer, very generous of you, but the chances of me being able to make any use of extra holding flexibility are currently heading to the point of zero. (PM on the way)
 
Something else you might find useful, there may be occasions when you want to reverse chuck an irregular shaped rim item clamped onto a faceplate or Cole jaws to finish off the base.
To aid this if you leave it mounted on your chuck and remount your chuck on the tailstock it will centre the workpiece while you arrange clamps or necessary packing pieces.

Not a 'Use All Day' solution but for the occasional use printed thread bushes have proved robust enough.

tailmandrel1.jpg
tailmandrel2.jpg tailmandrel4.jpg

And if a need for a different thread size is required for any reason with a spare chuck just as a mounting aid then they can be changed out.
tailmandrel3.jpg

Because my blank mandrels are short Morse style with Draw Bar facility they are not quite long enough for the Tailstock eject to reach so they need a Bolt fitting in the end to lengthen them.
tailmandrel5.jpg tailmandrel6.jpg
 
Clever solutions to a problem I know well and has me worried about whether my current large rimmed bowl will fit in the cole jaws. I might have to test this before I proceed further
 
The way I did it (without Cole jaws) on the day course with Paul Hannaby was the same way described in this video.

Did many reverse turning tasks this way before progressing to making a Longworth chuck, and indeed still use jam chucks quite often with irregular edged and odd pieces my other jaws can't accommodate.

The Longworth chuck helped with the easier centring, but found it too had its limitations of weak clamping force, often felt it needed three hands to operate.

Biting the bullet and spending the pocket money on Cole Jaws was an immediate transformation into another world of less frustration and the ability to concentrate on the love hate relationship with the spinning wood.


As an aside, I'm surprised the guy did not true up his jam chuck and take more care centring his bowl for the video, perhaps it's the mechanical side of my experiences that always wants to minimise any source of vibration or out of true.
 
Did many reverse turning tasks this way before progressing to making a Longworth chuck, and indeed still use jam chucks quite often with irregular edged and odd pieces my other jaws can't accommodate.

The Longworth chuck helped with the easier centring, but found it too had its limitations of weak clamping force, often felt it needed three hands to operate.

Biting the bullet and spending the pocket money on Cole Jaws was an immediate transformation into another world of less frustration and the ability to concentrate on the love hate relationship with the spinning wood.

I think I was very lucky getting those Cole jaws & buttons for £15. Having seen the price of them on Axminster's website I don't think I would have ever been able to justify them!

As an aside, I'm surprised the guy did not true up his jam chuck and take more care centring his bowl for the video, perhaps it's the mechanical side of my experiences that always wants to minimise any source of vibration or out of true.

I agree - I don't think I'd have the confidence to do anything without making sure it's centred.
 
Back
Top