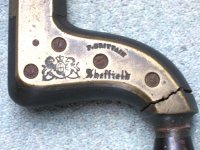
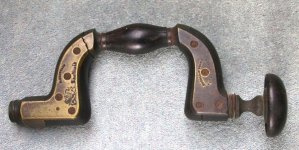
I recently "won" this brace at auction. As you can see, it is in very poor condition but I intend to try and get it back to usable condition. The worst fault is the broken brass frame. I'm thinking of attempting a repair by silver soldering but I would be grateful for any suggestions.

-
Hi all and welcome to TheWoodHaven2 brought into the 21st Century, kicking and screaming! We all have Alasdair to thank for the vast bulk of the heavy lifting to get us here, no more so than me because he's taken away a huge burden of responsibility from my shoulders and brought us to this new shiny home, with all your previous content (hopefully) still intact! Please peruse and feed back. There is still plenty to do, like changing the colour scheme, adding the banner graphic, tweaking the odd setting here and there so I have added a new thread in the 'Technical Issues, Bugs and Feature Requests' forum for you to add any issues you find, any missing settings or just anything you'd like to see added/removed from the feature set that Xenforo offers. We will get to everything over the coming weeks so please be patient, but add anything at all to the thread I mention above and we promise to get to them over the next few days/weeks/months. In the meantime, please enjoy!
You are using an out of date browser. It may not display this or other websites correctly.
You should upgrade or use an alternative browser.
You should upgrade or use an alternative browser.
F. Brittain Brace
- Thread starter rxh
- Start date

You do like a challenge, don't you!
I guess it's been kept somewhere damp, so the wood has swollen and split and broken the brass plating. And the (original, correct) steel screws have rusted beyond use.
As I see it, you'll need to remove the brass to solder it. So you'll need to drill out and destroy the screws.
Do you then try and get the wood back to its old dimensions, to fit the repaired brass? I guess so. So you could try cutting opposite the split, then regluing. That would need even more dismantling. Maybe it would be simpler to fill in the split with a wedge of matching wood, then carve away excess wood under the plate.
I'll be interested to see what you do. I'd be tempted to offload it on eBay and look for a better one!
I guess it's been kept somewhere damp, so the wood has swollen and split and broken the brass plating. And the (original, correct) steel screws have rusted beyond use.
As I see it, you'll need to remove the brass to solder it. So you'll need to drill out and destroy the screws.
Do you then try and get the wood back to its old dimensions, to fit the repaired brass? I guess so. So you could try cutting opposite the split, then regluing. That would need even more dismantling. Maybe it would be simpler to fill in the split with a wedge of matching wood, then carve away excess wood under the plate.
I'll be interested to see what you do. I'd be tempted to offload it on eBay and look for a better one!
Thanks Andy,
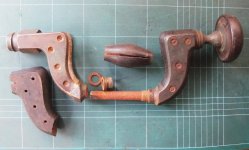
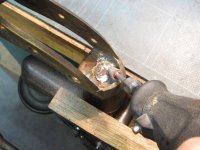
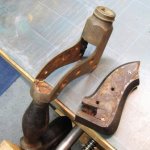
I have started work on the brace. Andy Toolsntat kindly provided me with useful information about how these braces go together. I removed the screws that hold the lower infill. Six of them came out intact but I chewed up the other two and had to drill their heads off. The top of the steel linking rod was peined over and I had to grind it with a Dremel tool in order to removed the damaged brass part and the central handle. Further progress reports to follow.
I have started work on the brace. Andy Toolsntat kindly provided me with useful information about how these braces go together. I removed the screws that hold the lower infill. Six of them came out intact but I chewed up the other two and had to drill their heads off. The top of the steel linking rod was peined over and I had to grind it with a Dremel tool in order to removed the damaged brass part and the central handle. Further progress reports to follow.
Attachments
Bearwoodcraft
New Shoots
AndyT":4gec12jr said:Fascinating to see the details of the construction of one of these.
How is the central rod fixed at the ends? What failed at the broken end?
I'm sure you will make a good job of this.
Are you the chap I saw on bench talk last week who was sat in his car? I was speauking to Peter Tiffany he said well if it is you that your very skilled woodworker indeed I take it you don’t bother with the social media rubbish? I think the forums are enough really. U.K. workshop was good but so many people jumped ship as I think it was sold and people weren’t pleased with changes or somthing.
Bearwoodcraft":25k4fwlp said:AndyT":25k4fwlp said:Fascinating to see the details of the construction of one of these.
How is the central rod fixed at the ends? What failed at the broken end?
I'm sure you will make a good job of this.
Are you the chap I saw on bench talk last week who was sat in his car? I was speauking to Peter Tiffany he said well if it is you that your very skilled woodworker indeed I take it you don’t bother with the social media rubbish? I think the forums are enough really. U.K. workshop was good but so many people jumped ship as I think it was sold and people weren’t pleased with changes or somthing.
I'm rumbled! And a big raspberry to Facebook and its spawn.

(Richard was there too.)
Bearwoodcraft
New Shoots
AndyT":3f6ncz7f said:Bearwoodcraft":3f6ncz7f said:AndyT":3f6ncz7f said:Fascinating to see the details of the construction of one of these.
How is the central rod fixed at the ends? What failed at the broken end?
I'm sure you will make a good job of this.
Are you the chap I saw on bench talk last week who was sat in his car? I was speauking to Peter Tiffany he said well if it is you that your very skilled woodworker indeed I take it you don’t bother with the social media rubbish? I think the forums are enough really. U.K. workshop was good but so many people jumped ship as I think it was sold and people weren’t pleased with changes or somthing.
I'm rumbled! And a big raspberry to Facebook and its spawn.
(Richard was there too.)
Haha Richard Arnold? His partner said he wasn’t very well wanted a word about somthing for his auction that’s coming up. He’s the only one I’ve really connected with to be honest he was fundamental in my new bench build. The unplugged page is pretty fair to be honest if a bit much for some but other than that feels a waste of time generally
Bearwoodcraft
New Shoots
rxh":1bg4atnq said:Thanks Andy,
I have started work on the brace. Andy Toolsntat kindly provided me with useful information about how these braces go together. I removed the screws that hold the lower infill. Six of them came out intact but I chewed up the other two and had to drill their heads off. The top of the steel linking rod was peined over and I had to grind it with a Dremel tool in order to removed the damaged brass part and the central handle. Further progress reports to follow.
I remember speauking to you about this I saw some in a recent sale but all go for more money than I have as I can’t work currently my grandfarther had one that along with many other tools he had went walkies sadly.
I still have his tool box he built as an apprentice and hope to fill it with the tools he was given when his mentor retired due to I’ll health. Not sure I’ll ever replace the infill planes sadly all far too collectible now
Bearwoodcraft":19pq5r7n said:AndyT":19pq5r7n said:(Richard was there too.)
Haha Richard Arnold? His partner said he wasn’t very well wanted a word about somthing for his auction that’s coming up. He’s the only one I’ve really connected with to be honest he was fundamental in my new bench build. The unplugged page is pretty fair to be honest if a bit much for some but other than that feels a waste of time generally
Well, yes, but I meant rxh - him with the broken brace who started this thread!
We do look a bit similar and have been mistaken for each other a few times.
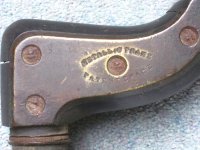
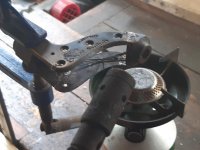
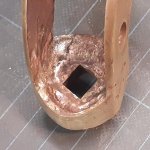
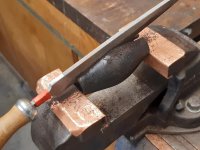
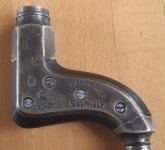
I have repaired the break with silver solder. It seems to be at least as hard as brass. I managed to build up a fillet on the inside so I think it is quite a strong joint but not perfect in appearance. Quite a lot of heat was required - I used a camping gas ring and a blowlamp, both running on propane/butane mixture.
Attachments
That's impressive!
Is the silver/blue effect in the first photo just a digital artefact of some sort? Does it still match the other end?
If you had to go back to fresh bare metal, ammonia ages brass well.
Is the silver/blue effect in the first photo just a digital artefact of some sort? Does it still match the other end?
If you had to go back to fresh bare metal, ammonia ages brass well.
Thanks Andy,
That was the appearance after removing the scale and flux residue with abrasive paper. Thanks for the tip about ageing using ammonia - I didn't know that one. I have a way of patinating using soft solder wire and "blacking" liquid intended for leaded lights glass work.
That was the appearance after removing the scale and flux residue with abrasive paper. Thanks for the tip about ageing using ammonia - I didn't know that one. I have a way of patinating using soft solder wire and "blacking" liquid intended for leaded lights glass work.
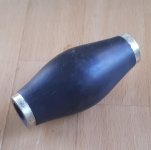

Where’s the join? :eusa-clap:
The dark colour and very fine grain helpsAndyp":1lsk6xhq said:Where’s the join? :eusa-clap:

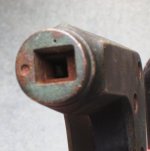
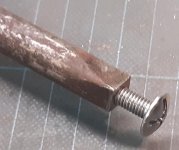
The upper brass frame was cast around one end of the central steel rod so they could not be separated and there was no need to do so. The other end of the rod has a tapered square shape that fits into a socket in the lower brass frame. It had been peined over but I had to grind off the peining to remove the frame and get access to the central handle to repair it. To allow the frame to be re-attached securely I drilled and tapped the end of the rod, and provided it with a screw.
Attachments
Lurker
Old Oak
Interesting to see how these were made originally.
You are making a cracking (pun intended) job on something most of us would have written off as a basket case.
You are making a cracking (pun intended) job on something most of us would have written off as a basket case.
And that's one of the things I like about places like this.Lurker":3h6nuoil said:Interesting to see how these were made originally.
You are making a cracking (pun intended) job on something most of us would have written off as a basket case.
Someones skip material is someone else's delight.
This is something that in its original condition I probably wouldn't look twice at and when this is finished it's going to look wonderful again!
Thanks Andy, Lurker and Stuart - it is an interesting challenge.
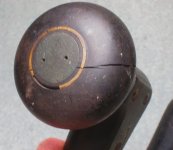
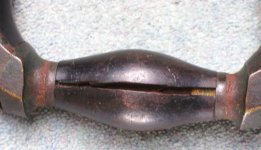
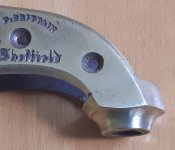
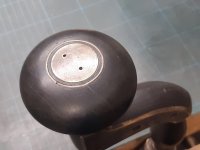
Here is a photo of the pad (or whatever its correct name is). I picked out the remaining bits of white inlay and I found that the groove dimensions were just right to accept some violin purfling. I filled the crack with fine ebony dust mixed with epoxy and I dealt with some cracks elsewhere on the brace in the same way.
Here is a photo of the pad (or whatever its correct name is). I picked out the remaining bits of white inlay and I found that the groove dimensions were just right to accept some violin purfling. I filled the crack with fine ebony dust mixed with epoxy and I dealt with some cracks elsewhere on the brace in the same way.
Attachments

AJB Temple
Sequoia
- Joined
- Apr 15, 2019
- Messages
- 7,722
- Reaction score
- 1,201
You are doing a great job on that. Skilled work. Must admit when I first saw it I thought that the tool was beyond realistic repair. The silver soldering work is very neat indeed considering how bad the break was. Super job on the handle repairs too.
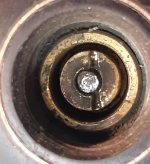
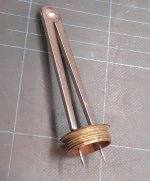
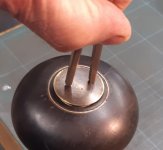
Thanks AJB Temple. The pad was a very sloppy fit on the stem - I think the brace must have had quite a lot of use to cause so much wear. I removed the top cap by unscrewing it using an old pair of school dividers (I think this type is banned in schools now owing to use as a weapon ). The upper nut has a left hand thread and I removed it with a saw nut driver. I made a tool of a piece of SS tube to allow me to remove the lower nut, which has a right handed thread. I turned a sleeve or collar of brass and inserted it in the top of the brass core of the pad to improve the fit of the pad on the stem (I forgot to photograph this detail before I put it back together). The pad now turns smoothly on the stem without wobbling.
). The upper nut has a left hand thread and I removed it with a saw nut driver. I made a tool of a piece of SS tube to allow me to remove the lower nut, which has a right handed thread. I turned a sleeve or collar of brass and inserted it in the top of the brass core of the pad to improve the fit of the pad on the stem (I forgot to photograph this detail before I put it back together). The pad now turns smoothly on the stem without wobbling.Attachments

toolsntat
Nordic Pine
As always Richard, fantastic work.
Cheers, Andy
Cheers, Andy
Thanks Andy - the information you gave me was very helpful.toolsntat":8xpjpyo8 said:As always Richard, fantastic work.
Cheers, Andy
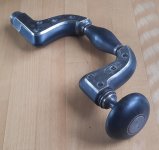
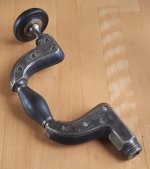
Here are some photos of it put back together. Before I could replace the lower infill I had to deal with the shanks of the two screws that I had had to drill the heads off. I used a 3/16" diameter end mill to remove all the metal, then enlarged the holes to 3/8" diameter with a drill. Then I inserted cross grain wood plugs of beech. With the infill in place I secured it with newer screws. I decided not to remove the upper infill as I thought that the chances would be small of removing all the screws intact.
Attachments
Thanks AndyAndyT":3sns2qsq said:What a brilliant save!
I'm really very impressed.
:eusa-clap: :eusa-clap: :eusa-clap:
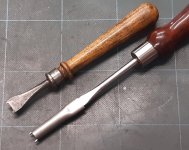
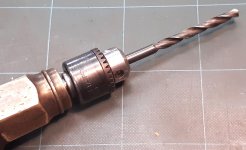
My remaining problem is that I don't have any bits that will fit it. I have some bits with notches in them but the notches are in the wrong place. I filed a piece of mild steel rod to the have the correct size and notch position - I can carry it with me when searching for bits at boot fairs and second hand tool shops. I threaded it to fit a chuck so I can use the brace with round or hex shank bits or drills.
Attachments
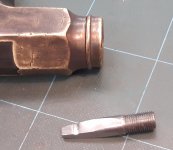
Some of my bits have two notches, on different faces, which could be an easy workaround.
I don't think there was ever a standard.
But I don't want to put anyone off buying more bits.
That chuck adaptor is a good idea.
I don't think there was ever a standard.
But I don't want to put anyone off buying more bits.
That chuck adaptor is a good idea.