• Hi all and welcome to TheWoodHaven2 brought into the 21st Century, kicking and screaming! We all have Alasdair to thank for the vast bulk of the heavy lifting to get us here, no more so than me because he's taken away a huge burden of responsibility from my shoulders and brought us to this new shiny home, with all your previous content (hopefully) still intact! Please peruse and feed back. There is still plenty to do, like changing the colour scheme, adding the banner graphic, tweaking the odd setting here and there so I have added a new thread in the 'Technical Issues, Bugs and Feature Requests' forum for you to add any issues you find, any missing settings or just anything you'd like to see added/removed from the feature set that Xenforo offers. We will get to everything over the coming weeks so please be patient, but add anything at all to the thread I mention above and we promise to get to them over the next few days/weeks/months. In the meantime, please enjoy!

Mitred Through Dovetail

NickM

Old Oak
Joined
Dec 8, 2020
Messages
1,537
Reaction score
843
Location
Near Basingstoke
I’m making a box which I think calls for mitred dovetails (just mitred corners - not the secret mitred joint), partly to hide grooves for the top and bottom panels, partly because they look good, and partly because I’ve never done one and would like to have a go.

I’ve watched some videos on how to go about it (Matt Estlea’s are good - in fact it’s a version of his tool box which I’m making), but thought I’d ask on here whether there are any tips and tricks or traps for the unwary.

Thanks
 
My 2 tips would be these: Firstly make sure your stock is absolutely perfect. Square faced and even thickness, and clear. Secondly, practice on some scrap. Any joint with "mitre" in it's name is the work of the devil, and your initial efforts might well keep you warm on a chilly winter's evening.
 
Mike G":3asvas18 said:
My 2 tips would be these: Firstly make sure your stock is absolutely perfect. Square faced and even thickness, and clear. Secondly, practice on some scrap. Any joint with "mitre" in it's name is the work of the devil, and your initial efforts might well keep you warm on a chilly winter's evening.

Good advice. Thanks. I’m going to make a guide block to help me pare the mitres. I’ll be having a practice with that once I’ve made it.
 
Damn, that rogue apostrophe struck again. Must do better. Its, Its, Its, Its, Its, Its, Its, Its, Its, Its, Its, Its, Its, Its, Its, Its, Its, Its, Its, Its, Its, Its, Its, Its, Its, Its, Its, Its, Its, Its, Its, Its, Its, Its, Its, Its, Its, Its, Its, Its,
 
Mike G":29mlnxjo said:
Damn, that rogue apostrophe struck again. Must do better. Its, Its, Its, Its, Its, Its, Its, Its, Its, Its, Its, Its, Its, Its, Its, Its, Its, Its, Its, Its, Its, Its, Its, Its, Its, Its, Its, Its, Its, Its, Its, Its, Its, Its, Its, Its, Its, Its, Its, Its,

Probably autogenerated by a computer which thinks it knows better…
 
Did one once and it went together perfectly first time. I was so startled by this witchcraft that I ran away and never did another. :shock:

But fwiw, that archaic format, the DVD, specifically Rob Cosman's Advanced Handcut Dovetails, was my guide. Followed exactly what he said, no problems. Unfortunately I have zero memory of what that was. :eusa-think:
 
Mike G":1vrlkf04 said:
My 2 tips would be these: Firstly make sure your stock is absolutely perfect. Square faced and even thickness, and clear. Secondly, practice on some scrap. Any joint with "mitre" in it's name is the work of the devil, and your initial efforts might well keep you warm on a chilly winter's evening.
I don't know what the aversion is to mitres Mike. As you say, the timber must be square and true and in addition, your marking out must be perfecto. Get those two bits right and the rest of it's easy peasy. Sort of :D - Rob
 
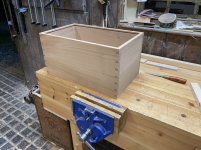
I had a crack at these over the last couple of days.

It’s not too difficult but needs concentration as it would be easy to make a wrong cut.

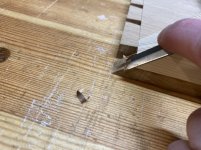
I made a simple block to guide the chisel when paring the mitres.

This is only dry fitted so far. Next job is to make the lid and base.

8228C2A0-E4EB-452F-9FFF-0BC51281FCA8.jpeg

CC7E9D4C-54EE-4609-8D86-BBD11EDB8617.jpeg

153A6FD6-CD39-4FCA-9981-5D67CAEBA27C.jpeg
 
Nice job, Nick. Don't leave those big wide boards long before you glue them, will you. They're already plotting to change shape whilst you're not looking..... :)
 
Mike G":1w4xcoix said:
Nice job, Nick. Don't leave those big wide boards long before you glue them, will you. They're already plotting to change shape whilst you're not looking..... :)

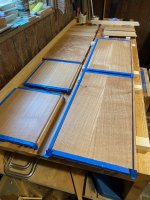
I’ve had them stacked in stick for a few days and they seem to be staying flat (they’re near enough quarter sawn). I will try to crack on with it, but there’s going to be a bit of work to do first. Veneered lid and (I think) a tongue and groove base.
 
Alf":1t4yxrgo said:
:text-bravo:

:text-+1:

Cabinetman":1t4yxrgo said:
... with you using face side and edge marks! Ian
Doesn't everybody? That's been ingrained into me since day one of this woodworking malarky, but I do now use spotty dots instead of pencil marks to indicate corners etc - Rob
 
Woodbloke":24cazueg said:
Cabinetman":24cazueg said:
... with you using face side and edge marks! Ian
Doesn't everybody? That's been ingrained into me since day one of this woodworking malarky...
:text-+1:

(I think there's an echo in here... )

So, Ian, what d'you use instead? Always keen to learn alternatives. :)
 
Alf":ko09l2lp said:
Woodbloke":ko09l2lp said:
Cabinetman":ko09l2lp said:
... with you using face side and edge marks! Ian
Doesn't everybody? That's been ingrained into me since day one of this woodworking malarky...
:text-+1:

(I think there's an echo in here... )

So, Ian, what d'you use instead? Always keen to learn alternatives. :)
Well yes I still do of course, I haven’t noticed them on work on here or in the other place and I thought they had gone out of fashion with most woodworkers — of course I could be wrong. Perhaps people don’t think they need them when the timber comes out flat and square edged from the machinery. Ian
 
Well, I use face and edge marks. We didn't have much woodwork teaching at school, but the use of reference surfaces was one of the basics, taught well enough to stick in my brain many decades later.
 
Cabinetman":17o55n3o said:
Perhaps people don’t think they need them when the timber comes out flat and square edged from the machinery. Ian
Even though it comes out flat and square edged (mostly) one side is usually better than the other with its corresponding edge and the face side/edge marks have traditionally indicated them. They also of course act as datum faces for squaring a line on all four sides so they meet up; something I used to show the kids when I was teaching - Rob
 
I only use face and edge marks because it makes me feel like a proper woodworker :D .

I've been doing some more on this box. All of the internal faces have been given a coat of Osmo and I'll wax them as well before the scary glue up commences...

IMG_0770.jpeg

For the glue up. I'm going to the lengths of making clamping blocks which will put pressure directly on the dovetail joints. I've never done that before but it seems a sensible idea.
 
NickM":2dp4g4oy said:
For the glue up. I'm going to the lengths of making clamping blocks which will put pressure directly on the dovetail joints. I've never done that before but it seems a sensible idea.

I used to do that but it's a bit of a faff. I now just use a short length of scrap slightly narrower than the base of a tail and pull each up with a sash cramp a little at a time until they 'bottom'. Works well of course, if you've only fitted them half way to begin with and if you've marked out and cut the mitres accurately, you'll find they pull up righty-tighty as well - Rob
 
Woodbloke":ti98atib said:
NickM":ti98atib said:
I used to do that but it's a bit of a faff. I now just use a short length of scrap slightly narrower than the base of a tail and pull each up with a sash cramp a little at a time until they 'bottom'. Works well of course, if you've only fitted them half way to begin with and if you've marked out and cut the mitres accurately, you'll find they pull up righty-tighty as well - Rob

It's a big if!
 
I don't bugger about. I hit it with a hammer. If that doesn't do the trick, I get a bigger one.
 
Mike G":2x9zs3ga said:
I don't bugger about. I hit it with a hammer. If that doesn't do the trick, I get a bigger one.

That's been my approach to date. If making the clamping blocks does gain anything, it will probably become my standard approach again. I am hoping that it will really close the mitres up nice and tight though. We'll see...
 
NickM":3khvo9ni said:
Woodbloke":3khvo9ni said:
NickM":3khvo9ni said:
...and if you've marked out and cut the mitres accurately, you'll find they pull up righty-tighty as well - Rob

It's a big if!
Nope, it's a small 'if'. It only becomes a big 'if' when a) you've been a bit sloppy in marking them out and b) you've been a bit sloppy in cutting them.

IMG_5067.jpeg

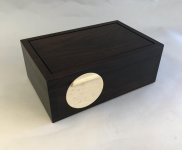
They're easy peasy, yonder is a jewellery box with mitred corners.

Mike G":3khvo9ni said:
I don't bugger about. I hit it with a hammer. If that doesn't do the trick, I get a bigger one.

The ultimate 'go to' tapometer is a 1Kg lump hammer - Rob
 
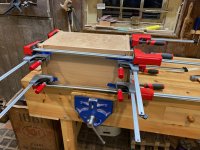
OK, so the deed has been done.

IMG_0773.jpeg

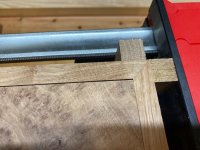
I think it went OK. All of the mitres seem to have pulled together. Here's one example.

IMG_0774.jpeg

There will be inlay to hide the gap between the veneered panel and the box sides so ignore the fact that it's a bit messy at the moment.
 
That mitre looks great. I'll be intrigued to see you do inlaying. I've never had the balls to do it. I presume you'll reduce the level of the sides to flush with the veneer first, will you?
 
Mike G":38sx78p7 said:
That mitre looks great. I'll be intrigued to see you do inlaying. I've never had the balls to do it. I presume you'll reduce the level of the sides to flush with the veneer first, will you?

Yes, that’s the plan. The veneered panel ended up being a bit thinner than I intended, so I took off the bulk of the excess on the box sides before gluing up as that’s much easier than planing around the corners. I’ve been paranoid about the panel ending up taller than sides because the veneer is very thin. It should just be two or three passes with the plane to get it flush.

I’ve done inlay a few times and it is a bit scary. I do it with a dremmel which I’ve had for years with a cheap router base and homemade fence arrangement. I’ll probably do it after I cut the lid off (yet another opportunity to turn the whole thing into firewood) so it’s at a more manageable height for me to work on.
 
Stuart":235vg4hy said:
Looking rather neat Nick, you should be pleased with that.

Thanks Stuart. Yes, so far so good!

I’ll be unclamping it when I get home from work this evening which will give me a better idea of how the glue up went. Annoyingly, I spotted this morning that one of my clamping blocks had slipped and wasn’t doing its job. I don’t think it will be a problem, but I wish I’d checked that more carefully when I glued it up!
 
NickM":2d3ln38u said:
Annoyingly, I spotted this morning that one of my clamping blocks had slipped and wasn’t doing its job. I don’t think it will be a problem, but I wish I’d checked that more carefully when I glued it up!
When I used to do that (and occasionally still do) I used to stick them in position with some ds tape. I have seen it done by actually gluing them in place with a dab of PVA and then sawing off afterwards - Rob
 
Woodbloke":1u3b9yty said:
NickM":1u3b9yty said:
Annoyingly, I spotted this morning that one of my clamping blocks had slipped and wasn’t doing its job. I don’t think it will be a problem, but I wish I’d checked that more carefully when I glued it up!
When I used to do that (and occasionally still do) I used to stick them in position with some ds tape. I have seen it done by actually gluing them in place with a dab of PVA and then sawing off afterwards - Rob

I contemplated doing that with superglue onto masking tape before the glue up. However, I decided I wanted to knock it together without the blocks there so I had full visibility of what the joints were doing and so that each component was fully supported by the bench as I tapped (hammered) the joints together. I then taped on the blocks quickly before clamping.

Next time I’ll trying fixing the blocks in place first before the glue comes out and the panic sets in :D
 
NickM":24jp4h63 said:
Next time I’ll trying fixing the blocks in place first before the glue comes out and the panic sets in :D

When I did that jewellery box (above) in Indian Rosewood, there was inordinately large amount of 'panic', first and foremost because it had to go together first time and second and foremost because the wood is very oily and I suspected it would be difficult to glue.
I got round both problems by using 'old skool', sloooooooow setting Araldite, which gave me literally hours and hours to faff around with it to make sure it was spot on. I did the glue-up early evening, then locked up the 'shop and took it out the clamps the next morning, so the epoxy had a full 12 hours to set. I seem to recollect I used blocks for that one as well - Rob
 
Back
Top