• Hi all and welcome to TheWoodHaven2 brought into the 21st Century, kicking and screaming! We all have Alasdair to thank for the vast bulk of the heavy lifting to get us here, no more so than me because he's taken away a huge burden of responsibility from my shoulders and brought us to this new shiny home, with all your previous content (hopefully) still intact! Please peruse and feed back. There is still plenty to do, like changing the colour scheme, adding the banner graphic, tweaking the odd setting here and there so I have added a new thread in the 'Technical Issues, Bugs and Feature Requests' forum for you to add any issues you find, any missing settings or just anything you'd like to see added/removed from the feature set that Xenforo offers. We will get to everything over the coming weeks so please be patient, but add anything at all to the thread I mention above and we promise to get to them over the next few days/weeks/months. In the meantime, please enjoy!

More of those lab benches.

Sheffield Tony

Nordic Pine
Joined
Nov 25, 2020
Messages
734
Reaction score
154
Location
Bedfordshire
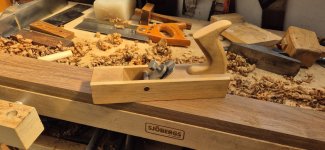
We were talking about chemistry lab bench tops the other day. At the weekend I cut up a couple of them, one 1.8m and this one, 2.6m long, both 600mm wide. These came from the long since demolished labs at my former place of work. Cut carefully to avoid the tongue and groove joints every ~150mm. The bit pictured is the spare. The rest is going to be a gate for a side passage, and should go nicely with the iroko front door which I made some years ago. I presume it is iroko, but the second (larger) board was much waxier to the touch than the first, though in colour and grain they look pretty similar. I could hardly lift the bigger piece ! I was younger and stronger when I acquired it.

This cutting up saw done outdoors as I only have the choice of a 28" 4 tpi rip handsaw, or a hand held circular saw, with no dust extraction. I did the initial cut by hand which established a straight edge to reference off; the back of the boards had been trimmed to follow a wall (seemingly by axe !) and the front edges were not too straight either. I was surprised how short work the hand saw made of this, which bodes well since some of the bits need to be ripped down the hard way still. A lot of hand planing to do if it is ever cool enough too.

Oh - my main purpose in posting this, aside from proving I still do some actual woodwork, was to ask for opinions on gluing up waxy stuff like this, for outdoor use - glue choice, preparation ?

20260718_152913.jpg
 
I always clean areas to be glued with acetone.
I generally use a D4 poly expanding glue on Iroko

Many years ago one of my clients called me to look at her Iroko windows that would not close, basically all 4 glue joints had failed, apparently these windows had not been fitted long so my guess the manufacturer didn’t clean prior to glue up.
 
That's a good straight edge. I have high expectations for the gate 🙂
 
Has cascamite gone back to its old formula, I quite liked that stuff
 
Has cascamite gone back to its old formula, I quite liked that stuff
According to posts in this thread, yes, with the brand now belonging to a different company from the one whose ingredient supply was interrupted by geopolitical problems.

 
The last time I glued up iroko I used "Extramite", which I think was a Screwfix cascamite rip off. The door is still in one piece after 20+ years, so maybe that's the way to go.

So after the sawing up, yesterday I tackled removing the varnish and whatever else may have penetrated the surface of a former lab bench (these were from a lab that mostly analysed soil samples, so maybe nothing too offensive). That seemed like a job for my homemade rudimentary scrub plane made from wood from an old sofa, a piece of M3 power hacksaw blade and some scrap box metal bits.

20260802_114602.jpg

I also ripped some of these pieces down the hard way to make thinner slats; to do that I grooved both edges with a Record 050C (the one with the plastic handle nobody but me likes) fitted with a 3mm cutter (this one also came with metric sizes metric !), then hand sawing using the grooves as a guide. Then you can plane the sawn surfaces down to the side of the grooves left at the edges, and you have it in two pieces only losing 3mm, which is not bad. I would have taken some more pictures, but (a) I realised my work area was in a terrible mess and (b) it has a a roof of that triple wall plastic stuff, so I had to retreat somewhere cooler !
 
Still planing up pieces of bench top. And spending a lot of time re-sharpening plane irons. Checking with "Wood identification and use" by Terry Porter, I see this is not my imagination, iroko blunts tools quickly because of mineral inclusions. And you can clearly see white deposits that must be the cuplrit.

This has me wondering, I'm using my Record #5 with its original tungsten steel iron. Rather than wearing that down, should I swap out the original cutter for a modern replacement one ? Thomas Flinn or Ray Iles for example. Though IME the old Clifton "wonky stamp" irons were if anything too thick for older planes requiring filing at the mouth; Ray Iles doesn't seem to say how think theirs are. I guess it will probably take me more years than I have left to wear out the Record one though !
 
I'm too tight to buy expensive replacement irons myself, but isn't it logical that a harder, possibly thicker iron would take longer to sharpen each time, cancelling out any benefit?

And you're probably getting quicker and more efficient by using and sharpening a lot more than usual.

But that's just me! If you need to treat yourself, why not.
 
If you move your cap iron close enough that it straightens out the shavings, then your original cutting iron will handle it fine,
instead of going blunt after about twenty shavings or so, after say a minutes working,
you can expect it good for few hundred, or whatever equates to about 40mins constant work.

That goes not only for your smoother, but your panel plane also.

All the best
Tom
 
I'm too tight to buy expensive replacement irons myself, but isn't it logical that a harder, possibly thicker iron would take longer to sharpen each time, cancelling out any benefit?

And you're probably getting quicker and more efficient by using and sharpening a lot more than usual.

But that's just me! If you need to treat yourself, why not.
Years ago I did a very 'Heath Robinson' test sort of thingie by comparing standard O1 steel against the newfangled PMV-11 stuff, newly invented by LV. Derek Jones was the current editor of F&C mag and had got hold of the first PMV-11 blade in the UK, which he posted to me (I still have it in my LV LA Jack) with an instruction to "test it and let me know what you reckon"
I can't remember exactly what I did but I do recollect comparing a sharp O1 and PMV-11 blade on genuine, proper Teak which as far as I'm concerned is the bench mark timber for dulling plane blades.
I planed a board of said Teak with each blade until it refused to take another shaving, counting the number of passes each time, the result being that PMV-11 steel took roughly twice as many shavings as O1 before it needed re-sharpening - Rob
 
That is an eye opener. Twice as durable is amazing. The best edge I've ever had in woodwoking tools is from Blue Spruce chisels I bought in a moment of flushness. (I have too many chisels). I don't really understand steel differences, but these are A2 tool steel cryogenically treated. Is that similar to PMV-11? Second best are my LN chisels which are the regular work horses. No idea what the steel is.

My habit is once a day's work is done, I give any blades (plane, chisel, scraper) a touch up ready for next time.
 
Back
Top