• Hi all and welcome to TheWoodHaven2 brought into the 21st Century, kicking and screaming! We all have Alasdair to thank for the vast bulk of the heavy lifting to get us here, no more so than me because he's taken away a huge burden of responsibility from my shoulders and brought us to this new shiny home, with all your previous content (hopefully) still intact! Please peruse and feed back. There is still plenty to do, like changing the colour scheme, adding the banner graphic, tweaking the odd setting here and there so I have added a new thread in the 'Technical Issues, Bugs and Feature Requests' forum for you to add any issues you find, any missing settings or just anything you'd like to see added/removed from the feature set that Xenforo offers. We will get to everything over the coming weeks so please be patient, but add anything at all to the thread I mention above and we promise to get to them over the next few days/weeks/months. In the meantime, please enjoy!

Nick's workshop

bluebirdnick

New Shoots
Joined
Jun 13, 2017
Messages
112
Reaction score
0
Location
Herts
Hi all

With the help of this board I built a practice shed in late summer last year, ready for a workshop build early this year. I have now finished that shed - I will put up a final pic soon. Unfortunately due to a back injury I was unable to build the workshop in Jan and Feb but I do want to get it done this spring. Due to the bad back, I am going to get someone in to do the base and, possibly the brick plinth - they are here tomorrow to price up. I am finalising the design and will share what I have when it is ready but very broadly it will be 5.4m x 3.6m, and will sit just over a meter inside my boundary. It will have a monopitch roof.

But in the meantime, I do have a few questions and would really appreciate your thoughts:

1) How important is insulating the floor? I am within 2 meters of a boundary so need to stay under 2.5m to avoid PP. The slab will be above ground level and adding insulation will eat up valuable floor space. Plus it is a lot cheaper to have the concrete as my finished floor than it is to buy the timber, sheet material and insulation to put on top.

2) If I just have the concrete base as my floor, I will obviously leave a gap in the plinth for the door. What do I do with the DPC at this point? Do I just return the DPC to the slab and run it under some sort of threshold strip at the door?

3) Has anybody used box profile metal cladding for walls? I am building this thing in the corner of the garden - the back wall and one side wall will not be visible from the house or garden. I think it will be quicker and cheaper to clad those walls with box profile cladding, spaced off the main wall with 25mm battens just like I would with feather edge. I also suspect that this will require less maintenance, which is helpful as those walls will be a pain to repaint in future. Is there any reason why this wouldn't work? the concern that springs to mind is I cannot see how to install the insect mesh, but I would appreciate your thoughts.

4) Is there any reason why I shouldn't use sliding patio doors as the main entrance? I want a big door to get in and out; they go for tuppence on Ebay; and I suspect would be easier than building my own door. (and the wife prefers the idea of a patio door facing the house than a large wooden one).

I cannot promise fast progress I am afraid (I would like the slab and plinth done by Easter ready to build in April), but your thoughts on some of this stuff could affect the fundamental design.

Thanks!

Nick
 
Hi Nick,

Welcome and great to hear you're about to build your own 'shop.

I'm hardly in a position to offer technical advice. I came to the forum as an enthusiastic DIYer but reading the builds and with the encouragement and advice of the other members I've got where I am.

There will be others who can give technical advice of the make up of the base and floor, but I live in a chalet bungalow on the side of a hill with suspended floors all over the ground floor. This means there are voids varying from 500mm to 1200mm below the floor. I have a large lounge and it loses warmth like you wouldn't believe. There are modern DG windows, cavity insulation and a bedroom over, so much of the heat is lost through the floor, even with carpet.

So, I d suggest seeking advice from other there about how to incorporate insulation into the slab without raising the floor. I suspect they may advise some excavation to manage the depth of slab/floor/insulation.

It gets really exciting at this stage. Enjoy the ride!
 
1/ Not very important. Mine isn't insulated, which shows how much importance I attach to it.

2/ If the top of the slab is at least 50mm above finished ground level, then (in an outbuilding only) I advocate not joining the DPM to the DPC. The DPC's sole function then is to prevent rising damp getting to the sole plate, and there is no sole plate at the threshold. Therefore no need for a DPC. For anyone getting hot under the collar about this, this advice applies only to outbuildings not covered by Building Control.

3/ Profiled sheets are fine with a timber frame, so long as you allow air flow behind with top and bottom vents. You'll need to work out how to keep insects out of the void behind.

4/ Well........ The only good reason I can think of is security. Patio doors are relatively easy to break into, and they give a would-be burglar a view of what's inside, which may or may not be an incentive for them to break in. Apart from that, no. Personal clumsiness aside, of course. I'm forever crashing long lengths of timber into mine, or chucking a ball for the dog against the door, so it wouldn't suit me.
 
Fantastic, thanks both!

That's it then- no insulation on the floor. And I will just stop the DPC at each end of the plinth. I will get a sample of the box profile cladding to work out how to install the insect mesh. The point on the patio doors is taken - whenever I move anything of any length around I always whack it in to walls. I will give it some thought.

You won't be seeing many pictures from me for a while I am afraid - progress is going to be slow, but I will be reading the other threads on here as I shuffle along with my project. Thanks again for the advice!
 
My garage workshop floor has no insulation but I use rubber interlocking mats for comfort and tool safety on top of the concrete.

Rod
 
Hi all. As evidenced by the complete lack of photos, I have made absolutely no progress on my workshop mostly due to a slipped disc. For a variety of reasons relating to the base, it is unlikely to get built where I want it this year. But we are fast running out of space so I do urgently need a workshop or something similar.

We used to have a garage to the side of the house, but that was knocked down to make space for a digger when doing the rear extension, leaving just the concrete base. We will do a side extension at some point in the next year or so, covering the area of the old garage base. In the meantime, given the delays with the workshop my wife wants to buy a cheap shed as a temporary measure and put it on the old garage base.

At approx 4.8m x 3.2m the garage base is similar to the size as I want for the workshop at the bottom of the garden (5.4m x 3.6m). I am thinking that rather than wasting money on a bought shed that we will throw out in a year or so when we do the side extension, I should basically build the workshop on the current garage base, and then dismantle and reassemble it as a workshop at the bottom of the garden when we come to build the side extension.

Does that sound sensible? Or am I kidding myself that I would be able to reuse a lot of the materials (and effort) that go into the temporary shed? Some points:

- In its life as a shed, it would have an apex roof. In its life as the workshop, it would be monopitch. So the roof would need to be done twice, and I would need to heighten one of the walls.

- The "front" of the shed will be the side of the garage - the door would have to move when I turn it into workshop.

- The garage base is slightly smaller than I wanted for the workshop, but i won't be too upset if I end up with a 4.8 x 3.2m workshop.

- The shed would be built right up to the boundary. The workshop would be 1 meter from the boundary. This means that both buildings will be max 2.5m high, but if I needed to I could expand the floorspace of the building when turning it into a workshop with no PP or building regs issues. I am assuming that the internal floor space of the shed with external dimensions of 4.8m x 3.2m is just under 15m2)

- I would be using box profile metal cladding for the "out of sight" walls for both buildings, as well as for both roofs. Although as mentioned, the shed would be apex roof and the workshop would be monopitch. Visible walls on both buildings will be clad with featheredge.

- Both buildings would incorporate the brick plinth

- To keep costs and construction time to a minimum and because it is primarily for storage, the shed would not be insulated or lined. I would obviously add insulation and OSB sheeting on the inside when it becomes a workshop.

Any thoughts welcome!
 
Unless you are extremely lucky or do a lot of design work, making something that will transplant perfectly to a new location without a lot of grief is unlikely.
Have you looked at the hire of a 20 foot container to use for now?

Bob
 
Thanks. I am not sure if I expect to transplant the entire building as built. As a minimum I will need to remove all of the cladding as on the workshop I want to do it properly i.e. breather membrane and a timber battens to space the cladding off the wall. But once I've removed the cladding I do expect that I could move the walls too, in particular as I would bolt rather than nail them together. But even if I just salvage the wall frames and cladding/feather edge, I think it will "save" me well over £500.

As regards 20 foot container: I wish! we cannot get one to the site for teh workshop, and the front of the garage base (and therefore shed) will be in line with the front of the house. I don't think the neighbours would ever forgive me if I plonked a shipping container there for a year or two. I used to hire one at a site around the corner but the only ones they have now are accessible by steps, and it's just too much of a pain to do that now.

The cost of even the cheapest 16x10 shed is over £1500 by the time you add a floor and some sort of roof covering.
 
I think you can do this. You've just got to be very precise with your measurements, and have corner joins which can easily be disconnected. Nuts and bolts seems the obvious answer to the latter. I would build all the walls panels to the same plate height, and have small additional panels from there to the underside of the roof. You could just chuck away the ones from the mono-pitch, and make new ones for the duo-pitch. If I were you I would put the building up in its temporary location without any cladding. In other words, just the panels covered with your breather paper and battens. With the permanent outer covering they'd be too heavy to shift. Obviously you'll need to set it up initially without electrickery, and work just from extension leads. This really isn't the end of the world.

When you put your roof together in the initial position, you'll need to make sure it is demountable. This means having screws rather than nails, and making sure that those screws aren't buried way into the timber. A little care at that stage with make it much easier when you come to take it apart.

You might need to jig up some sort of wheel or trolley arrangement for moving the panels during the big move, and have 2 or 3 friends around to give you a hand, but fundamentally I can't see why you couldn't make this idea work.
 
Thanks Mike - those are helpful suggestions. The point on not sinking the screws in too far is a good one - I did that on a different project a few years ago and couldn't get some of them back out again.

I think I am going to go for it. I really want to build something and I just cannot bring myself to spend £1500 on something rubbish that will be thrown away after a year or so. And it gives me a chance to practice some stuff I've not done before, like bricklaying.
 
Bricklaying in this heat is not easy. Getting the bricks wet enough, but not too wet, and the mortar just right, is quite difficult even for the experienced. If you know anyone who can give you a bit of guidance, with a trowel in your hand, you'd benefit enormously.
 
I’ve had three previous workshops with concrete floors and they're murder on your feet in winter and unless you paint them the inevitable dust isn’t good either. My present workshop sits on a concrete base but the floor is timber with 2” insulation. I covered the timber floor boards in 9mm ply which I then painted. I can’t tell you how much better this is underfoot than concrete and it is incredibly easy to keep clean. I tried all kinds of matting in my old workshops to make them more comfortable but they ended up being dust and swarf traps. A small added bonus of a wooden floor that I’ve found is that anything dropped is much less likely to get damaged.
 
Just to add a counterbalance to Woodster's point, I prefer a concrete floor, but I used a power float when I cast it, so it has a smooth, polished surface. It doesn't trap any dust at all.
 
We had a polished concrete floor in one of the places I worked, foot traffic and trolleys still generated dust. Two coats of floor paint sorted it though and it looked so much better. ;)
 
Thanks both.

The temporary shed is for storage mostly. The concrete has a raked finish. I was actually going to put down interlocking rubber matting to cover much of the floor as I've got loads of the stuff. When I come to do the workshop I want a polished, smooth floor. But that is a job for 2019!

As regards bricklaying- it is a daunting task. Two of the four walls won't be visible so I will practice on those, but I think I need to get the corners set first so I'll need to learn quickly! My dad has done a bit of bricklaying so I'll ask him to talk me through it. I am aiming to take a week off in early September so will try to get it done then. Once the plinth is up, my simplified shed should be a doddle!
 
If you wanted a median route to learning bricklaying - certainly enough for dwarf walls. you can mix up mortar containing no cement but possibly with a little plasticiser and it will behave very similarly to the real thing and then practise with your bricks and getting used to them absorbing moisture from the "mortar" as you work.

The obvious advantage is that afterwards you can take it all apart, re-use the sand and let the bricks dry off and brush the sand off them and reuse them.

Bob
 
Thanks all. I would love to do a bricklaying course, but with a small baby time is at a premium and I just don't see me having time to do it before I need to start. I will, however, practice first. My dad was here yesterday and he advised something very similar to the sand and plasticiser practice.

As always, progress will be slow but I'll put up photos when I do start.
 
A quick question ahead of ordering:

what size timber do I need for the rafters and ridge beam? I will upload some diagrams soon, but the temporary shed will be 4.8m long by 3.2m wide, with a duo-pitched roof. The ridge can only be 2.5m high and I want the eves no lower than 1.8m, so each rafter will span a distance of 1.6m from wall to ridge; and be at an angle of approx 20 degrees. I want rafters at 600mm spacing, to sit direcly above the studs.

My local building control produced this this seemingly helpful set of guidelines for proper buildings which I think say 47x100 C16 is fine for spans my size if at 400mm centers. And that is with a proper roof: I am just going to be using box profile metal cladding (not even any sheet material), which will be substantially lighter.

Any thoughts? As I cannot re-use the rafters when I move the building to the back of the house and it becomes the workshop with a monopitch roof I am reluctant to use more than I need here, in particular given the very lightweight nature of the metal cladding roof covering. (I will build a proper insulated roof for the workshop.

Thanks. I've got the week of 17 Sept off work to get this thing built, with the help of my dad. With the weekends, that is 18 man days. With good weather, I think I'll get the main structure up - it is the doors, windows, guttering etc that i suspect will have to be finished on subsequent weekends. I am practicing the brickwork this weekend.
 
Rafter size is more often dictated by insulation thickness than by strength requirements these days. 100mm rafters would only allow you 50mm of insulation, which isn't enough, so you should use at least ex-150 rafters. If you have ties at plate level (ie you have a flat ceiling, or, at least, joists where a flat ceiling would be, then your ridge board is non-structural and it can be anything convenient, such as 200x25. The idea with a ridgeboard is that it is wide enough such that all, or nearly all, of the plumb cut on the end of the rafters sit against it, which would be the case with 200x25 for a 145 rafter depth at 20 degrees. You could just about get away with a 150x25 ridgeboard. However, if you don't have ties, then I'll need more info before calculating a structural ridge purlin (and remember, I'm an architect, not a structural engineer).
 
Thanks Mike. The question is about the rafters for the temporary shed - there will be no insulation. just rafters with the box profile cladding on top. The building's only purpose for now is to store stuff. When I come to move the building into its permanent home as a workshop I will get rid of the roof structure, and replace it with a monopitch roof (re-using the box profile cladding). So to my mind, all I need is timber strong enough to hold up a lightweight roof covering. I did not intend to put in ties for the temporary shed unless I need to - the pitch is so shallow (and the eves height so low) that I was hoping it wasn't necessary.

I'll upload some diagrams over the weekend to make this easier -I've got a model in sketchup, I just need to get some diagrams out of it!
 
bluebirdnick":3qh32r0h said:
Thanks Mike. The question is about the rafters for the temporary shed - there will be no insulation. just rafters with the box profile cladding on top. The building's only purpose for now is to store stuff. When I come to move the building into its permanent home as a workshop I will get rid of the roof structure, and replace it with a monopitch roof (re-using the box profile cladding). So to my mind, all I need is timber strong enough to hold up a lightweight roof covering. I did not intend to put in ties for the temporary shed unless I need to - the pitch is so shallow (and the eves height so low) that I was hoping it wasn't necessary.

I'll upload some diagrams over the weekend to make this easier -I've got a model in sketchup, I just need to get some diagrams out of it!


I fully appreciate the temporary nature of this phase but if the roof sheet itself has no inherent insulation then beware the demon condensation. Even some cheap osb under the metal will help in addition to as much ventilation as possible. I can't recall if you have a DPC in the floor of the temporary structure but if not maybe layout a tarp on the floor before loading the place up. Not ideal but should help reduce moisture input

Bob
 
9fingers":u7pzm14h said:
bluebirdnick":u7pzm14h said:
Thanks Mike. The question is about the rafters for the temporary shed - there will be no insulation. just rafters with the box profile cladding on top. The building's only purpose for now is to store stuff. When I come to move the building into its permanent home as a workshop I will get rid of the roof structure, and replace it with a monopitch roof (re-using the box profile cladding). So to my mind, all I need is timber strong enough to hold up a lightweight roof covering. I did not intend to put in ties for the temporary shed unless I need to - the pitch is so shallow (and the eves height so low) that I was hoping it wasn't necessary.

I'll upload some diagrams over the weekend to make this easier -I've got a model in sketchup, I just need to get some diagrams out of it!


I fully appreciate the temporary nature of this phase but if the roof sheet itself has no inherent insulation then beware the demon condensation. Even some cheap osb under the metal will help in addition to as much ventilation as possible. I can't recall if you have a DPC in the floor of the temporary structure but if not maybe layout a tarp on the floor before loading the place up. Not ideal but should help reduce moisture input

Bob
Thanks Bob. I was wondering about condensation. The cladding comes with foam fillers that you wedge between the profile of the cladding and the timber wall of the shed, but I was wondering if I could deal with the condensation problem by leaving them out thus allowing ventilation. my reluctance to include osb was as much to do with time as anything else - when I built the practice shed It took me quite some time to do, and this one is 4x the size.

I doubt the slab on which I am putting the temporary shed has a DPM. The garage that was there before was probably built in the 1930s. I was considering putting down an Ardex liquid DPM sandwiched between layers of Arditex NA, which is something I've done in the past with damp floors. It works well but it is expensive gear and I am hoping unnecessary for what I am doing.

I will rethink the roof then.
 
Certainly leaving out the profile sealing stuff and allowing ventilation both at eaves and ridge levels will help.
No need to throw money at the dpc on the floor just some tarps/ground sheet will keep ground source moisture out and if you are going to be in and out a lot, maybe some osb duck boards for the heavy traffic areas.

Just feeling that a few precautions at this stage will help keep the contents is as good as condition as possible.

Bob
 
Thanks. when I built the shed I allowed ventilation above the roof insulation and below the plywood. As I am not insulating the roof for the temporary shed, is the best way to do it to go with cladding on battens on OSB (do I need battens?), and allow ventilation underneath the osb i.e. ventilate the inside space of the shed, if you see what I mean?
 
Hi Nick,

I'm trying to see this from a layman's point of view.

If you just put a metal cladding on the roof for the temporary situation, you will get condensation and that can potentially damage roof timbers in the long term but in the short term what you are storing, particularly as it will drip on to it. I know I stored my stuff in a container for 5 years!!!!

I think the way to go is to use OSB onto the rafters, then battens, then metal cladding and the battens gap creates the space which ventilates the roof structure, preventing condensation settling on roof timbers. The OSB then creates a vapour barrier.

Put everything together with screws so that the dismantling will be easier, and many screws could be reusable. I find that torx headed screws are far more reusable than pozi headed which tend to get rounded off.
 
In an ideal world yes add battens running down the slope on top of the OSB but in practice for a short term solution, the channels formed by the roofing sheets will give some vent channels and any condensation should run down the water resistant surface of the OSB and drain away harmlessly.

I don't think we are after the Rolls Royce solution here, Ford should be more than adequate!

Bob
 
Thanks both. Right, OSB it is. If I am adding OSB to the roof then I might as well put on breather membrane, battens and cladding. I can re-use the OSB on the roof for the workshop. I'm putting breather membrane to the walls anyway and will have loads left over, so it won't cost any more.
 
brick plinth detail.png

EDIT: diagram says C32 timber. Should be C24- I'm working on a project called C32 in work and I cannot get it out of my head!
 

Attachments

  • Rafter detail.png
    Rafter detail.png
    893.8 KB · Views: 12,251
  • Roof OSB.png
    Roof OSB.png
    705.5 KB · Views: 12,250
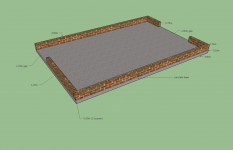
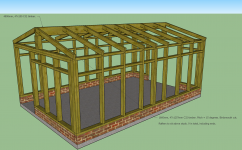
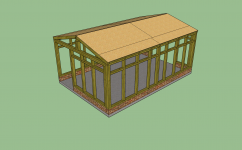
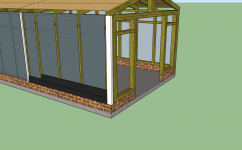
Some pics from my sketchup model. The long walls are made in two sections to make life easier when I come to move it. The cladding will be cut so that it does not need to be removed in order to move each part of the wall. For the same reason, the breather membrane will be wrapped around each part of the wall before they are joined, so that they are still detachable. The join is covered by 2 battens, on top of which I have put the white batten to protect the cut edges of the cladding. When it comes time to do the move, I just remove the white batten and unbolt the two wall parts from the inside. Each wall part will be heavy with the cladding on it, but I hope not so heavy that it cannot be lifted and moved by two people.

The other long wall will have box profile metal cladding as it is tight up against a fence and unseen. I will reuse that cladding for the back wall of the workshop, which will also be unseen.

The corners will be 47mmx100mm timbers. Not as pretty as the more intricate corners that I've seen on here, but it requires less skill and less time to do so I am going with it.

I will also put in blocks between the rafters to close up that gap, but leave say 30mm for an air gap which will be covered by insect mesh.

The brick plinth and roof timbers will all go to waste when I come to do the move, but the rest should all be reusable. I am hoping I can reuse entire sections as constructed rather than breaking the building up into the individual timbers, but I will put it together with screws and bolts just in case (except the cladding, which will be nailed on). I was actually looking at using torx screws but I've got about 500 fischer 100mm screws with a pozi head so I'll get through those first!
 
Looks like you've got it covered, Nick.

I found the beauty of Sketchup was that if I couldn't make it or fit it on the screen then it wouldn't work on site. So I'd carry on till I found something that would work.

Keep it up.
 
A quick question on the plinth.

I was planning a on doing 3 courses of bricks in stretcher bond. But obviously a brick is only 102mm wide - just about wide enough to sit the wall frame timbers on. By the time you add the battens and the cladding, the wall thickness gets to 150mm+.

Is it OK to leave the cladding overhanging the wall? I see Mike's workshop has 50mm blocks behind the brickwork, but neither of the suppliers I am using have 50mm blocks. How much of a faff would it be to cut a 100mm block into two 50mm blocks? I think I need 30x 50mm blocks, so that means (successfully) cutting 15 100mm blocks.

If it is too much of a pain, I assume there is no reason why 100mm blocks instead wouldn't work, other than it being more than is necessary?

Thanks
 
Nick,

Thermalite and similar blocks are easy to cut with any of cheap saw from a DIY shop, although I did buy a stone cutting saw from Toolstation, it was only about £16.

I also made up a jig so the saw didn't wander on the way down. It was not too much trouble and I had a similar number to cut.

It would be desirable for the cladding, or at least the bottom most couple of lengths, to over hang the wall so that rain doesn't drip straight on to it. I also incorporated a bit of a drip curve into the bottom length to encourage the drips to increase in size and fall outside the wall.

And that's why the wall is made 50mm thicker to accommodate studying, battens and cladding etc.

Good luck.
 
bluebirdnick":1x3r35py said:
A quick question on the plinth.

I was planning a on doing 3 courses of bricks in stretcher bond. But obviously a brick is only 102mm wide - just about wide enough to sit the wall frame timbers on. By the time you add the battens and the cladding, the wall thickness gets to 150mm+.

Is it OK to leave the cladding overhanging the wall? I see Mike's workshop has 50mm blocks behind the brickwork, but neither of the suppliers I am using have 50mm blocks. How much of a faff would it be to cut a 100mm block into two 50mm blocks? I think I need 30x 50mm blocks, so that means (successfully) cutting 15 100mm blocks.

If it is too much of a pain, I assume there is no reason why 100mm blocks instead wouldn't work, other than it being more than is necessary?

Thanks

There are two or three threads that demo where members have done exactly this Nick, cutting blocks down. Have a search for block cutting and see what you find and that should help you with what you're looking for.
 
Good evening all.

2 days in, and the brick plinth is up. One skin only - the blocks that sit behind the brickwork are not yet done. Pics to follow tomorrow. As mentioned above, this was my first go at brickwork. It's hard, slow, messy and not much fun, but it's level and done. The base I was working off was not level - it was out by at least 20mm over the length and 30mm from one corner to another which led to a good 90 mins of head scratching. My kees are done too. Making the mortar was the hard part. Dad was helping - he seemed to think the building sand was wrong but the mix took much more water than any guides on making mortar would suggest.

Question
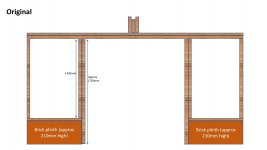
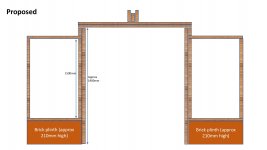
There is a fairly glaring design flaw. The top of the wall plate will be about 1.8m above the ground. This was what I wanted and the timber I've ordered means that this is really all I can build. However, because I am doubling up the wall plate at the gable walls, it means that the underside of the wall plate is just 1.7m above the ground. I will have to duck to get in.

new gable wall - original.jpg

So I need to find 15cm extra height at the doors, ideally 20cm. Lengthening the main studs beyond 1.5m is going to cause me trouble, so would this work instead?

new gable wall - proposed.jpg

It looks like it might be a pain to make so I think i would actually make it largely as originally designed, and then cut the wall plate and sole plate once it is in place and add in the longer door lining timber (150mm x 50mm) and the doubled-up plates above (the lower of which would be 150x50 and form part of the door frame). The main concern is whether this would get in the way of the rafters - I will have to do the maths to work that out - but thought I would check to see if anyone had any other concerns.

Lessons for next time

Seriously - get someone else to do it if possible. No part of this was enjoyable.
If I do have to do it:
- It DOES get much, much faster once the corners are in and you can string a line.
 
You don't have to have corners in to string a line! You can build a temporary wooden arrangement to tie your strings to. It speeds things up no end.
 
Mike G":3sthfz24 said:
You don't have to have corners in to string a line! You can build a temporary wooden arrangement to tie your strings to. It speeds things up no end.
Doesn't it just. it took me hours and hours to get those corners in. Once the string line went down and I could build the walls, I was putting bricks in at about 5 times the speed. (but still slow!)
 
quick question: The temporary shed/garage is being built tight up against a fence and so was going to lay blocks along that wall for the outer skin. Are areated blocks OK for this, or do i need medium dense? I cannot see how they could get wet, but I've got a nagging concern that something that looks a bit like a sponge may not be great externally, even though the supplier says that they can be used below DPC and externally.
 
The thermalite blocks on my inner skin appeared to suck water up when it rained earlier last week on my build (mine is open and unbuilt at the moment) so I wouldn’t risk it unless anyone knows different.
 
Back
Top