• Hi all and welcome to TheWoodHaven2 brought into the 21st Century, kicking and screaming! We all have Alasdair to thank for the vast bulk of the heavy lifting to get us here, no more so than me because he's taken away a huge burden of responsibility from my shoulders and brought us to this new shiny home, with all your previous content (hopefully) still intact! Please peruse and feed back. There is still plenty to do, like changing the colour scheme, adding the banner graphic, tweaking the odd setting here and there so I have added a new thread in the 'Technical Issues, Bugs and Feature Requests' forum for you to add any issues you find, any missing settings or just anything you'd like to see added/removed from the feature set that Xenforo offers. We will get to everything over the coming weeks so please be patient, but add anything at all to the thread I mention above and we promise to get to them over the next few days/weeks/months. In the meantime, please enjoy!

Nick's workshop

Another quick question.

The FE boards I've ordered to clad this building are pressure treated. I didn't really think twice about it- I always order the same stuff for fences etc that I leave unpainted. But I want to paint this building. Bedec's technical sheet tells me that I need to leave pressure treated wood for at least 5 months before painting. Whoops.

So am I left with cladding it unpainted, and painting it in the spring? Any way I can get these boards painted before they go up?
 
I don’t know why they say that unless it’s because the tanalising goop might leach out through the paint.

If that’s the case then try Zinsser Bin or similar stain coat as your primer and that should be fine I would think.
 
In reaction to the cladding, we are encouraged to paint both sides of the cladding to enable even movement of the wood, or rather to prevent uneven movement of the wood.

Therefore, that requires the inside faces and edges to be painted before the cladding is attached.

I used a local sawmill to supply newly cut FE cladding and painted each board with 2 watered down coats of Bedec Barn Paint all round before putting it up, and a full strength coat after.

Would it be possible to return the treated FE and then source a sawmill to supply newly cut boards?
 
Thanks all. Malcolm- good question. I've given the supplier a call. They don't stock untreated but say they will give the sawmill a call to see what it would cost, if anything, to swap it for the same in untreated.

Wall panels made today. Not put up yet, but a far more enjoyable day than kneeling down trying to do brickwork (badly). Pics to follow tomorrow - honest!
 
I wouldn't take any notice of the treated timber thing. Bedec Barn Paint works perfectly well over treated timber.
 
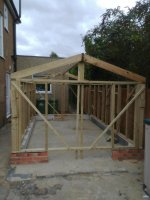
About time I put up some pics. Here is where we are at close of play today- ridge beam temporarily in place, with gable rafters up. Plan for tomorrow is to put in the rest of the rafters and OSB roof sheeting, and cover with breather membrane ready for the rain on the weekend.

The sole and wall plates on the front and and back wall will then be cut; door lining and support for ridge beam installed per my post above.

EDIT: Apologies for the orientation. Will fix!

20180920_174821_resized.jpg
 
Looks good to me Nick. Well done.

I rotated your image. If you are having problems attaching images or rotating them before you post please let us know. Images taken on Apple devices we know can be a pain to rotate. Easier to take the image with the device's ( iPad or iPhone ) volume buttons at the bottom. Full details here :-
viewtopic.php?f=20&t=2850
 
I built my shed a couple of summers ago when the weather was really bad and very changeable.
I laid OSB then EPDM to make roof water tight then covered walls with the breather membrane.
Doing the rest inside ie internal insulation, OSB linings etc wasn’t that much more difficult but it meant I could crack on with everything nice and dry.

Rod
 
bluebirdnick":23qi3jbk said:

At the moment you have the load from the ridge beam going through a plate, centre-span. Whilst this plate is acting as a tie and thus in tension, it will still deflect. You need a proper lintel in over the door opening.
 
Thanks everyone for the encouraging messages. I've had a busy day - all the rafters are in; all of the blocks at the eves that sit between the rafters are in; and 4 full sheets of OSB are installed on the roof. A quickly taken picture is to follow. I still need to install some cut-down OSB sheets to complete the roof, but with most of the OSB on the roof I have finally been able to clear the drive so my wife can park there again. This is BIG NEWS and has won me brownie points - we have parking restrictions on the road and my wife was unable to get the car onto the drive past the building materials that have been there all week. She can now park the car on the drive again, which has gone down very well.*

Mike - I agree, and that's the plan. If I were to install a door today it woudl be just 1.7m high, so it will have to change.

The plan is to leave the vertical props in place temporarily; cut the sole plate and wall plate; install the door lining (6x2 timber) which gives a double-batten at each side of the door; add doubled-up 4x2 timber above the new door lining to form the lintel; install a post coming off that lintel to support the ridge beam; and then remove the props. Hard to explain in words, but hopefully the diagrams on the previous page show what I mean! I did it in two steps because I thought that was the most secure and certain way to do it.

It will look a bit odd as the lintel will be above the eves, but it was the best compromise I could find in order to get within permitted development and maintain something of a pitch on the roof. The building faces the road and most other houses have garages like our old one with nice high ridges, so having a totally squat building didn't seem right. It is still going to be pretty flat compared to the rest, but an eves height of 1.8m was as low as I was prepared to go.

*I was able to park the car on the drive past the building materials, as was my dad. However, pointing this out did not really deal with the situation and just getting the timber and sheet material off the drive before the weekend was definitely the better approach.
 
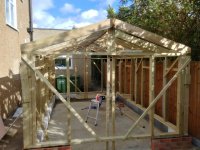
Progress as at about 4pm today. Only other development after this was getting ties in on the gable rafters and the middle rafters; and getting most of the OSB up on the roof.
 

Attachments

  • 20180921_154917_HDR.jpg
    20180921_154917_HDR.jpg
    396.9 KB · Views: 13,269
Some points of detail/lessons for next time, recorded more for my own benefit really:

1. I forgot the straps. Will add them over the weekend, weather permitting. I'll have to fix them to the concrete floor or blockwork.

2. In the thread above, I asked whether I can use aerated blocks on the exernal skin. I did do this on the wall which is tight to the the fence, with 140mm wide blocks. I gave Celcon/H+H a call beforehand to check with them what I am doing, which will include dropping the box profile cladding on that side to ground level so as to cover the blocks. (This was something I had decided to do to allow me to use longer metal cladding sheets, which give me flexibility on design of the building when I move it). They said it was fine, so that is what i have done. To try to err on the side of caution I did "render" the external face with a coat of 4:1 sand:cement mortar. Time will tell if it will work.

3. On the opposite wall I used bricks as the external face, and used full 100mm blocks (rather than 100mm cut-in-half blocks) on the internal face as we were struggling for time to get them cut and I had enough to lay that skin in full block widths. It will look a bit odd on the inside and will make strapping a bit harder/less effective, but it meant we got the job done in the time we had allotted to it.

4. There are doors front and back, so the brick wall is actually 2 separate "U" shaped walls. My errors mean that one is about 8-10mm lower than the other, but both are level in themselves. I therefore screwed some 9mm ply onto the bottom of the sole plates on the low side, and painted this with end grain treatment. Not ideal, but it seemed like the best way to deal with the error in the brickwork.

5. You can barely see it, but I did put down some narrow DPC that does sit under the sole plates. Next time I will use wider stuff. In this build I am hoping it will perform 2 tasks: protect the timber against rising damp; and also provide a clean surface for the sole plates to be cut away from in a year or so's time

6. With a view to preserving the wall panels and to facilitate moving the building in a year or so, I used building silicone rather than mortar to bed the wall panels onto the plinth. My theory is that it will be easier and cleaner to slide a blade underneath the wall plates to cut them away from the plinth than it would be to get them out of mortar. And to be honest, I really couldn't face any more sand and cement at that point. I also put dabs of silicone under the dpc - I didn't like the thought of it unbonded to the plinth and so subject to slip around.

7. I cannot bolt the wall panels together! I need bolts at 6 junctions: each of the corners; and the joins in the middle of the two long walls. I've managed about half of this using my dad's drill, but he left this morning and my 18v drills just don't have the power to get through. The only mains powered drill I have now is a 5kg SDS monster, and that is far too big to get into place to drill the holes I need. I've temporarily clamped the unjoined corners. I think I'll find a way through the connections in the middle of the long wall, but the corners have me stumped. When using my dad's drill I had most success with a 12mm auger bit, but my drill dies when trying to it through the corners, even when I do it in phases.
 
A question. I got the roof covered with OSB this morning, but it started raining before I could get the breather membrane on the roof. I waited for an opportunity to get out there to finish off, but it didn't come.

If I can get 30 mins free in the morning, can I cover the wet boards with breather membrane? It is due to rain heavily tomorrow. I would obviously do what I could to dry them as I go, but as a matter of principle is it OK to cover damp/wet boards?
 
bluebirdnick":31vprc50 said:
A question. I got the roof covered with OSB this morning, but it started raining before I could get the breather membrane on the roof. I waited for an opportunity to get out there to finish off, but it didn't come.

If I can get 30 mins free in the morning, can I cover the wet boards with breather membrane? It is due to rain heavily tomorrow. I would obviously do what I could to dry them as I go, but as a matter of principle is it OK to cover damp/wet boards?

I'd always assumed that the breatheable feature would allow water vapour through but not liquid water. OSB is reasonable resistant to water due to high glue content. So I think you will be fine.

Bob
 
What roof covering are you proposing as EPDM sticks better to new OSB and are we talking about the top layer of OSB? I cannot see that breather membrane here will do any good.
It will keep the rain out nailed to the wall sections.

Rod
 
I am going to put on box profile metal sheets. Originally this was all I was going to go with (this is a temporary building) but advice here has correctly pointed out the condensation issues, so I've put OSB on top of the rafters. I was going to cover the OSB with a breathable membrane; then battens; then the cladding. The membrane was only going on because it will be 2 weeks before the metal sheets arrive and I wanted some sort of protection for the OSB in the meantime, and the membrane I intend to use for the walls comes on a roll so big that I have more than enough to spare for the roof.

The weather did clear up briefly around 6am this morning, but the little one picked up a virus yesterday and had kept us up all night so I was in no state to do any work on the roof! It is going to dry out in the next couple of hours and due to be dry from then on for the rest of the week, so I might just sit it out and let it dry out this week while I am in work.
 
After I got my osb sheathing up, I got a cheap couple of plastic tarps from any diy outlet and anchored them Dow till I cold get the metal on . They’re cheap enough to dispose of after, and you might even be lucky for them not to be torn at the end of the job.
 
Thanks all. The weather cleared up beautifully around lunchtime and by 5pm everything was dry (or at least felt dry). I've covered it with a breathable membrane, which is hopefully doing the same thing as the pastic sheets did on Malcolm's shed ie keeping the boards dry until the roofing material arrives. I wil leave the membrane on my roof though - I might as well, now that it is there. And I don't want to have to go back on to the roof just to take it off!

Next job is wrapping the building, and adding the FE boards. But that will have to wait until next weekend, assuming I can get a few hours during the week to paint them.
 
Thats looking good and you're making much quicker progress than I am!

I have my walls up and screwed the panels together. Part drilled and used a driver which is a godsend and it seems pretty sturdy, much easier than the last shed I build when I used bolts.


Did you screw or nail the OSB ? What size nails/screws did you use.
 
hi Tabs

I screwed the OSB down. I used 4.5mm/40mm screws - the ones that require no pre-drilling as I didn't want to spend longer on the roof than I absolutely had to. But then I am using screws everywhere other than fixing the FE boards, as I expect to take it all down again and move it in a year or so. What I found when I made the shed last year was that the small screws do shear and break quite easily. I had to remove the sheet material on the roof to change the design after a week or so, and quite a few had broken. I think one of the benefits of nails is that they are more likely to bend than snap which may be an advantage, but as I say above I screwed mine down as I want to remove that material again in the not too distant future.

I am in work until Xmas so progress will now slow to whenever I have time on weekends, but next steps are installing membrane and battens on walls; and painting and installing FE boards. Then I need to do doors and windows. Conceivably I could be secure by the end of the weekend, and finished by mid October. But please realise that getting a building up as quickly as possible was the main objective and my build is far more basic than the others on here - I used a pre-existing slab; there is no insulation; no internal wall lining; a roof that will arrive cut to size and ready to screw on; and lots of details such as the arris rail at the foot of the wall are missing on mine. And I have benefitted a lot from having done the practice shed last year. I spent a lot of time scratching my head during that build trying to work out how best to build frames; square things up; do corner details etc. This time I am trying to apply what I learned, which has led to far more activity and far less pondering! The main area where I had to learn things this time was the brickwork, but as I say above I am displeased with what I have managed and will likely ask a bricklayer to do the next one for me. Yours looks much better - well done!
 
Hi all

I've had almost no time so progress has all but stopped. I had a full day free yesterday and wanted to get the doors on, but I simply couldn't work out how to bend the hinges. Any tips? The hinges I have are pretty heavy, and I just cannot find a way to bend them cleanly. I've got a small bench vice that I thought would do the trick but I end up with a massive radius. What's the correct technique? Or do I just need lighter hinges?

Thanks
 
Nick,

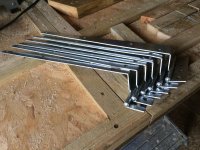
I trolled round the industrial estates in mine and nearby towns till I found a little fabrication firm who had a sheet bender. I told them what I was doing and showed them the scribed mark and which was inside and outside and offered a fiver for their coffee club. They took about three minutes to do six.
IMG_1449.JPG
 
Thanks both. Those additions for a vice look perfect, but I have the problem you identify in that my vice is pretty shallow. I will see if I can find someone to bend my hinges this weekend.

If I cannot find someone, then given my time constraints, I may just go with doors that open inwards instead.
 
This did actually get built in the end. Not quite finished as this pic shows, but finished enough that I've been using it pretty much since my last post here in October. There is still a bit to do and if I get a an hour or so I will finish cladding the front today and putting an edge on that roof, but wanted to thank everyone (again) for their comments and posting their own builds as it is really helpful! I gave up on bending the hinges in the end, so the doors open inwards. The front doors are there for show really, I have almost no reason to open them as the back door is closer to the house so it's not that big of a deal, in particular as it's only going to be there for 2 years.

The doors will be painted - the front doors will be red to match the house front door; and the back door will be turquoise as I've got some leftover paint - turquoise was the first colour we picked for the shed, before deciding it needed to be a lot darker. Which actually means I've painted all of the cladding twice! I've spent longer painting this building than I have spent building the thing. There are some other odds and ends to finish off (guttering, windows) but mostly finished now.
 

Attachments

  • IMG_20190302_164926.jpg
    IMG_20190302_164926.jpg
    459.8 KB · Views: 11,980
I hope you are proud of yourself, you should be.

Dont forget to show us a bit of what you get up to in there.
 
Thanks, all. This is a simpler building than the others on here so when I get a minute I'll try to get some photos up of some of the short-cuts I have taken.
 
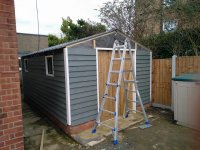
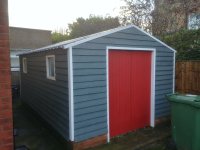
Hi all. I did finish this in the end, probably around easter last year. So about a year ago. Here is the proof:

20200116_085411_HDR_resized.jpg

20200116_085355_HDR_resized.jpg
 
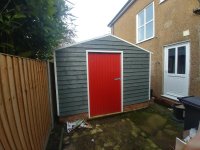
... and then in January this year we started the side extension so it got taken apart again! Again - proof:


20200116_105125_HDR_resized.jpg
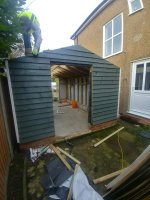
The builder arrived at about 9am to start taking it apart. Somewhat depressingly, he had it dismantled and stored in the back garden in the constituent panels, with the brick plinth in the skip, by lunchtime. Oh well.

So, it is now ready to be re-assembled in the back garden as soon as I can build/afford a new base and plinth. It unbolted really quickly and easily so my hope (!) is that it will go together as easily again. I may make it a bit shorter, but that is just a case of amending two of the side panels and cutting the ridge beam. Time will tell.

Thanks to everyone on here for sharing their wisdom, in this thread and in the multiple threads on this part of the board. It's a brilliant resource, and I'm quite proud of what I did with your help. When I rebuild it I am going to add some of the other key elements like insulation and osb lining, but for £1500 or whatever I spent on it so far and the effort I put in, it is a bargain. The hardest part was the plinth (not doing that again myself) and the longest part was the painting which took forever - the carpentry bit in the middle was a doddle really, and good fun.
 
Hello everyone.

As set out in this thread, I built a large shed/small workshop on a temporary site about a year ago; and a few months ago the builder dismantled it and built an extension on that site. I built the workshop in a way that (I hope) made it easy to transport to a new location, and I am now turning my mind to putting it in its permanent home. As always, any advice or comments would be much appreciated.

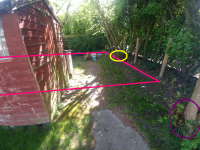
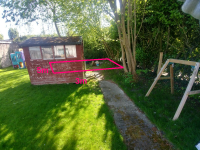
Here are some photos of the area where it will be permanently located:
20200419_101024_HDR_resized (1).png

20200419_101041_resized (1).png

I will have to remove the tree circled yellow; but not the one circled purple.

It is hard to show, but towards the back of the plot the ground does slope upwards slightly so I will have to remove more soil there in order that the slab will be proud of the ground level.

20200419_101122_resized.jpg

The site is about 40m from the road via a narrow pathway approx 850mm wide, and we are on clay soil. There is a substantial laurel hedge that runs alongside, as you can see in the photos. There is also a concrete path that will need to be taken up as part of this. The building will be used as a workspace but also for storage. I don't have any heavy machinery, the heaviest thing to go in there is probably a workbench. I have asked some local groundwork companies to quote for doing the excavation, but before I go ahead I wanted to check that my basic plan was sensible:

- remove old red shed, which sits on concrete lintels over soil

- cut down tree and dig out stump- excavate to 150mm generally, but 200mm at the edges - (first 300mm around the edge). Dispose of waste. I make it approx 2.25 cubic meters to get rid of, mostly soil but some concrete.

- fill with type 1, compacted with whacker plate to depth of 100mm. Edges should still be 50mm lower than the rest of the base.

- sand blinding laid

- DPM put down

- shuttering installed to allow for top of slab to sit approx 50mm above ground level
appropriate mix of concrete to be supplied and transported to site, and laid to depth of 100mm (150mm around the edges). I estimate it to be approx 2m2 of concrete. Surface to be left level and smooth as possible, ideally power-floated.

I am not insulating the floor as I am working to 2.5m.

Any thoughts? My concerns are that there are a lot of roots in the area and so I question whether I need to go down further. My other concern is cost of concrete. I am in Herts, and while volumetric is easy to find, the only option I can get for moving the stuff 40m from the road to the site is a pump, which is expensive, especially for such a small quantity. Mixamate advertise a mini dumper but don't actually have it, and barrow mix is seemingly not offered in my area.

Obviously COVID-19 will play its part too and things will move more slowly than I'd like, but I just want to make sure I've got a sensible plan before starting.

Thanks!
 
Nick,
I'm probably going to build something very similar to your temporary shed - 10 x 16 on a concrete base.
I'm also close to a boundary so restricted to 2.5m overall height. Did you manage to stick to that with your build - and if so what was the headroom like inside?

If so what size timbers did you use for the studs and roof? Was the pitch sufficient enough or would you suggest a mono-pitch roof like you mentioned for your new build?

I'm busy teaching myself sketchup (as well as learning about building design at the same time!!). Do you still have your plans and if so could I be cheeky and ask for a copy of your sketchup file so I can see what an experienced builder has come up with?

Cheers
Sean
 
Hi. Sorry for the late reply. You are the second person to ask for my sketchup file - apologies also to the other person who had asked for it! You are welcome to it if I can find it, as is the first person that asked. I am away from home at the moment (It's on my desktop pc) but will try to dig it out when I am at home in a few weeks.

Warning: my workflow in sketchup is erratic. To "save" my work I simply copy and paste the build at a point where I am satisfied with it and then tinker/move on with the copy. So my file will be full of half-finished, abandoned buildings and one or two that actually represent what I built! But if I can find it I am more than happy to share.

Yes I stayed under 2.5m for the temporary garage. 2.5m at the ridge means 2.2m internally after allowing for the ridge beam and roof materials, and that is fine for my primary purpose of storage of toddler's toys and second-hand tools. If I was using it as a workshop the headroom would be a bit tight: moving a sheet of plywood around was possible and I did it quite a bit, but I was constantly careful of bumping into the roof ties. Depends on your hobbies I guess. If you make nice things out of 5x5 sheets of baltic birch plyood then it would be absolutely fine. My projects are a bit more... utilitarian than that and generally call for full-size sheet material and long timbers, so if I was building a workshop I'd want space to move that stuff around easily. It's certainly not impossible to do it and I did cut down dozens of sheets in that garage, but if that is the purpose for the building then yeah, 2.5m ridge height may be lower than you would want.

At the eves I was at about 2m externally I think, it felt fine internally too - plenty of space for lots of useful shelving. However I did not insulate or line mine as it was temporary (I will do both when it is re-assembled in a more permanent position soon). Doing so would reduce the sense of space you get, but nevertheless- it still felt quite normal for a garage on the inside.

However externally, the pitch did look too shallow to be honest. Aesthetically, a 3m+ ridge would have allowed for a much more satisfying pitch. On mine, it did look sqashed (see the pics) and had my temporary garage been a permanent structure I'd defintely have sought planning permission to have a taller building. The brick garage that stood there before was a handsome building with a ridge height of about 3.5m, and that looked MUCH better and was much more in keeping with the rest of the road. However mine was temporary (it lasted about a year!) so spending hundreds on PP would have been silly. But even so.... whenever I looked at it I did think it looked squat. If yours is going to be there for longer, then decide what you want to have. I don't know what your budget is or what your objectives are but even so - if your desired design means paying a few hundred for PP, then just do it. Part of the value in doing these sorts of projects is the pride of looking at it and knowing you did a good job. If you constrain yourself to a 2.5m ridge height and materially compromise your design to fit that, I suspect you will always regret it. I did, and I only had to look at mine for a year! 2.5m is not an absolute limit. If your perfect design calls for 2.7m then yes I guess try to work out if you can shave off some height to make life a bit easier and fall under 2.5m, but if you want 3m+ then just get the PP.

I've not yet built with a monopitch so cannot really comment on that yet. I am actually about to start on two new concrete bases in the back garden: one is to build a base for the re-erection of the temporary garage exacly as I'd originally built it, which I think will be a first for this forum i.e. designing and building a shed with the specific intention of it performing a temporary function before being moved to a new location. But the other is for a new, ambitious garden office build with vertical cedar cladding; a living roof; a modern interior and glass sliding doors. (I've got a toddler, a baby and an office job that post-COVID sees me working from home for 3-4 days a week. I need a separate building to work in as toddlers, babies and conference calls do not work in the same building!). This new garden office will be monopitch for aesthetic and practical reasons. You cannot really escape the unquestionable logic of Mike's basic principles of getting timber construction elevated above the ground level and having a space for air to flow between cladding and the vapour barrier of the walls so I'll build it off a dwarf wall and the wall construction will still be very similar to that seen on all of the fine buildings in this forum, but it is an office not a a workshop so I feel a bit uncomfortable about asking for advice on here on it! It will look a bit funny - cedar-clad garden offices are commonplace, but I've not seen one on a plinth yet - but I cannot bring myself to build something that has timber frame construction a few cm above the earth!

As regards timber sizes for the walls: Practice shed, I used 50x50 wall studs (see separate posts on this). For the temporary garage, I used the standard 100x50. 100x50 was much easier and sturdier and not much more expensive. And if you are going to insulate it (and I'd recommend it), then why not allow yourself 100mm of insulation instead of 50mm? 100mm will also make life easier when fitting the timber construction on your dwarf wall. It seems that the construction industry expects your walls to be built with 100mm studs. I don't see why you would deviate from that. There are a lot of good reasons for that being the case and anything else would likely cause you a headache somewhere in the process for no apparent gain.

For the roof: I think I took advice on here, but if not then I would have followed the advice offered by my local council which has since disappeared when they outsourced building control to an entirely incompetent private company (they issued me a completion certificate for my extension 2 years before we built it; they almost let a neighbour dig a continous trench foundation 1.4m deep, within a meter of the approx 30cm deep foundations of my house. They routinely ask me and my builders what they should be specifying for drainage; and change their minds frequently on things. Idiots, unlike the entirely competent and very helpful council-employed experienced BCOs that we had before). But I am sure plenty of councils still offer free advice on rafter sizing for pitched roofs and flat roofs. If in doubt follow that and/or the advice of the clever people on here who can actually work stuff like that out. My dad is a structural engineer so I did run it past him before ordering timber, but he took a look at the advice on this forum and basically told me to do whatever Mike advised. I used at least 200mm for the ridge beam, and I am pretty sure I used 175mm for the rafters. Once you work out what you need from a structural perspective, there is a practical aspect too: if you are to insulate the roof (and I am sure you would want to) then you need at least 150mm, but 175mm makes life just that little bit easier when it comes to ensuring you have sufficient air gap between the insulation and the roof sheet.

I wish you luck with it. Set up a thread, share your designs and thoughts and people on here will offer invaluable advice (hopefully on a more timely basis than I have!). It is a BRILLIANT forum. Just look at the quality of the buldings it has spawned - hopefully yours will be next.
 
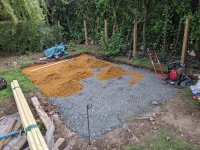
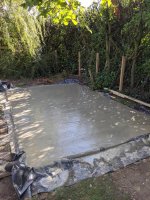
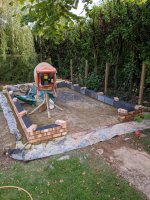
I finally got a base sorted. With a bit of luck I will find time this weekend to re-assemble the walls and roof. The builder we are using for work on the house had a few days spare so he did the base for me. The concrete finish is a lot rougher than I'd like, but it is level and the brickwork is a lot better than I could manage, and done in a fraction of the time.

There is a tree stump nearby that needs killing but otherwise I hope it's in good shape and ready to go. Apologies for the orientation: on my computer the images show the right way up!

EE68CFE8-9277-4D11-892A-235B2BE7F604.jpeg

A54073D9-5775-4A33-8CCF-40871D18F881.jpeg

3AFE7920-CCBC-4CD9-AF27-A981541CA1AB.jpeg
 
Back
Top