• Hi all and welcome to TheWoodHaven2 brought into the 21st Century, kicking and screaming! We all have Alasdair to thank for the vast bulk of the heavy lifting to get us here, no more so than me because he's taken away a huge burden of responsibility from my shoulders and brought us to this new shiny home, with all your previous content (hopefully) still intact! Please peruse and feed back. There is still plenty to do, like changing the colour scheme, adding the banner graphic, tweaking the odd setting here and there so I have added a new thread in the 'Technical Issues, Bugs and Feature Requests' forum for you to add any issues you find, any missing settings or just anything you'd like to see added/removed from the feature set that Xenforo offers. We will get to everything over the coming weeks so please be patient, but add anything at all to the thread I mention above and we promise to get to them over the next few days/weeks/months. In the meantime, please enjoy!

Oak settle: minor alterations(finished).

Mike G

Petrified Pine
Joined
Jul 30, 2014
Messages
12,482
Reaction score
3,033
Location
Suffolk
Name
Mike
Goodness knows how many years ago, maybe 15 or 20, I made a couple of oak settles. I even posted about it on a forum somewhere, and one or two of you have been around long enough to perhaps have seen them back then. One of them has had a really tough life, having been parked in front of the underfloor heating manifold at my last house for all of its life until we moved house. Being in the kitchen, it has also been mopped at the bottom repeatedly:

Z4vFJx7.png

8zjgluP.png

G1zRkd7.png

As you can see, it has really suffered. Time to give it a bit of TLC, I thought, so I popped it out to the workshop. No mean feat as it is solid oak throughout and weighs a ton. I needed a sack barrow for the task.

It's quite nice inside, and features an absolute rarity....some turning of mine:

s7fCpJm.png

I popped the bottom out:

CN7ifhW.png

H0Gll5Z.png

Then made some minor adjustments to the sides:

Uj1veWl.png

R90P2Oo.png

This was rather unfortunate. A loose panel that wasn't as loose as it should have been:

StrCcBc.png

I've discovered that I used PU adhesive in building this, so maybe it foamed up and went somewhere it shouldn't have done. No problem. A bit of filler and polish will soon hide the problem. The settle is going to a new home in the porch, so I want it looking spick and span for its new location.
 
Mike you have a gift for drama. :)

If only you'd have used hide glue--then you would have had to repair it years ago. :lol:

Kirk
 
I am sure you must have a good reason for sawing it in half, but it does seem a bit unkind![emoji44]
 
I remember these very well. You posted them on here when I was making Andy's settle about 3 years ago. I like them a lot and they look beautifully made. I can imagine the weight of them. 8-)

I have every faith in what you're doing is the correct decision. :P
 
:shock: :shock: :shock:

Sure a bit of polish would have fixed it - no need to saw in half!! :D Keen to see what you have planned!
 
Pinch":2ytlqkbr said:
.........I have every faith in what you're doing is the correct decision. :P

My wife has just seen it. She isn't quite so confident as you! :)
 
Mike G":1h1cnj29 said:
Pinch":1h1cnj29 said:
.........I have every faith in what you're doing is the correct decision. :P

My wife has just seen it. She isn't quite so confident as you! :)

I've got one like that. They don't seem sympathetic when the time comes. But we like 'em that way, don't we !

Still think taking a saw to it was cruel.
 
I decided I didn't need the lower panels in the front, so I made a minor intervention with a jig saw:

ygHRTKW.png

Removing the remnants from the edge grooves wasn't entirely without collateral damage:

BmJJnYA.png

Here's one of the tenons cut off flush:

v42u15E.png

A few minutes work with some chisels restored the mortise to its former glory, and revealed that I used to use machinery rather more than I do today:

0UW4u95.png

Here is the arm rest mortise after removing the tenon:

mjTEKSL.png

My wife made me stop at this point. I was going to cut out the cracks in the back panels and put in 2 Dutchmen, then carve a Tudor rose in the middle of each panel. She thought I was joking:

4tcwctR.png

I had really hoped to avoid this next problem. Raising a panel in situ is just such a silly idea:

X7Y6RKw.png

jg6V9qt.png

qiBgXE3.png

Qdj0P9G.png

KqzUGtD.png

Moving on to the tenons, I marked and cut the shoulders (knife then saw):

XVBcqi3.png

uCtVDam.png

Workholding was something of a trial. Not your classic set up, and it made an awkward job even more awkward:

Uo6TSGT.png

I didn't get long at this today, so that's all I managed I'm afraid. I did however buy a whole load of wood, so more exciting woodworking adventures will ensue.
 
The next phase of the works involved putting the two halves of the settle back together again. This was quite awkward, and after a bit of thought I made a quick template of the back legs to ease proceedings:

0Hb9qqm.png

When offered up to the side panels I could now mark out the shoulder lines:

gyDH0Us.png

However, because the arm rest was in a different plane from the side panel, the mark I made for that was a best guess, and not to be relied upon:

RKRoHBy.png

What I did was cut the bottom two tenons accurately as per the template, but make the shoulder of the armrest 3 or 4mm on the safe side of the marked line. Then, it was a case of continual offering-up-and-adjusting. Sometimes those seekers of perfection miss out on the pragmatic solution, and this was a good example of guessing and adjusting. Poor old Steve Maskery has just fallen over in the corner in a heap, covered in a cold sweat . :) Anyway, sneaking up on the final shoulder line, and adjusting the panels etc in the process, took maybe 3 hours:


mPq5x9D.png

sBHeaeO.png

LMowh80.png

cig1kOk.png

0lCSB1D.png

But finally, everything lined up properly, the joints fitted well, the panels slid into their grooves, and all was well with the world:


lCI9yb6.png

UmEvSHc.png

Whilst the glue on that was drying I adjusted and put back the little overhang, the fixed part of the top:

iAA0Wfz.png

This photo, showing the seat offered up in its position, shows you how much width I had removed (and also how much colour I had stripped out of the thing by scraping off the oil and wax mess:

S5UzQIX.png

So I hacked a piece off the front of the seat to make it fit its new circumstances:

F4LmLn7.png

All the grooves around the front frame which had previously taken panels needed infilling:

sVgIms4.png

Those bored of dovetails might want to look away now.

The whole idea of this alteration to the settle was to convert it from being a box to being a shoe rack, with a couple of big drawers. So, time to make some drawers:

rw9lTn1.png

But what's this, Mike? Why would you suddenly swap from dovetails to box joints?

ni8neSJ.png

Patience, grasshopper.......First, I need to cut a couple of short grooves in here:

7k92F49.png

The chisels fitted, but the mallet didn't. The router fitted, but the dust extraction didn't. Oh well, who needs functioning lungs anyway?

mRBoYgZ.png

Having previously made the draw sides and back, time to fit the fronts:

aDUZG8q.png

B6CUkH7.png

I put a little cut across the middle of each one, and chamfered it, to give the appearance of having 4 drawers rather than two:


ulnjOUD.png

fCmyw6O.png

Now, the answer to the box joint question. I really wanted to have the deepest possible drawers (front-to-back) that I could. These drawers are going to run on proprietry runners, so the face of the drawer has to overhang the sides by the thickness of the runner. Normally this is achieved by making a drawer box and planting on a drawer front, but, as I said, I needed the maximum possible front-to-back measurement. Thus the sides needed to join directly into the back of the drawer front, and for a novel problem I devised a novel variation of a joint:


it9vFG2.png

Rf6Zp35.png

CmTunMX.png

The floor of each drawer is long (about a metre) and although narrow I felt there was a good chance of them starting to sag over time. I therefore decided to strengthen the floor with some muntins:


P8rr0zS.png

F8tsdrQ.png

All glued up:

1lk1RV7.png

Whilst the drawers were drying, I did a little experiment with some dye to see if I could match the new into the old:

jYHSYoZ.png

After cleaning up the drawers:

TrxSsz3.png

KIH8coK.png

....I messed about for quite a while making them fit properly:

T82Pe6F.png

The final construction task was to re-build the floor, but above the drawers rather than below them. This involved a new piece on the back of the box, and these grooved end-pieces:


bx9Uqu7.png

Ps5kmoi.png

The front of those cross-pieces sits in the groove I struggled to rout out way back up there ^^^ somewhere. Here's a trial fit of the flooring. Note the half lap joint:


3skXJYt.png

9kbOY13.png

There is no possible means of clamping, so I found some heavy stuff for the glue up:

S4cwul6.png

I abandoned the idea of dying the new to match the old. The previous finish was oil, so I was pretty much stuck with re-oiling (unless I stripped right back to bare wood), so I tossed a coin between Osmo and Danish, and went with the latter. This was going to yellow fairly rapidly anyway, and the settle is going in quite a light space, so will also darken again fairly soon. Therefore, I reasoned, even if the match isn't great now in 6 months time no-one will be able to tell new from old:


K7mFkmd.png

b3lQWnz.png

zwytcx5.png

The area under the seat is a throw-in space for dog leads, gloves, balls, whistles etc (you know......dog-walking necessities).

After finally (yeah, yeah, I know it's been 3 or 4 years. I've been busy) sealing the porch floor, I wheeled the settle around and plonked it in position:


Fgq9mdu.png

aBAcvMb.png

56dD9dn.png

oUTrpz6.png

Here, for comparison, is what it looked like before I started work:

Z4vFJx7.png

It all fits rather well. I'm rather pleased with the settle 2.0. unfortunately, we had originally planned that it would be on the other side of the porch, and so I had installed these coat pegs accordingly. Since we changed our minds on the settle location, they're now on the wrong side of the room. How on earth am I going to get them out, whole, for re-location to the other side? They're friction fitted......but there's lots of friction:

tqOaoGL.png
 
If you find the drawing for the pegs and a few off cuts of oak I could turn some more for you. So you could just leave the current ones there, or trim them off flush.
I could have a look on my PC, the drawing might still be there somewhere.
 
Very kind of you Dave. It might well come to that......but I'm going to have a try at hauling the old ones out tomorrow. I'll let you know. As for finding the drawing...!!! Miracles happen, I guess. I do have one or two of your pegs surplus, which would probably be easier for you to work from anyway, wouldn't it?
 
Great job. I can barely see the join from here.

You certainly can't leave those pegs there, at head height for someone.
 
Great conversion Mike, please don't take offence but I reckon you could have chosen those drawer pulls a little more sympathetically...far too plain and conservative. IMO something a little more 'ye oldie worldie, Olde England' blah blah etc might be more in keeping.
I've said it before plenty of times, but handles/pulls are THE most important part of any project. Just my two Euros (for what they're worth and it's not much :D) and repeat, no offence intended - Rob >> ducking for cover :D
 
They're a place holder, Rod, whilst we look for something more appropriate. Actually, whilst we try to agree what would be more appropriate..... :lol:
 
Yes I should be able turn more from a pattern peg.
What diameter are they? I might have a collet that could grip them to give a better chance of removing the current ones.
 
I'm making a wooden collet tomorrow, Dave. If that doesn't work I'll let you know, but I have a plan coming together.
 
I have just had a thought as to why they are held so firmly, the pegs where dry i.e. seasoned while the beam you fitted them into was still relatively green. So the holes have shrunk as the beam has dried. That's a technique used in chair making to stop the spindles becoming loose in the legs. I am not sure you will get the out whole!
 
:eusa-clap: :eusa-clap: That's a real tour-de-force, Mike.
 
I made a crude clamp, and added the power of wedges:

eHWv6G9.png

YYFsQRV.png

Six out of the seven co-operated:

tbbWOZS.png

The seventh suffered a structural failure:

d6e6d0O.png
 
Well done, same failure rate as the Swans at Bakers Mill!
So do you have enough for the other side of the porch?
 
No, I'm two short Dave. If I could get you to do three for me, to cover breakages, that would be wonderful.
 
Mike,

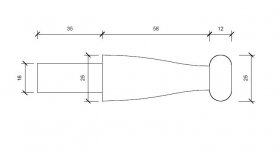
I have had a look for the drawing, do the dimensions on this look right?

mikes_peg.JPG

I will have a look for some oak off cuts and let you know what I find.
 
The drawing looks right Dave. I've got piles of oak off cuts, and of course a number of pegs you could use for a pattern if you'd prefer. I could drop those off with you tomorrow or Sunday if you like.
 
I think dropping the pattern and some of cuts over is the best plan. I don't have any nice bits of oak thick enough.
We will be hoping out to the market tomorrow late morning and I will be out on my bike Sunday morning. But you can leave it on the doorstep if we are not about.
 
Lovely job Mike and a lot of work in that alteration. It's good to see you've used traditional jointing methods as you always do. I would think the drawer width dimension must be on the limit for the drawer runners' spec. It suits your new porch beautifully and looks an absolute treat sat there. Great job! 8-)
 
Pinch":5myed0kh said:
Lovely job Mike and a lot of work in that alteration. It's good to see you've used traditional jointing methods as you always do. I would think the drawer width dimension must be on the limit for the drawer runners' spec. It suits your new porch beautifully and looks an absolute treat sat there. Great job! 8-)

Thanks Paul. Sorry, somehow I missed this post.
 
Back
Top