• Hi all and welcome to TheWoodHaven2 brought into the 21st Century, kicking and screaming! We all have Alasdair to thank for the vast bulk of the heavy lifting to get us here, no more so than me because he's taken away a huge burden of responsibility from my shoulders and brought us to this new shiny home, with all your previous content (hopefully) still intact! Please peruse and feed back. There is still plenty to do, like changing the colour scheme, adding the banner graphic, tweaking the odd setting here and there so I have added a new thread in the 'Technical Issues, Bugs and Feature Requests' forum for you to add any issues you find, any missing settings or just anything you'd like to see added/removed from the feature set that Xenforo offers. We will get to everything over the coming weeks so please be patient, but add anything at all to the thread I mention above and we promise to get to them over the next few days/weeks/months. In the meantime, please enjoy!

Potential workshop or not worth it?

FatboyUK

Seedling
Joined
Jan 3, 2018
Messages
31
Reaction score
0
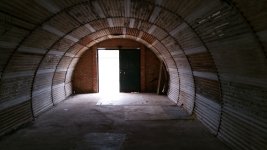
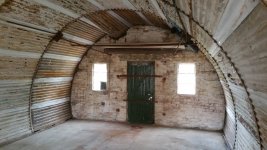
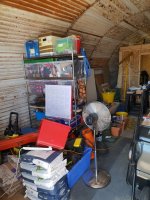
I've just been offered this, or at least 2/3rds of it as a potential workshop, the other third will be used by the owner to store a couple of classic cars. Its an original Nissen Hut, in stable if not good condition, dry and cheap! :D There are a few little holes around the bases that need filling and what looks like a condor's nest in part of the roof but nothing that can't be sorted out in an afternoon.

It will need to be made a little more secure but its remote location helps, plus there are a couple of guys who live on site nearby

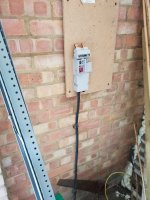
The downside is that its not insulated, just the inner and outer skins of wriggly tin and no one knows whether the slab has any membrane under it although I'm told it is always dry. There is power to it but not sockets, lights etc as yet.Its 12.8m x 4.8m but its going to be very expensive to try to keep that heated during the winter months and I'll only use it at weekends until I retire in 5-7 years time.

So I thought I might be able to build a workshop inside, say 3.5m x 4m x 2.4m, that would be insulated and heated (as if is was outside) to keep tools from rusting and to give me somewhere warm to work in. The extra storage is what appeals to me. I'd install windows to steal some light from the rear windows of the hut and back it up with LEDS.

The question is do I need to raise any wooden structure off the floor or would it be safe to lay it straight onto the floor with a membrane between concrete and floor. I was thinking a 50x50 framing floor with 50mm polystyrene insulation inbetween and 18mm flooring. Then build a 75x50 frame with 12mm ply internal walls, 75mm insluation and just a membrane on the outside to hold it in and keep the bugs out. 175 x 50 roof joists, 100mm insulation and 12mm ply ceiling, again with just membrane on top. Would I need to clad the outside? seems overkill as its not going to see any weather but would the lack of cladding reduce the effect of the insulation to any significant degree?

I'd have a saw bench outside the shed and no heavy duty machinery

Am I missing any obvious problems doing it like this? Is there a better solution?

It does mean I can reduce the size of the shed I'm putting in the back garden at home, that can be just a normal garden shed size now

outside 2.jpg

inside from front entrance.jpg

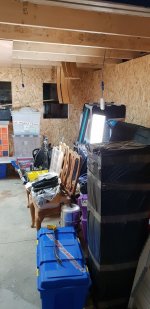
inside front entrance.jpg

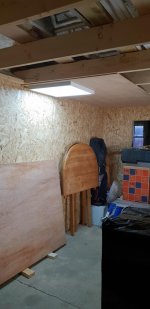
inside rear entrance.jpg
 
They make a great workshop. Build a 4x2 structure inside (bigger joists if you want to use the "loft" for storage), and insulate between the Nissen hut and the timber structure. I sorted one of these out for a friend last year, and he's now got a great workshop. Test the floor first by leaving a piece of plastic down, weighted, and come back after 2 or 3 days. If there is any darkness when you remove the plastic, then raise your walls on a 1 brick plinth. If you are going to do a floor, then just put a membrane down anyway, and I'd suggest a floating floor (no frame.......just insulation with some T&G ply or chipboard over, and trapped down around the edges with a skirting).

Build your workshop hard up to one end or the other to take advantage of the light, but put internal shutters over the windows so no-one can see in, and if they want to break in they'll have to work a lot harder.

The only thing I would say is that being remote is a disadvantage rather than an advantage, security-wise. If there are people around to keep an eye on it, then fine, but I would go way over the top with security measures if I were you. That will be your biggest headache.
 
Thanks Mike.

I was being cheap going with 3x2 :oops:

would 200mm joists @400 be strong enough on a 3.5mm span? I wouldn't use it for a lot of storage

I was thinking to leave a 500mm air gap along the wall by time I've taken into account the curvature of the nissen hut, do you mean insulate that as well? what would you suggest?

There is a big sheet of lino laying on the floor from the last time it was used, I pulled that up today and it was dry but I'll try it with a bot of plastic sheet.

If I use a floating floor would I just run the membrane under the walls too?

This is proper remote; about 3 miles off the local road and there is an electric gate about 1/2 mile away across the access road that would need to be defeated to get a van in, otherwise anyone snooping around would have to carry their ill gotten gains back 1/2 mile but good advice, I have got some heavy duty anti intruder bars in mind for the front door and windows; the back door is already secure
 
Not to be one who would say we woz 'ard in the old days, but my mum, dad and two older sisters lived in a Nissen hut for several years after the war until I came along when they were allocated a brand new council house.
 
FatboyUK":awugrztb said:
.......would 200mm joists @400 be strong enough on a 3.5mm span? I wouldn't use it for a lot of storage

Yes, they're fine

I was thinking to leave a 500mm air gap along the wall by time I've taken into account the curvature of the nissen hut, do you mean insulate that as well? what would you suggest?

Ah, that's too big to insulate. We built much closer to the shell than that, and ended up with a max gap of maybe 150mm.

If I use a floating floor would I just run the membrane under the walls too?

I wouldn't, personally, if you're building on a plinth. A course of bricks sitting on plastic would be very vulnerable to knocks. If the floor is dry enough that you're building your timber frame directly to it, then you don't need to sit the timber on plastic anyway.

This is proper remote; about 3 miles off the local road and there is an electric gate about 1/2 mile away across the access road that would need to be defeated to get a van in, otherwise anyone snooping around would have to carry their ill gotten gains back 1/2 mile but good advice, I have got some heavy duty anti intruder bars in mind for the front door and windows; the back door is already secure

I'm a big advocate of not letting the buggers see inside. The first thing they'll want to do is look in the windows and see if there is anything worth pinching. If they can't do this, they're gambling, and they may well decide it isn't worth the risk if they don't know what they would stand to gain.
 
As a former officer of the lair with a part rural beat, I can support Mike G's recommendations as to not taking it for granted that isolation is part of the security arrangements.

Don't let the buggers see in: don't make the heavy security too visibly obvious so as to let them think there's something valuable in there but make sure it's well secure; they won't necessarily be opportunists just passing by if it's isolated.

Trying to investigate something like a burglary at such a a location would be difficult with the absence of witnesses and your infrequent visits, if they indeed would investigate a non-dwelling burglary.

I just let my insurance company know that I have a new outbuilding and...guess what! They asked that question...."Do your locks conform to BS No.............?"!!!!!!
 
All good advice thanks, I'll make up some shutter out of some the old junk lying around over there, give it a nice aged patina :D
 
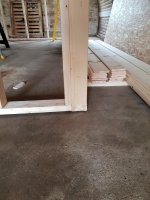
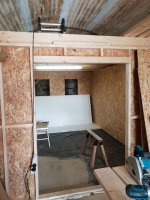
Day1 - a good start even though I was on my own. The floor looks wet in places but its oil, a damp check just revealed dust!

The basic frame is up and square, a bit to finish the frame and some levelling tomorrow - there is a slight dip in the floor level to the right hand front corner of between 5-8mm - then the floor and wall panels.

As this is not going to have to endure wind and rain I can take a few liberties with the roof, it will be just 175x50 joist with some insulation in between for some very light storage space


1st day 1.jpg

1st day 2.jpg

1st day 3.jpg

1st day 4.jpg
 
Excellent. You've much more space between the timber structure and the Nissen hut than I expected. That will make a nice storage area. Indeed, you could put some cross members in and make it a timber store.
 
Thanks everyone

Part of the deal I have with the owner is that I don't fix anything to the metal structure, and leave room at the front for a couple of small classic cars that he wants to store sometime over the next 12 months before sending them off for restoration. As it this gives me a 5 x 3 insulated workshop that I can heat for the colder days and another 3x5m space in front to set up another bench for working on the warmer days and still leave plenty of room for storage. Good LED lighting in the shop will help get over the poor natural light although I've left a couple of openings in the rear wall.

Downside is there are no 'facilities' to the hut but I did find an old sewage drain while i was mooching about yesterday so wheres there's a will....
 
Well this is embarrassing, my 5-8mm drop in the floor level turned out to be significantly more than that once I got the level set up, I may have dropped a bit of a testicle here!.

As I started bringing the level up it soon revealed a huge dip in the left hand corner that I had somehow missed. The frame is now level and square to within 3-5mm but there is a huge discrepancy in the floor level with a 25-28mm drop in the left hand front corner compared to the back wall which sits on the floor.

* I know the level looks a bit Heath Robinson but it worked and the tripod it came with was made out of bendy straws and string!

F19A14F0-5BF7-4DEE-82B3-498C4E98A3BC.jpeg

231897C3-12E5-4E16-A67B-628E12A8B40A.jpeg

EC9EEB53-1F73-4AAF-88A2-8C042511BA10.jpeg

The frame is stable, I’ve packed out the gap with expanding foam and its solid as a rock but I’m at a loss as to how to level the floor inside properly before laying the insulation down. Membrane with a screed over the top? It’s very deep for levelling compound and would need to be feathered back over 3/4 of the floorspace.

Any ideas/advice would be welcome
 
I'd pack out the really low spots with a strong sand/ cement mix.....5:1, maybe even 4:1. Once that had set I'd finish off with self-levelling compound.
 
Well its been a while since I updated this thread following losing my job, moving house (nightmare, never again!)and fighting with the power companies to get a permanent (legal) electric supply, this sort of slid down the list of priorities.

Anyway, work is now sorted, move is settled and we finally got some power so we moved on slightly.

Levelling the floor has dropped down the list of jobs to be done due to the onset of winter and the need to get the inner workshop heated and usable so the first job was to clad the interior and insulate

ws1.jpg
ws2.jpg
ws3.jpg
100mm rockwool, I don't think there is any need to clad the outside other than to cover with building paper, its not going to be affected by weather unless it would increase the insulation value?

ws4.jpg
Still trying to work in chaos as half of the house move is still stored here, SWIMBO is still not grasping the concept of 'downsizing' where you swap a large 4 bed, 3 reception for a 3bed, 1 reception. She's getting there.

ws5.jpg
This all we had when we moved in, it took over 10 weeks to convince a utility company to provide me with a meter, even after UK Power networks had intervened on our behalf; no record of the last supplier other than the RAF in 1967!

ws6.jpg
Finally got this installed, sparky came to connect it within the hour of EDF leaving

ws7.jpg
Started running conduit for lighting and power, initially we put in a garage 2 way cs as thats what we had to hand, but have replaced it with a 6 way now.

ws8.jpg
ws9.jpg
ws10.jpg
More clutter, we're keeping a table and chairs that we have no use for 'just in case' :? plus all the christmas decorations of course :x

ws11.jpg
Everything has to be moved 2-3 times for almost every job

ws12.jpg
Finally getting sorted with the electrics in the inner workshop, liked this idea from one of the other build threads. Used LED light panels which are much better now that the interior is painted in white. Nice to start getting stuff on the walls out of the way

ws13.jpg
Making a start on the doors and frame for the inner workshop, simple ledge and brace, no need for anything more secure than that.

ws14.jpg
Door 1 finished

ws15.jpg
Door 2 on its way
Had a bit of a break to celebrate my 60th, my wife had been planning a suprise holiday for the last 10 months to Orlando a short delay in progress.

ws16.jpg
Electrics completely finished and tested by the sparky without any issues. No more trailing cables to trip over!

ws17.jpg
It looks a little small in this one but its 3.5m x 4.5m (slightly smaller than planned) plus I have the 'outside' area to work in. Ceiling is a little lower, about 2.15m, than anticipated due to the need for storage above and the limitation of what I was allowed to build but its workable. The eagle eyed will have spotted the thermometer hanging on the wall, with a single 1.5kw heater on the lowest setting I can maintain a comfortable nheating level. Hopefully benches etc will be moved in over the coming week

The windows at the rear are just to allow a bit of light in to/from the storage area in the rear.
 
Fantastic. Very similar to something my buddy built in his Nissen hut last year.
 
Thanks everyone,its coming along slowly. I won't be earning a living Bob but hopefully some additional income for the retirement plan from small commissions. The change of job was a bit of a blow at the time; we had just signed for the mortgage, a small amount but over a very short period, and had asked the boss if there were any plans to change my role at all in the next 24 months. He said none at all - and 4 weeks later dropped the hammer :x
 
FatboyUK":2ogluwrr said:
Thanks everyone,its coming along slowly. I won't be earning a living Bob but hopefully some additional income for the retirement plan from small commissions. The change of job was a bit of a blow at the time; we had just signed for the mortgage, a small amount but over a very short period, and had asked the boss if there were any plans to change my role at all in the next 24 months. He said none at all - and 4 weeks later dropped the hammer :x


In retrospect, I did not mean to pry :oops:

Best of luck finding another day job to take the mortgage stress away and allow you to develop the sideline too.

Bob
 
:D no problem, I didn't take it as prying at all. By time I was half way home I'd already starteds to look on it as an opportunity to do something different, my wifes company stepped in and offered me a couple of days work, thats was 5 months ago and I'm still staying busy.
 
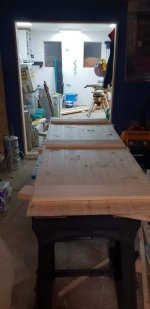
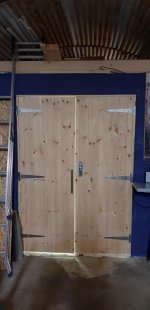
Doors finished and fitted, I'll add a coat of something or other later tomorrow

Untitled.jpeg

Untitled.jpeg

Bench and rolling cabinets in tomorrow and general clear out in the main part of the hut,

MOD EDIT : Flipped your photo's for you - Trim
 
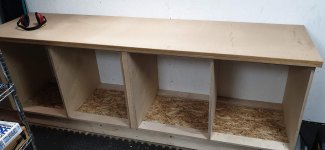
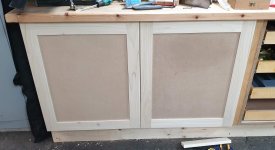
I haven't updated this for a while, business must be good! I needed some more storage/worktop so decided on some cabinets along one side of the inner unit using some 18mm Birch ply left over from a recent job. These won't be moved again so I built a solid base for them to sit on rather than legs.
Cupboard base 1 (2).jpg
Cupboard base 2 (2).jpg
base 1 (2).jpg
base 2 (2).jpg I used a Domino for jointing for ease

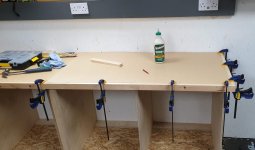
I wanted a base top that I could change as it gets tatty so used 2 x 18mm mdf with a hardboard work surface that can just be changed out as an when required, a softwood edging was added and a couple of coats of danish oil..
base top 1 (2).jpg
base top 2 (2).jpg
base top 3 (2).jpg
base top 4 (2).jpg

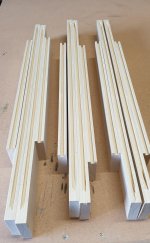
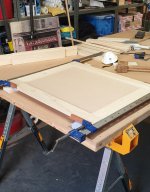
I left the doors for a while but eventually got fed up looking at the rubbish accumulating inside, I had a couple of planks of tulip wood for the frames and veneered ply for the centre panels - but as I got to putting them together realised the veneer panels has been used so used some 6mm mdf instead. Again, used the Domino to joint them.

door fronts 1 (2).jpg
door fronts 2 (2).jpg
door fronts 4 (2).jpg
door fronts 5 (2).jpg
door fronts 6 (2).jpg
door fronts 7 (2).jpg

I had some 4 pairs hinges left over from our 'new' kitchen 7 years ago (one of the benefits of never throwing anything away) and some heavy duty runners from a job last year.
door fronts8.jpg
door fronts 9 (2).jpg

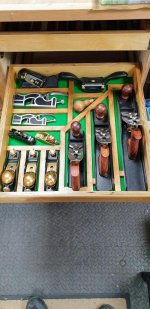
I wanted somewhere to put hand planes, I don't use many different big planes, what I have seems to fit my needs so one drawer would be enough. I'll make something similar up for chisels when I get a spare hour.
 
Plane drawer finished.

plane drawer 1.jpg
plane drawer 2 (2).jpg
plane drawer 3.jpg

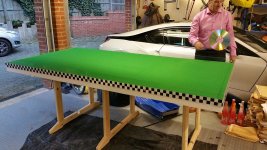
The green felt was left over from a knock down 8x4 scaletrix table a client wanted so he could take his scaletrix away to meetings but still get it into his car!! Torsion box design that breaks down into 3 sections and all fits in the rear of a car.
Scaletrix table 3.jpg
 
Good for you to be able to put something away for 7 years and then find it again.

I like those drawers within a drawer and the plane storage is very neat too.
 
Andyp":ahpi3wsl said:
Good for you to be able to put something away for 7 years and then find it again.

I like those drawers within a drawer and the plane storage is very neat too.

Thanks, but to be fair I ran out of Tulip so only had enough for two drawer fronts anyway
 
Back
Top