• Hi all and welcome to TheWoodHaven2 brought into the 21st Century, kicking and screaming! We all have Alasdair to thank for the vast bulk of the heavy lifting to get us here, no more so than me because he's taken away a huge burden of responsibility from my shoulders and brought us to this new shiny home, with all your previous content (hopefully) still intact! Please peruse and feed back. There is still plenty to do, like changing the colour scheme, adding the banner graphic, tweaking the odd setting here and there so I have added a new thread in the 'Technical Issues, Bugs and Feature Requests' forum for you to add any issues you find, any missing settings or just anything you'd like to see added/removed from the feature set that Xenforo offers. We will get to everything over the coming weeks so please be patient, but add anything at all to the thread I mention above and we promise to get to them over the next few days/weeks/months. In the meantime, please enjoy!

Prototype Box....Dun

Woodbloke

Sequoia
Joined
Jul 22, 2014
Messages
7,355
Reaction score
1,321
Location
Salisbury, UK
For the last coupla weeks I've been faffing around in the 'shop attempting to cobble together a smally wee box using some 'old skool' Laburnum oysters with an edge band in Holly:
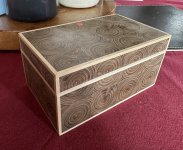
IMG_3338.jpeg

...and up to that point it was looking fairly presentable. Hinges were next, so I got hold of some of Andrew Crawford's excellent smartHinges which I've used plenty of times before. I downloaded and printed off the copious instructions:

IMG_3351.jpeg

...but despite being super careful, I wasn't careful enough and I simply couldn't get the lid to line up properly; moreover the holly lines were 'out' which made the whole thing look awful. I thought I could re-machine the errant slot so filled it (shown above) and was ready the following day to do the business, but then I had one of those 'eureka' moments and knew deep down that this wasn't going to work. I wasn't going to shove this through the bandsaw so all the Holly at the lid interface was drum sanded off:
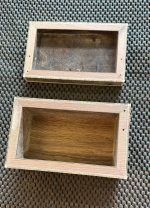
A803910D-DCA9-45EA-A085-30D151C4A01E.jpg

...and I wondered if a Cosman hidden wooden hinge could be applied to a sawn off lid box? In all his UToob clips RC uses a solid lid located between the two short sides, so in order to test the hypothesis I knocked up a 'cheap as chips' box in pine, set up the small router table, machined the cove grooves and fitted a solid lump of mahogany dowel to see if the corners and edges lined up exactly:
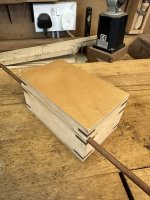
IMG_3367.jpeg

It's very-ruffty tufty but everything lined up perfick; nothing was out of kilter. I went ahead and made up the RC hinge and fitted it to the box:
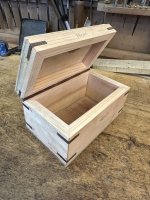
IMG_3369 2.jpeg

...and everything still lined up. Happy days, but I needed to fit a lining to the box as well:
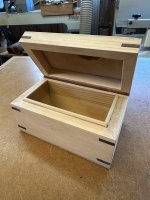
IMG_3374.jpeg

The lid closes snugly over the lining with no obvious pressure point on the hinge. The lining was quite tricky to fit and would be much easier prior to gluing the hinge in place. The technique appears to work so the next job is to replace the Holly interface on the proper box - Rob
 

Attachments

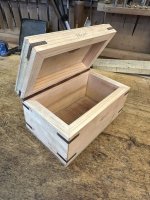
  • IMG_3369.jpeg
    IMG_3369.jpeg
    273.1 KB · Views: 3
Is there a wood dowel or metal rod inside this hinge?
Between each section of the five part wooden hinge there's a tiny bit of 1/16" welding rod. The really tricky bit is making the holes accurate and concentric but RC supplies a jig (at considerable cost) to do this job - Rob
 
Very neat solution. Thanks for the thread.

Edit: had a hunt on the RC site. Here's a vid with several examples for those who may be interested. Like him or not, the man has real skills.
 
One of which is flogging stuff....
Agreed Sam, but he's got to make a living somehow and I believe he has six kids to feed (and a wife no doubt) Some of the stuff he sells is dubious to the point of being farcical. There was a hilarious thread some years ago on UKW which he didn't find at all funny! - Rob
 
Last edited:
We almost all sell something: time, skills, products. We all choose what we buy.
 
If this is just a prototype I can’t wait to see the next one.
Hopefully a little more 'decorative' that this lash up Andy. Just made the Holly dowel which is always a bit fraught as the set up has to be spot on to get the right diameter - Rob
 
Rob, I 'm not sure what the special super expensive jig is that you have, but the one I saw on the 8 year old (or whatever it was) video seemed as if it could be replicated quite easily. Seems to be just a drill of the correct diameter, set centred in a tube that snugly fits the home made dowel. He said this stops the drill wandering in the grain in the dowel, but I couldn't see how an external metal tube would have that effect. What am I missing? Thanks, Adrian
 
Rob, I 'm not sure what the special super expensive jig is that you have, but the one I saw on the 8 year old (or whatever it was) video seemed as if it could be replicated quite easily. Seems to be just a drill of the correct diameter, set centred in a tube that snugly fits the home made dowel. He said this stops the drill wandering in the grain in the dowel, but I couldn't see how an external metal tube would have that effect. What am I missing? Thanks, Adrian
I'd like to see some folks take on this too.

Cheers
Tom
 
Rob, I 'm not sure what the special super expensive jig is that you have, but the one I saw on the 8 year old (or whatever it was) video seemed as if it could be replicated quite easily. Seems to be just a drill of the correct diameter, set centred in a tube that snugly fits the home made dowel. He said this stops the drill wandering in the grain in the dowel, but I couldn't see how an external metal tube would have that effect. What am I missing? Thanks, Adrian
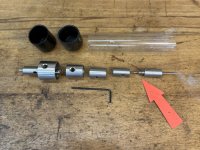
The jig is pretty expensive, bearing in mind that it's made in Canadia, but you only use a small bit of it, arrowed:

IMG_3385.jpeg

There's all sorts of different sized turned components, some hollow, some blanked off, so that with the biggest one, far left you could drill concentric holes in something very much like a broom handle with different sized doweling in between. If you knew what you were doing on a metalwork lathe, you'd be able to run something up quite easily. As it is I was happy to pay the CHT premium to save all the faff; using the jig to drill the holes for a box takes less than 30 seconds and it's the easiest way to do drill them. I've tried doing it on a lathe which seems the obvious way to do it, but it don't work....holes drilled aren't in line. NFG - Rob
 
Last edited:
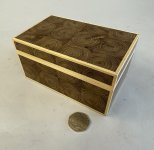
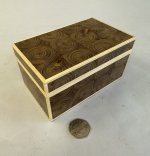
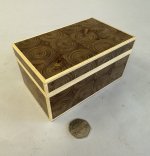
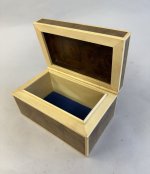
Finally finished after lots of skool boy errors and general faffing, but it hasn't turned out too shabbily. SWIMBO has yet again accosted this one for her watches and frankly I'm glad to see the back of it. This was the first time I'd done this sort of veneering so I was on a 'learning curve' all the way through. That didn't include making a pigs ear of cutting the hinge slots (they're easy to fit but you only get one chance to cut the slots correctly) so I resorted to a Rob Cosman hinge, which seemed to work but it's not perfik.

IMG_3392.jpeg

IMG_3393.jpeg

IMG_3393.jpeg

IMG_3394.jpeg

Holly is nice stuff to work with but is difficult to keep clean and fairly unforgiving of discrepancies in jointing. Finished with four coats of Polyvine Wax polish, cut back with 1000g paper 'twixt each coat with a final coat of Renaissance Wax - Rob
 
Back
Top