• Hi all and welcome to TheWoodHaven2 brought into the 21st Century, kicking and screaming! We all have Alasdair to thank for the vast bulk of the heavy lifting to get us here, no more so than me because he's taken away a huge burden of responsibility from my shoulders and brought us to this new shiny home, with all your previous content (hopefully) still intact! Please peruse and feed back. There is still plenty to do, like changing the colour scheme, adding the banner graphic, tweaking the odd setting here and there so I have added a new thread in the 'Technical Issues, Bugs and Feature Requests' forum for you to add any issues you find, any missing settings or just anything you'd like to see added/removed from the feature set that Xenforo offers. We will get to everything over the coming weeks so please be patient, but add anything at all to the thread I mention above and we promise to get to them over the next few days/weeks/months. In the meantime, please enjoy!

Rebate Plane Blade

Stuart

Sapling
Joined
May 21, 2021
Messages
401
Reaction score
133
I’ve got a few rebate planes and whilst they don’t get used that often they are invaluable when needed.

My question my seem a bit numpty but should the iron be the same size as the body of the plane?

Photo to illustrate:
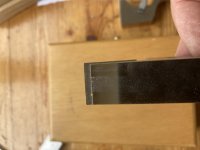
5D0D5ED9-A773-49A8-9C31-96764148029C.jpeg

As you can see the blade is a good millimetre wider than the body and this is common on all my stanley rebate planes. They’re usable but it’s a bit of a pain having to shift the blade from side to side when you change direction to trim from either end.

The obvious thing to do is to grind the blade down so it’s the same size a s the body but I want to check this isn’t a daft thing to do.
 
It's correct, the iron has to be wider than the body.
Don't grind it down. If you do, you'll never be able to cut a square rebate with it.

A millimetre sounds a bit much; try setting it central and you might well find it's just right either way with no adjustment.
 
AndyT":7tnuk2wz said:
It's correct, the iron has to be wider than the body.
Don't grind it down. If you do, you'll never be able to cut a square rebate with it.

A millimetre sounds a bit much; try setting it central and you might well find it's just right either way with no adjustment.
:text-+1: Agree with Andy. A mm is too much; 0.25mm overhang each side is about right - Rob
 
Taking this a step further, rebate blades (and plough plane blades) were/are intentionally very slightly trapezoidal in cross-section; this reduces the friction between the side of the blade and the side of the rebate as it cuts and descend.

As has been said, the blade needs to protrude slightly...... my habit is to leave a little overhang on the cutting side about the width of a piece of thick paper..... any excess width can hang over the other side where it doesn't do anything.

For a crisp rebate, you'll obviously need to have the corner of the blade pin-sharp, otherwise it will wander off course.
I also hone the junction of the back of the blade and the aris at the side for the first 3/4 inch or so behind the bevel so that it scours and burnishes the rebate as it cuts down. This forms one side of the pin-sharp corner.
You only do this once then maintain it......a small point that makes life a little easier.
 
Thank you for your comments, very helpful.

However, this feels a bit counterintuitive to me. I seat the side of the plane against the side of the rebate and that guides the cut leaving a nice edge/corner. When I’ve left a bit of blade exposed I find it much more difficult to achieve that clean edge as the protruding blade almost ‘rips’ the shoulder of the rebate leaving quite a coarse finish. It has also caused minor splintering of the top edge.

I’ll go away and do some sharpening, have a play and report back!
 
When I’ve left a bit of blade exposed I find it much more difficult to achieve that clean edge as the protruding blade almost ‘rips’ the shoulder of the rebate leaving quite a coarse finish. It has also caused minor splintering of the top edge.

Stuart, is it at all possible your blade is slightly canted toward the rebate side? This would mean the blade was dragging along the rebate wall and giving your described symptoms. I think this is sometimes called "an azimuth fault"? The points Argus makes are very worth following up. It may also be that your blade was never fettled to be trapeziod or trailing edge polished.

I have three rebate planes and I set them with two sheets of paper on a FLAT surface. The whole plane body goes on the first sheet, so that I can clearly see the blade mouth and then the second gets slipped between plane and first sheet, but BEHIND THE MOUTH. That allows the blade to protrude by the thickness of a sheet (0.09mm/90 micrometres or just under '4 thou' in old money). Tighten up the locking screw, quick check blade edge ended up parallel to mouth edge, off we go.
 
Stuart":17ym5oi7 said:
When I’ve left a bit of blade exposed I find it much more difficult to achieve that clean edge as the protruding blade almost ‘rips’ the shoulder of the rebate leaving quite a coarse finish. It has also caused minor splintering of the top edge.

There may be two things happening here:

It's essential that the corner of the blade that forms the edge of the rebate is pin-sharp.

The thing to remember when forming this edge is that it consists of three honed points (not just two!) of cutting metal meeting at an angle:

First, the bevel,
Second the honed surface at the back (opposite the bevel)
Thirdly, the side-edge of the blade, which as I mentioned, if you examine it closely, you'll probably see that it is not a right angle.

One other thing that you may have no control over (and may give you a ragged edge), is the grain of the wood.
We don't know what wood you are using but if it has any grain rising contrary to the direction of the cut, the blade may tear it out, even if it is very sharp. this will give the impression of a ragged cut.

The solution is easy: pre-cut the corner line of the rebate along its length with a sharp knife to sever crossing grains before you plane, then give a light knife-slice right along the corner every couple of plane strokes.
Alternatively, you may use a cutting gauge set to the edge of the rebate. Personally I always pre-cut the corners regardless of how good the grain is.

One other thing that makes rebate planes a lot easier to guide and control in use (in my opinion) is the addition of a broad wooden fence attached to the metal one that came with the plane.
Spend some time getting it at about the same length as the plane body and the fences side-face at right-angles to the plane's sole..... then a good rub of candle-wax on all the sliding surfaces of the plane.

Good luck.
 
Sorry to labour this but I really want to get it right. By coincidence I have quite a lot of rebating to do so this is the best time to get it right.

I'm struggling to understand some of what's being recommended so I've taken a couple of photos to help illustrate my understanding.

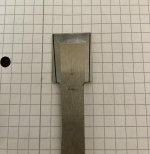
The blade is currently a tiny fraction wider at the bottom (19.28 mm) versus the cutting edge (19.21 mm) but in any case I need to make the blade slightly trapezoidal. Exagerated in the photo.

D4049D07-7224-48CC-9733-44EA57DB2B97_1_201_a.jpeg

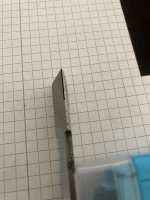
Then the back edge of the side of the blade needs to be honed as well.

7B9406F8-D020-44EB-A7CA-3D24CEED8CCF_1_201_a.jpeg

I'm less clear on exactly how this is done and the impact it has.

Thanks for your patience and help.
 
NO!

That blade looks as if it came from a shoulder plane...... have you got a pic of the actual tool?

When I said Trapezoidal I referred to the cross-section through the blade, not the profile as you have marked it .

Please don't grind anything off!

As it happens, your blade is bevel edged, so the comment on the trapezoidal cross-section does not apply.
Some older rebate planes have solid, un-bevel-edgeded blades and it is this type that I was referring to.

Sharpen the bevel, polish the back opposite the bevel and give the side of the blade that runs against the rebate edge a wipe on a very fine stone......you need a pin-sharp corner, this most important.

When the blade edge is dead square with the sole of the plane resting on a flat board, you need less than 1/2 mm protruding on the RH side. A piece of thick paper, that's all.

If you are ever in the area, I'll be pleased to show you!
Cup of tea thrown in!
 
I am of course a complete prat (my wife would agree wholeheartedly!) and what I'm referring to is a shoulder plane.

My humble apologies and I'll just wander away and stand in the corner until summoned!
 
Stuart,

It would be good to see which type you have...... a picture, perhaps, plus tell or show us what you are using it for.
We could then talk you through any problems that you may have.

Cutting rebates by hand is a task that we all do from time to time.

Some rebates are hidden and structural and don't need to be perfect - just the right shape and size. Others are part of the piece, visible and need some care.

As with everything.... there's more than one way to cut rebates by hand... and more than one specific tool to do it with.
Unfortunately, a shoulder plane would not be my first choice for excavating wood, though when set up it can clean up the edges and the corners of a rebate to a very high standard.

Going back to your original query about an overhang, because a shoulder plane can be used both left and right-handed, pushed or pulled (going and coming) it's customary to have the overhang equal on both sides.

My earlier point about having each corner pin-sharp applies to both the sides of a shoulder plane blade and therefore both the corners.
On good quality shoulder planes the blade is matched to the width of the mouth to give the right amount of overhang. So, keep the side edges clean and crisp, but don't reduce the width.
It is the width across the corners compared to the width of the plane's mouth that is important: don't worry if there is a very slight taper in the width away from the bevel end.
The blade should be mounted bevel-upwards.


Good luck.
 
Back
Top