• Hi all and welcome to TheWoodHaven2 brought into the 21st Century, kicking and screaming! We all have Alasdair to thank for the vast bulk of the heavy lifting to get us here, no more so than me because he's taken away a huge burden of responsibility from my shoulders and brought us to this new shiny home, with all your previous content (hopefully) still intact! Please peruse and feed back. There is still plenty to do, like changing the colour scheme, adding the banner graphic, tweaking the odd setting here and there so I have added a new thread in the 'Technical Issues, Bugs and Feature Requests' forum for you to add any issues you find, any missing settings or just anything you'd like to see added/removed from the feature set that Xenforo offers. We will get to everything over the coming weeks so please be patient, but add anything at all to the thread I mention above and we promise to get to them over the next few days/weeks/months. In the meantime, please enjoy!

Resawing thick timbers...

Accipiter

Sapling
Joined
Oct 16, 2025
Messages
334
Reaction score
284
Location
Frome, Somerset
Name
Frank
LOCATION
Somerset
On a table saw... Safest way?

I've dug out some timbers I got 35+ years ago for turning falconry blocks... They're 5" to 6" square by about 3ft long. I no longer see myself using these for the intended purpose all those years ago so I'm considering cutting them into 'planks' for, possibly, making boxes... putting the wood to some good use 🤷

My bandsaw would 'just about' - according to the specs - cut 125mm but I don't feel they'd cut properly - and wouldn't manage the 6". Hence the Evolution R255TBL+ with a cutting depth of 85mm at 90°. *Using the short riving knife*.
20260406_144114.jpg
I'd have to make a couple of passes... at least. I'm saying "at least" because I'm having doubts as to whether to set the blade at the full cut of 85mm or to do the cuts in increments? Something like 23mm/46mm/69mm and then 85mm.
20260406_143414.jpg
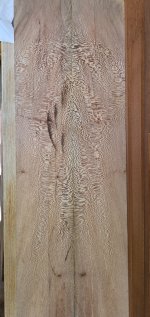
The timbers are Oak, London Plane, Ash... although the Ash has been attacked by woodworm - ive treated it but it's possibly not of any use... only by cutting it into planks will I see how bad it is inside. The Oak has water marks but also some ¼ sawn grain as does the Plane...

I'm intending to put them through the TPT125 just to clean up the surfaces. They are already PAR and square after all the time I've had them. Guidance on the cutting would be appreciated 😊
 
You could cut kerfs on opposite faces with the table saw, then cut the remaining middle section with the band saw. Assuming you have enough space under the guides to push it through. You say it can do 125 mm but not 6" so maybe my suggestion won't work.
 
I did something similar with a Kity 419, max depth of cut 60mm
Excuse the photobucket water marks.
IMG_4724.jpeg
I finished with a handsaw.
IMG_4725.jpeg

From memory I did a couple of incremental cuts but I did not enjoy using the TS like that and do not think that it is a recommended practice.

The panels cleaned up well enough.
IMG_4726.jpeg
 
Being sans- bandsaw I would trial cut in exponential incrememts on the first piece
If it feels ok then do the full depth.
If that blade is nice and sharp its narrow kerf will not push back at you very much.
Could you rig up a vertical support in the t-slots/ sled?
What are falconry blocks?
 
My table saw is 3hp so I cut full depth passes but I would use a full kerf 1/8"/3mm ripping blade, not the combination blade you pictured.

Pete
 
“Deeping” as it was traditionally called is a pretty safe operation to carry out on the bench saw, as you have a short riving knife it’s even safer than without one, just approach the work carefully and you will be fine.

I would definitely do the cut in increments, three or four passes, whilst the timber is PAR and pretty square and flat now, there is a high chance of tension being released in the plank as you cut it and it binding on the blade. If you try to take it all out in one cut and it pinches onto the blade, you might struggle to remove the piece off the saw blade, don’t ask me how I figured that out! Worse case scenario you get a bit of kickback, so definitely worth taking your time and taking it out in increments.
 
You could cut kerfs on opposite faces with the table saw, then cut the remaining middle section with the band saw. Assuming you have enough space under the guides to push it through. You say it can do 125 mm but not 6" so maybe my suggestion won't work.
Thanks Gary... yes, the 'incremental cuts' I'm thinking of would be from one side/edge then flip, raise the blade to cut again etc. POSSIBLY a final cut to separate using a handsaw *for safety*. The bandsaw is limited to 125mm so it depends on what the thicknesser takes off for cleaning the surfaces.
 
“Deeping” as it was traditionally called is a pretty safe operation to carry out on the bench saw, as you have a short riving knife it’s even safer than without one, just approach the work carefully and you will be fine.

I would definitely do the cut in increments, three or four passes, whilst the timber is PAR and pretty square and flat now, there is a high chance of tension being released in the plank as you cut it and it binding on the blade. If you try to take it all out in one cut and it pinches onto the blade, you might struggle to remove the piece off the saw blade, don’t ask me how I figured that out! Worse case scenario you get a bit of kickback, so definitely worth taking your time and taking it out in increments.
Thanks for confirming my thoughts on the approach to take. I'd thoughts on the kick back so wanted to avoid as much as possible. I'd not considered the timber possibly pinching - thanks for that.
 
That London Plane would look gorgeous on a couple of ukulele back and sides. :)
Would there be enough of it Malc? Probably... depending on the thickness it gets sawn to - then less the planing.

It cleaned up quite well... I see this as the best 'face' - but suppose it depends how the grain goes when cut. Think the ash will be past it though 🤔
 

Attachments

  • 20260406_152034.jpg
    20260406_152034.jpg
    320.8 KB · Views: 12
  • 20260406_170734.jpg
    20260406_170734.jpg
    212.9 KB · Views: 11
  • 20260406_170801.jpg
    20260406_170801.jpg
    358.3 KB · Views: 11
  • 20260406_170756.jpg
    20260406_170756.jpg
    299.5 KB · Views: 12
To create a back of an instrument, it's resawn thick enough, say to 12mm-ish. Then that slab is resawn in two equal halves and opened out to create the 'symmetrical' pattern which is glued together to form the back. Then I would drum sand it to final thickness.

The same process is used for the sides but with a longer and narrower slab. Some makers create the sides with two leaves of the main timber. I have done that with Sycamore, and having bought it, it increases the costs to the maker. I now prefer to use one leaf from the main slab and then laminate with two veneers, and my preference Swiss Pear for its density, neutral colour and tight grain.

The body of a concert ukulele, the next one up from the smallest, soprano, is about 270mm long 210 wide, meaning each half come from a slab only about 105mm wide.

The sides of a ukulele are not more than about 68mm wide and just over 400mm long.

If any slabs are less than 105 wide, then they could be able make a soprano ukulele.
 
Last edited:
Thanks for explaining and the description of the dimensions for the different ukuleles Malc. Wasn't aware that there are different ones.
 
Thanks for explaining and the description of the dimensions for the different ukuleles Malc. Wasn't aware that there are different ones.
They're sort of like the violin family, there's four of them - soprano, concert, tenor and baritone ( like violin, viola, cello and double bass but not so big :) )
 
I've just resawn some oak sleepers, even with an 18" blade I get less than 4" depth of cut. Instead of doing as much as possible in one cut I halved it. They werent this years fresh crop of french oak and were quite dry but not properly square. Hardest part was carrying them.
 
Frank..having done this many times, I would, and do, make the initial cut, about 10 mm.
This is to have a place for sawdust to go. If you take a large cut firstly, you will have to go slow, and most likely, burn the wood.
If you have the depth to cut all thru, place a thin strip, in the kerf, to keep the pieces separated.
 
Being sans- bandsaw I would trial cut in exponential incrememts on the first piece
If it feels ok then do the full depth.
If that blade is nice and sharp its narrow kerf will not push back at you very much.
Could you rig up a vertical support in the t-slots/ sled?
What are falconry blocks?
Apologies Martin... I didn't see your comment. Sadly the blocks were just oversize to go through the bandsaw. I did them on the tablesaw this afternoon... some photos to follow.

Falconry blocks (Traditional Falconry blocks) are a 'perch', circular in shape, tapered narrower near the base - something like 6" at the top and 4" at the base. There's a (usually) stainless steel double ring (1 to fit a groove in the block - 1 to attach the leash to) that rotates around the block. The top of the blocks used to be fitted with a thick piece of cork - now something like Astro-turf. There's then a stainless steel bar that goes into the ground to stop the falcon flying away and dragging the block - although it has been known to happen. I'd need to search deeply to find some photos of the ones I made.

There's also "Arabian Style" blocks of which this is an example. This one broke while turning the stem on the Trend Router Lathe:
 

Attachments

  • 20260101_153138.jpg
    20260101_153138.jpg
    158 KB · Views: 7
  • 20260101_152909.jpg
    20260101_152909.jpg
    130.4 KB · Views: 7
View attachment 53848
I think Frank's username is a bit of a giveaway. ;)
Thanks Roger 🤣. I used to make "Rotating Ring Perches" with timber for the perch part as well as the blocks rather than "Bow" perches 😉

My favourite hawk was/is the Goshawk... "Accipiter gentilis"... the Sparrowhawk is "Accipiter nisus" - female just known as a "Spar" when being flown by an "Austringer" (Falconers supposedly fly Falcons) - while the dinky little male Sparrowhawk is known as a "Musket"...

Could go on further but... 'nuff of a lesson 😎
 
Last edited:
Evolution R255TBL+ saws are quite dinky really, at 1800 Watts (~2.4 HP in theory) and aimed at the site market. Has it got the balls and stability on its small table plus fence to handle deeping big lumps of wood? I'd say it would be doable in stages with caution and good additional infeed/outfeed support including the fence plus a dedicated rip blade. It would be even better if a hold-down of some sort could be arranged to minimise the chance of kickback. Having said that, if the wood is heavy enough it may be more likely to bog down the saw rather than be lifted and thrown back by the blade. Slainte.

PS. Ha, I see I'm too late and the job's done! Should have kept my mouth shut, ha, ha.
 
Frank..having done this many times, I would, and do, make the initial cut, about 10 mm.
This is to have a place for sawdust to go. If you take a large cut firstly, you will have to go slow, and most likely, burn the wood.
If you have the depth to cut all thru, place a thin strip, in the kerf, to keep the pieces separated.
Thanks... I'm a bit behind in responding as I took the chance after lunch today to "have a go"...

The first cut was at about 1"/26mm taken slowly with the Ash first... 4 cuts by up ending and turning the block and running through... Then increase to about 1½"/38mm... cut/turn/up end. With the Ash I left about ¼"/6mm to cut with my handsaw. I was disappointed but expected that the damage by the woodworm would be too much. So the Ash is for the recycling centre wood container.

The London Plane was much better. Same method as with the Ash. Took off the two 'sides' and then evenly divided the remaining amount to get three more slices - 5 in total. Did the same with the oak - 5 pieces. They are now waiting to be put through the thicknesser in a couple of days time - I've an appointment at the RUH eye clinic in Bath tomorrow at 1.30pm...

I've some cedar - approximately 4ft long by 4" square so that I'll try on the bandsaw - feel I lost too much with the blade on the tablesaw. I've also some Brazilian mahogany, about 4" × 2½" (need to measure to be definite) to put through.

The photo of the cutting is of the Oak. The London Plane is attempting to show 'book marking' of a couple of the boards... although some blade burn marks. In the 1st I've increased the 'Contrast' setting by 100% to try to show the grain more enhanced... the final is with no contrast adjustment.
 

Attachments

  • 20260407_143857.jpg
    20260407_143857.jpg
    211.6 KB · Views: 10
  • 20260407_151906.jpg
    20260407_151906.jpg
    226.3 KB · Views: 10
  • 20260407_151906(2).jpg
    20260407_151906(2).jpg
    227.5 KB · Views: 10
Evolution R255TBL+ saws are quite dinky really, at 1800 Watts (~2.4 HP in theory) and aimed at the site market. Has it got the balls and stability on its small table plus fence to handle deeping big lumps of wood? I'd say it would be doable in stages with caution and good additional infeed/outfeed support including the fence plus a dedicated rip blade. It would be even better if a hold-down of some sort could be arranged to minimise the chance of kickback. Having said that, if the wood is heavy enough it may be more likely to bog down the saw rather than be lifted and thrown back by the blade. Slainte.

PS. Ha, I see I'm too late and the job's done! Should have kept my mouth shut, ha, ha.
ALL input is appreciated Richard 😊. Had I attempted to go full blade height I'm sure I'd have had the issues you've mentioned. Having asked for some guidance and the consensus opinion being incremental cutting it did extremely well. My main problem was with the extraction force not being quite up to it - but that was because I'd put too much of a tight angle on the pipework to begin with. Sorted out once I realised.

I'm very pleased that the Evolution R255TBL was very capable of doing the task. I'd probably have had issues if I'd been using the original blade it came with though 🤷
 
I'll post some photos of the timbers after they've been through the thicknesser... some of the grain, especially in the oak, is difficult to make out with the blade marks...
 
Having said that, if the wood is heavy enough it may be more likely to bog down the saw rather than be lifted and thrown back by the blade.

I saw a video recently where someone was using a jobsite saw to cut a small sheet of plywood. They were pulling the sheet through from behind, and the sheet pinched on the blade, and amazingly, instead of kickback ripping the sheet out of their hands, the whole saw tipped over! The blade even caught the gentleman on the trousers near the nether regions with what looked like minimal damage but I imagine a change of pants were needed.

Never seen something like that happen before, just goes to show that these saws are a bit top-heavy and can tip in extreme situations!

 
Extremely foolish thing to attempt... Extremely nasty.... agree with Ian - with the crown guard could have been 'relatively' harmless - butthe crown guard hitting him in the nether regions... painful.

Doesn't excuse his foolishness but that particular site saw does look to be on the small and flimsy side and not on a stable level ground...
 
That could have been very nasty indeed! Relatively harmless if he’d had the Crown guard on though !
Crown guard on him or the saw?

There is a circumcision joke in there somewhere.

Pete
 
Thanks @wallace 😊. I can well imagine the hardest part being carrying them. Hoping you got/get usable stock from it 🙏

Ive been keeping an eye out for some sleepers going cheap all winter, these turned up on facebook for £20 each so bought 25. I was half expecting bananas after ripping but I was pleased to see they stayed straight. I have a couple of garden gates to make and am rejuvinating my old koi pond so might attempt some kind of roof/gazebo type thing over it.
 
Ive been keeping an eye out for some sleepers going cheap all winter, these turned up on facebook for £20 each so bought 25. I was half expecting bananas after ripping but I was pleased to see they stayed straight. I have a couple of garden gates to make and am rejuvinating my old koi pond so might attempt some kind of roof/gazebo type thing over it.
Be interested in seeing/reading a "WIP" if/when you do the roof/gazebo over your koi pond 👍.
 
Back
Top