• Hi all and welcome to TheWoodHaven2 brought into the 21st Century, kicking and screaming! We all have Alasdair to thank for the vast bulk of the heavy lifting to get us here, no more so than me because he's taken away a huge burden of responsibility from my shoulders and brought us to this new shiny home, with all your previous content (hopefully) still intact! Please peruse and feed back. There is still plenty to do, like changing the colour scheme, adding the banner graphic, tweaking the odd setting here and there so I have added a new thread in the 'Technical Issues, Bugs and Feature Requests' forum for you to add any issues you find, any missing settings or just anything you'd like to see added/removed from the feature set that Xenforo offers. We will get to everything over the coming weeks so please be patient, but add anything at all to the thread I mention above and we promise to get to them over the next few days/weeks/months. In the meantime, please enjoy!

Routering trickery.....

Woodbloke

Sequoia
Joined
Jul 22, 2014
Messages
7,389
Reaction score
1,378
Location
Salisbury, UK
Here's somat to tax the little grey cells on a dull Sunday afternoon 😁 :

IMG_4467.jpeg

A couple of examples done in gash material where the curvaceous shapes fit exactly, one on one, into the corresponding square pieces. They can be picked up, shaken all about and they won't fall apart, but if tapped with a maul they'll come apart. They were done with a router, but how? - Rob
 
My guess would be a template used for both cuts but with different guide bushes used on the hole (bigger piece) to that used on the insert (smaller piece). As long as none of the corners are too sharp and that the router cutting size is known, I'd expect that to work okay.

For example (and without double checking my maths), if the router cutter is 6 mm, then use a 12 mm guide bush to cut the inner piece, which would result in the insert piece being (12/2 + 6/2) = 9 mm smaller than the template. Then use a 24 mm guide bush to cut the hole in the outer piece, which would result in the hole being (24/2 - 6/2) = 9 mm smaller than the template.

That's all assuming the template is bigger than the cut-out (i.e. the template has a hole in the middle, in which the cutter runs). If the template is smaller than the cut-out (i.e. the cutter runs round the outside of the template), then you probably have to swap the guide bushes round.
 
Yep router bushes and a 6mm cutter.
Back in 2017 you were going to show me how to do a yin and yang plate using this method like the one I made below using templates

IMG_0294.jpeg
 
or make it out of metal with wire EDM :D

3ef80426e409513c42dc90639525fb89.gif
 
My guess would be a template used for both cuts but with different guide bushes used on the hole (bigger piece) to that used on the insert (smaller piece). As long as none of the corners are too sharp and that the router cutting size is known, I'd expect that to work okay.

For example (and without double checking my maths), if the router cutter is 6 mm, then use a 12 mm guide bush to cut the inner piece, which would result in the insert piece being (12/2 + 6/2) = 9 mm smaller than the template. Then use a 24 mm guide bush to cut the hole in the outer piece, which would result in the hole being (24/2 - 6/2) = 9 mm smaller than the template.

That's all assuming the template is bigger than the cut-out (i.e. the template has a hole in the middle, in which the cutter runs). If the template is smaller than the cut-out (i.e. the cutter runs round the outside of the template), then you probably have to swap the guide bushes round.
More or less, but try it out. It's not as easy as you think! :ROFLMAO: - Rob, who'd forgotten the exact sequence!

Edit: this used to be a party trick on the old Axminster courses in their workshop at HQ, which is where I first saw it done...but it's not easy!!
 
Last edited:
I think it could also be done with a Vee cutter, but the cut is done on opposite faces of the workpieces so that one drops into the other.
 
Here's somat to tax the little grey cells on a dull Sunday afternoon 😁 :

View attachment 32065

A couple of examples done in gash material where the curvaceous shapes fit exactly, one on one, into the corresponding square pieces. They can be picked up, shaken all about and they won't fall apart, but if tapped with a maul they'll come apart. They were done with a router, but how? - Rob
Easily done, you need a shaped pattern, a straight cutter and 2 follower bushes. The difference in diameters of bushes needs to be equal to the diameter of the cutter. You use the larger bush to cut the male insert and the smaller bush to cut the socket. The pattern needs to be smaller than the finished design by the difference of the cutter and large bush diameters. The whole.set up can be reversed by using a female pattern.
I hope I've got that right, it's a long time since I last did one.
Trend will sell you a bush set which consists of the small bush, 12mm from memory, and a 10mm wall thickness collar. The collar slips onto the bush to form the larger follower. You then need a.10mm cutter to complete the job.
If you want sharp corners the pattern has to be modified to allow for final hand finishing.
Brian
.
 
Some appear to say it’s easy and you say it isn’t Rob.

I need to do something similar in the not to distant future so would appreciate a walk through.
 
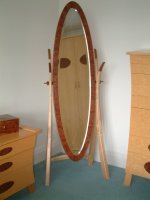
This is one piece I made many moons ago, in a previous life. Kevasingo veneer on a ripple maple ground, with ebony stringing. No idea where it is now, but I did rather like it. There was a whole bedroom suite in the same vein. I do still have the Cheval mirror though.
17 Finished (Small).JPG

Finished (Medium).JPG
 
Last edited:
1000011347.jpg

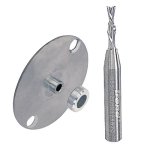
Here is the Trend Inlay Kit
The cutter is ¼"dia, therefore the collar wall thickness is ¼"
The problem I found is that, because the collar is retained on the bush by a compressed O-ring in its internal bore, there is possible play between the 2 parts. Thus when pressure is applied to keep the follower hard against the pattern, the collar can move resulting in a slight mismatch between the inlay and it's housing. I overcame this by fixing the collar more solidly with a pair of screws:-
1000011348.jpg

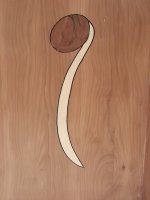
This the last inlay I made:-

1000011349.jpg

It's a motif on a door panel in a Mackintosh/Arts&Crafts inspired cabinet.
Brian
 
You don't necessarily need the Trend kit ^^ but you do need a goodly selection of router bushes to play around with as well as a cutter than will supply a 'one on one' fit between the two pieces of wood - Rob
 
Router bushes as has been described above. You do need a very steady hand though as the smallest deviation from perfect contact with the template shows up as a gap. I've used mine to make and fit keys to stabilise splits in big boards.
 
I might give the trend kit a try, it doesn’t appear to be massively expensive and if I can achieve what I’m after it’ll be worth it.
 
Back
Top