• Hi all and welcome to TheWoodHaven2 brought into the 21st Century, kicking and screaming! We all have Alasdair to thank for the vast bulk of the heavy lifting to get us here, no more so than me because he's taken away a huge burden of responsibility from my shoulders and brought us to this new shiny home, with all your previous content (hopefully) still intact! Please peruse and feed back. There is still plenty to do, like changing the colour scheme, adding the banner graphic, tweaking the odd setting here and there so I have added a new thread in the 'Technical Issues, Bugs and Feature Requests' forum for you to add any issues you find, any missing settings or just anything you'd like to see added/removed from the feature set that Xenforo offers. We will get to everything over the coming weeks so please be patient, but add anything at all to the thread I mention above and we promise to get to them over the next few days/weeks/months. In the meantime, please enjoy!

Shed rebuild

Coolhands

New Shoots
Joined
Apr 3, 2018
Messages
84
Reaction score
0
Location
Edgware, London
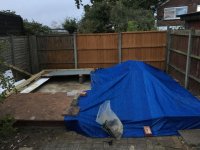
In the offing. I have a wooden framed shed / workshop I built 9 years ago, on a concrete base. I made it up as I went along. Roof now leaks and has sagged (rafters too thin which I knew at the time) so blue tarp put over it today. Want to rebuild in summer off 3 courses of bricks.
 
Hi Coolhands

Welcome to the forum. There's plenty of information on the forum to help you should you need it.

We love pictures, by the way!

Roger
 
Are the walls sound? It might just be possible to take the roof off, then jack the building up, build a plinth, then put the building back down again (if height isn't an issue).
 
hmmm I had never considered raising it in that manner. I think it would look odd though as the neighbours have an outhouse a similar height so mine would end up being higher afterwards. The walls are well built but I didn't construct them properly (although it's never been a problem).

eg they are featheredge > uprights > plasterboard with insulation in-between. There is no membrane at all.

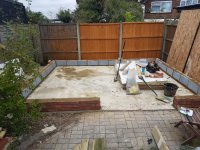
I'm so annoyed I never really knew what I was doing as it took a lot of effort to build, and now I might have to start again. The problems start at the bottom - I wanted the base to be insulated to work on motorbikes, so I laid a frame and used insulation. But the frame spacing didn't make sense so the boards dip at some of the edges when I put side stand down etc

see if pic works:

hd9ArAR2MqCD-tkiaE8NseHg98lxBocP5U1QcJVlMVi28hai1l80axalfrcKtgl4txRvEaghLuRk3SQFbQ=w664-h440


5em2W7d1Uf986dVj9l6Cc29KaXoqq571Ycw7yxVG1WpKzm5Hc-DVAsiJYHcjDxcZdzCxIijR1klqzD-wWQ=w664-h440


OlYKBdiXY2536Z0EztkDILaf8t6fytNYX88jgvIVU8K5U77CxqOl_m2M7V5D8-LwVxWJg_TtL7ipTYV62Q=w664-h440


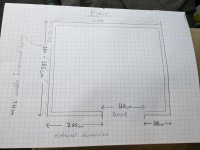
then I built up off the frame outline the perimeter of the slab:

9WxIosIYSIY5C5W553OEOiNXkAz0rskaC0kX6X0sxNXAfFsBrGw4LmM7MHCb0eLt3mbCRaCT7-anLU6cng=w664-h440
 
I've decided it really does need rebuilding as the roof is pretty rotten (just been up to put a tarpaulin over), and I want a bit on the outside for storage of ladders - roofed but semi-open perhaps.

I also might have an internal wall to have effectively 2 rooms. eg the smaller narrow room would be a clean room maybe used for modelling (RC models) and the larger space for my car tools eg roll cabs etc and space for when I need to get a motorbike in for maintenance.
 
Well even if you have to take it down you should be able to re-use much of the timber. In fact, if you can detach the corners (fairly easy if they were screwed), then you might just be able to lay each wall down, cut them 225mm shorter, re-fix or replace the sole plates, and set them aside whilst you build the plinth. Follow the principles outlined in my sticky thread and you won't be having to do this work again, ever.
 
Welcome to the forum from me too.

I am also working on a motorbike workshop when the weather picks up a bit.


Sent from my iPhone using Tapatalk
 
Thanks. I think from reading other topics I need 200mm deep rafters rather than 150mm. Or, could I stick with 150 (as cheaper) and run one long 200mm one from left to right in the middle of the roof to support them? It’s about 4.6m wide. Although I don’t know the price difference, will try and look today.

Edit dimensions are 3.8m deep front to back, 4.6m wide.
 
I'm building a flat roof as well(probably 10 degree slope) . My span is only 2.4m so not as wide as yours and I may put a green roof on it so it needs to be able to take plenty of weight. I've chatted to the green roof people and been told for my span 6x2 graded C24 timber at 400 centres would be ok. Whether this would do your bigger span I don't know but considering yours isn't going to have the weight on it mine will have it could be ok.
 
Hi, separate question: I am considering if I did rebuild the shed to put it on 3 courses of bricks as per sticky / mike. But, what if I also want the back wall (only) to be entirely block? Reason being land behind my shed is completely overgrown with brambles etc - I don’t own it and it’s not maintained and they are invasive trying to get under my feather edge.

So can I have one wall only? Struggling to see how it would link with the 3 courses on the side walls. + would it stand on its own and then I build timber frame up to it.

Or should stay wood frame all round but in back wall use OSB instead of feather edge. Thanks for anyone’s thoughts.
 
I think you would need piers every few feet in the block work wall and maybe a one block return at each end/corner for stability.
You can deal with damp-proofing the block wall by synthaprufing the inside surface and adding insulation for comfort. The whole of my workshop is built like this and stays bone dry. I have one 10 metre wall on the boundary that I cannot maintain as my neighbour refuses me access to it and so it is bare, rough pointed, high density concrete blocks left as built.

Bob
 
Question:

I can’t get 50mm thermalite blocks anywhere. Why can’t I just use 100mm ones, presumably they’ll stick out into the room by 39mm if I have 11mm OSB on the walls. Does that matter? Or will it just look weird / be awkward for putting shelves up or whatever. Otherwise my only option is to cut them in half lengthways and I’m not sure how hard tha is.

Also I’m using dense concrete blocks for the 2 sides and back instead of bricks as they are not visible from my garden. I am using brick on the fron face only. Is there any problem I am not anticipating with that? I believe they should be ok. (Ie they are just as ‘good’ as bricks it’s just they are normally unsightly).
 
No problem mixing bricks and blocks, it is done all the time in the building trade.

Just use 100mm thermalite and think of it as a masonry skirting board! :lol:

Malc cut his down in a homemade jig if you are really concerned. Details will be in his build thread.

Bob
 
Thanks. I’ve read that, just wondering how tiring it is, not as fit as I used to be lol! I have bought a concrete saw from screwfix to have a go.

Got brickie coming soon to lay the blocks and bricks for me. Got to take existing shed down tomorrow if rain holds off. Pouring today.
 
Yo, CH!

It's a doddle to cut down thermalite or similar blocks.

I used some roof battens to make the jig up and bought a stone hand saw from toolsation for about £16. Did the job a treat. I made the jig because I didn't trust my straight cutting ability.

Other guys on this site say that any cheap DIY saw will cut thermalite, too.

So, go for it!
 
Ok I’ve made my own 50mm block cutting jig. I had lots of spare wood and plasterboard screws. I used metric 47mm 2x4 as I thought it would be close enough, but actually change my design after first block. If you put 4 screws (in pairs of 2 for stability, 2 high up and 2 lower down) through board from other side you can leave the heads protruding to creat the extra few mm gap you’re you need to make the 47mm offcuts 50 mm so you get block cut in the middle

5lPna1I5gmYHl983VPFw_aEEuJ-cm-GfmS-gbW3Gk62VrT1RMBNdv2JDUtIhPzJ1OlSM5iqD6TfsmIXi0w=w330-h440


See gap

B44wCqJ6QD0kxq7PZz2GBTGr_XV2I5pn4tPldRqrRrlBArV7GD65epLbovQ4VSk0MtHReFPliCfqPbd0PA=w330-h440


Here’s my design. You can lay the block flat up against the back

t5exw_5VvtqXt56YFsIF3oW7KH5gHm0FQqGM0lqappG-pMY88XkTw6cqW69i7es8s8dVXaOwhnPEKahAzg=w330-h440


Then hold with batten and clamps, and simply run your saw up against the 2x4 as you cut down. Move the clamp above saw when necessary.

I think it’s accurate enough.

3RCSXZ2RNiY-hn0SXvfPx_cqQA03s7ntvHob9pzDgLT_zaJ4Xm1MDSB3gFDlraZryFQ7WbVXm4KTcn3GQg=w330-h440


0FoJZ9yXKLIyFysgPQMeIX9_G-mfRGCOcNUSApRtnSkSBW-YKDk_KZEN4bFIV-etF1MnsJtCUryNxqp3Bg=w330-h440
 
Got blocks and bricks this morning at 8 from selco. Disassembled my toolboxes to move them out existing shed. Emptying the current space is the hardest thing - trying to keep everything out the rain. I have a lean-to (already full up lol) which these toolboxes will be going in.

XuUJxQL8J8dENpIpzncbNvh7H5GXE65HEvnEfTUs-hoCUmefgb6qIaUzAm0hWgi0hMHimmsbJkqq57nWHQ=w586-h440


Question: anyone have a link to a how-to-build-a-flat-roof with a gradient on it? I have looked at firring strips which would be my ideal but they are ten quid each and I’m not spending £120 on firring strips! So how else can I reliably create a fall using rafters?

I really wanted top of all walls to be even, with horizontal joists going front to rear. But without firring strips I need to create a fall somehow but then that introduces problems with the top of the side walls having to also slope, which is how my current shed got made-up walls by me in the first place!

My shed must have a flat roof by the way, not a pitched roof.
 
Could you cut your own firring strips by clamping a straight edge on at an angle and a circular saw?
Could you borrow a track saw?

Have we a member nearby with a decent table saw to help? Even careful work on bandsaw would be OK.
The strips don't have to be in one long length don't forget.

You can have the tops of the walls level if you must (?) and cover the sloping gap with wide fascia boards at the sides.

Bob
 
Can you not simply put some packing pieces under one end of the rafters ?
 
RogerS":1a2nuis7 said:
Can you not simply put some packing pieces under one end of the rafters ?


T'would be the easy way but the OP said he wanted horizontal joists but not quite sure why.

I think the span is 4m and 1:40 fall would give good drainage. so that is 100mm to nothing for the firring.

Cutting 2 just over 1m pieces of 4x2, on to give 100 to 75 and 25 to nothing and the other 75 to 50 and 25 to 50 would do the job
NB need to adjust the cut sizes for real world dimensions and the saw kerf but the principle is there.

Bob
 
Ok maybe angled rafters are best. So I would need front header plate to be higher than rear? Small birdsmouth cuts on rafters? (I could work out the angles)

Or, how do I get the front header plate to be high enough compared with the rear?

Thanks. Back outside now! Trying to pack a quart into a pint pot
 
I'd use metal joist hangers and not mess around cutting your joist ends which will compromise strength.
EG toolstation 43424 or similar to suit your timber thickness.

Pop in a couple of screws to secure whilst you are tinkering with angles etc then you can take them out to adjust. Then either use more screws when you have it right or galvanised nails, skewing some into the walls for optimum strength.

Bob
 
There's no great compromise on the strength with such a shallow birdsmouth. Site chippies most certainly wouldn't bother cutting the timbers in that circumstance, but if you can without too much trouble, it would be nice.

I don't understand the reference to firring pieces costing X amount of money......they are simply bits of 4x2 or 2x2 ripped into long wedge shapes, two per piece, with no great wastage. But frankly, unless you are desperate for a horizontal ceiling, I'd just raise the roof at one end. Oh, and with your span you definitely need 200 deep rafters, and ideally you'd have a fall of about 60/ 65mm.
 
Here's a photo of the shed I built a week or two back, showing the front plate 150 or 200 higher than the rear plate.

Im0DNu5.png

Note that my roof timbers sat directly above the wall studs, so I only needed a single plate. If yours don't, then you'll need to double up the plates. If you want to build a green roof, then all bets are off........you'll need a structural engineer.
 
Hi I have been busy disassembling the existing shed, see pic

S0Si-frJqi5ujCBZ9kHCitx4SiBHbGyS6mY3WKp38CaosXiRJoU4IOZH7PR7zmCS7kELusHs2gptDjfjvg=w586-h440


eIfvUtcCtcy-21qWfaYh3xP5OYyqYPKWKH7G1QtBVGtxYIi1-eaTRJkJ-x7KU5UyInUIBPFiRLGBn-smBQ=w586-h440


I also had to build a gargantuan holder to hold all the insulation, which I've decided to reuse after much humming and erring. Decided it would be a waste of money to simply bin it then buy new in 2 months time

9i1y1NIvoT1BoHlmM6FslUOgqeRhqFh64T1-CEjSLQv6Oxv8AW5ecS5zdkkmR1c2tCepYv40KcYNF4Ll9Q=w330-h440


I have 3 questions if someone could help

1) I have decided I want my shed to have 2 halves, ie separated by an internal wall. If I run a joist from this to the side walls, it can support the fore / aft joists midway along their length. In this case, will they be ok at 150mm deep as I will have halved their span to just over 1.8 meters?

2) if the above does allow the fore / aft joists to be 150mm deep, can the supporting joists (running from the mid wall to the side walls) also be 150mm? The span left to right will be about 2.2m however it will also be bearing the load of the other main rafters. In which case, can I double them up (join) and still have them as 150mm?

3) I've taken out a load of 2x3" timber from the original shed which was too skinny for the load. Before I chuck it all away (I've got serious site issues here managing space!!) is there anything you think I could / will ant to use it for? I'm thinking bin it as it's no good for joists or the walls, so what would I use it for. I've got too much junk around here wlaready so if I won't use it I want to get rid

Cheers!
 
Could you post a sketch of your proposed joist layout, with the wall position shown. It's too ambiguous at the moment to give you an answer confidently.
 
Keep that insulation bone dry. Otherwise it will be useless.
 
Put it in the wendy house - quick when the kids aren't looking !
 
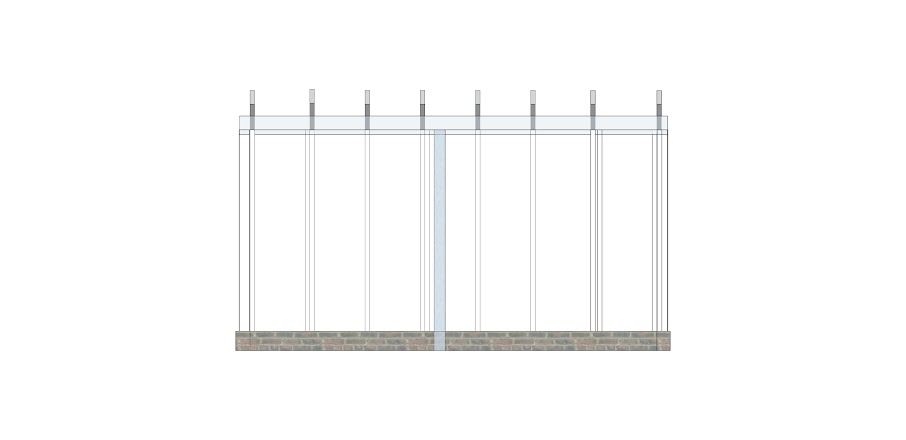
sorry just trying to learn sketchup quickly!! Imagine the front wall does extend up to meet the inclined rafters! So it would rest on header plate front and rear, and sideways joist midway. I need to redraw whole thing but taking a while to get to grips with it.

R2gZ73-U7uCxDSgX3sPWdvFb9s7eormPs4raqBm6RFR8l-vT1TeKRHjHSbTU1c_JAtnwGGAHiN6WCHcKzQ=w906-h440


Plan view:

YpG8qDzaHlEe6C6REWfxko7B6ztUm_xqWLCx6w8HloavEWKldOgZHafhnTCxMChjYnPj6m-Dq45FkQ8A5w=w906-h440


front view:

uZTATZedNwOfIR11GaGrC_OUZyzLyKaGhisnsSEPde7YxDDuNVt4oKNm5mkgAuwJ8Js0WYIJcBd9GXVCUw=w906-h440

left view:

ZAsC43BIJc5O6omJKZKKxTahrYNRurc2fyeOwuMmbcZRCHaiDhw8PyIJsrfoRMnfs1-7fzIs7u2vyNG7dw=w906-h440
 
Progress. 2 new fence panels (nearly 60 quid!) just cos it makes sense to do it now. Old ones were shot.

44570A62-2319-46EA-9A5B-B787BB2256E8.jpeg

Shed down, floor up, which was to be honest a pretty mammoth task all in all. Including unnailing all featherboard to reuse. Site clear and blocks laid to hand for brickie.

4A369F63-F2EA-42E9-9960-0CDA4709AFEC.jpeg

nice clear pic for him! Lol

EFC0B837-977A-4B08-AA9C-6217833CA6C4.jpeg

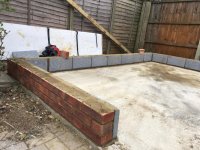
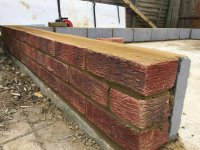
And then he did the business

695E7980-19F2-482D-9C5B-F894D8288604.jpeg

1482D358-64CD-4B5E-9019-40D4F87671A5.jpeg

Couldn’t afford Flemish bond as he wanted more money as it takes longer.

BBD2E8F0-11DB-4194-BCFD-678BD89C91C9.jpeg

Obviously as I’ve brickwork done it’s decided to rain tonight. So last minute scramble to cover up. It’s had about 6 hours since finished with no rain so I think it’ll be ok.

5D3A8567-756F-406C-B5C4-326A2AF38307.jpeg
 
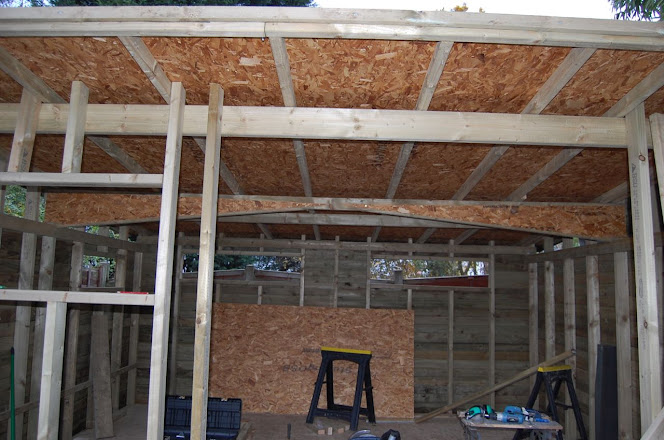
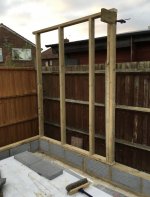
finally started on the making, after spending ages calculating & recalculating the measurements. The sides slope gradually up the front so each stud is a different length; I've got about a 9 cm drop front to rear. Since I'm using all the original wood I'm trying to make sure I use the shortest lengths necessary for each piece and leaving the longer ones for the front elevation.

I'm making all the walls in 2 sections each to keep weight manageable. This is the first one (just propped up as a test fitting) & I've cut the mirror image for the other side.

the little piece sticking out is example of where the 150mm cross member is going to sit to support the rafters front to rear. It will be sandwiched between the next section of wall. I'm considering 'doubling up' that joist ie having double. Might be overkill though.

fullsizeoutput_80ad.jpeg

edit looking at that pic the cross member will be too low. Can't believe it I've planned, planned and re-planned this framework! Luckily not too late I can redesign! Possible I can just change that stud for one 47mm taller to raise the crossmember to roof joist (rafter?) level
 
I work in a school, so in preparation for when I seat my framing on a bed of mortar, I asked the DT technician about me making some simple folding wedges after hours with offcuts. Guess what - not allowed, health & safety :lol: kids can use the bandsaw but a grown man cannot :eusa-clap:
 
Back
Top