• Hi all and welcome to TheWoodHaven2 brought into the 21st Century, kicking and screaming! We all have Alasdair to thank for the vast bulk of the heavy lifting to get us here, no more so than me because he's taken away a huge burden of responsibility from my shoulders and brought us to this new shiny home, with all your previous content (hopefully) still intact! Please peruse and feed back. There is still plenty to do, like changing the colour scheme, adding the banner graphic, tweaking the odd setting here and there so I have added a new thread in the 'Technical Issues, Bugs and Feature Requests' forum for you to add any issues you find, any missing settings or just anything you'd like to see added/removed from the feature set that Xenforo offers. We will get to everything over the coming weeks so please be patient, but add anything at all to the thread I mention above and we promise to get to them over the next few days/weeks/months. In the meantime, please enjoy!

Small workshop

Thanks again Bob I did a search of 200 mm bandsaws and noticed that many of them were the same shape and had clearly came from the same factory and had a different paint job and badge fitted.

Andy the last ones I can find were some years ago and sold for around £100 I have sent an email asking if he has used it and if so did it run well, I also asked if he knew the history of the machine. Oh and if he is open to offers.

Do you think it would be worth contacting Tuffsaws to ask if they have a blade for this machine.

Thanks again

Michael
 
Good news my work bench with dogs and holes is being delivered tomorrow bad news I don’t have anywhere to put it. Early start tomorrow for me.
Any suggestions for a good varnish for it.
Thanks
Michael
 
MY63":2auvlofl said:
Good news my work bench with dogs and holes is being delivered tomorrow bad news I don’t have anywhere to put it. Early start tomorrow for me.
Any suggestions for a good varnish for it.
Thanks
Michael


I think that, much as I don't like 'oils', I'd be inclined to put something like Osmo Polyx on or any hard wax oil.
 
I had to google sam maloof mixture but I understand now.
The MR MDF panel has just arrived it is well sealed in plastic so I will set it aside for now until I can clear some space in the garage / utility. (it was a garage but is going to be a utility room eventually) Then I can unwrap it and apply the varnish.
I don't know why but I expected it to be heavier.
 
MY63":29qmxzrg said:
I had to google sam maloof mixture but I understand now.
The MR MDF panel has just arrived it is well sealed in plastic so I will set it aside for now until I can clear some space in the garage / utility. (it was a garage but is going to be a utility room eventually) Then I can unwrap it and apply the varnish.
I don't know why but I expected it to be heavier.


You must have the version with lightweight holes :lol:

Bob
 
Izat the one wot gets mixed with Baking powder and then - after its proved - gets baked at gas mark 5 for twenty mins? Or, is it the Swiss MDF? You know..Gruyere brand? :eusa-whistle:

Sam
 
I would like to thank everyone who offered advice on the band saw question.
The one I linked to was a De Walt 3501 on a metal stand listed on Gum tree was not too far away from me so I made arrangements to see it today.
The saw was exactly as described and had been in a packaging department of a company since new and going by the condition had not seen much use.

2018-12-22_12-55-02 by my0771, on Flickr

The stand was made in house for the saw and is way heavier than the saw definitely a 2 man lift :).

2018-12-22_12-56-03 by my0771, on Flickr

The guides look like brass and have a little wear they are attached to the guard mechanism which has a know to move it up and down.

The tyres are intact and attached to the rims although there is some debris on them looked very much like aluminium dust (even though there is a notice on the side that says wood only)

2018-12-22_12-55-28 by my0771, on Flickr

The toothed drive belt squeaks and squeals and looks quite tight against the sides of the drive wheel on the motor. But the motor turns and runs freely, Blade tensioner works wheel alignment screws work. No mitre fence or other accessories but the main fence works well.

I am over the moon thanks to Bob (9fingers) for his advice on what to look for when I viewed it which was invaluable.
I will be contacting Tuffsaws asap to obtain some new blades.
Thinking about the base it might be very good to use as a support for the stamping section of my leatherwork bench and I could build a wooden stand on wheels for this saw. :)
 
Looks good Michael and lad my comments were helpful.

I suspect that it does not have brush to clean the tyres.
You can easily make one from a brass bristle suede cleaning brush. Shorten the handle and mount on a bracket so that the bristles brush the surface of the lower wheel. This should sweep off the dust and stop it getting carried up to the top wheel as well.

See here for how I did mine. A wooden block would be just as good as the mount

https://www.ukworkshop.co.uk/forums/post450110.html

hth

Bob
 
Ah ha it does indeed have a little brush but the bristles sit a few mm above the tyre. Looking closer I can see the brush is worn where the wheel passes. The part not touching the wheel is longer ie it has a step in it I wonder if the brush can be turned around. It won’t pull out with fingers I will have a better look tomorrow.
Thanks again Bob
 
All of the festivities are over for another year so I have started to work on my workshop again.
I had previously dug and filled one side and the back foundation. Today with the help of my wife and the loan of a wheel barrow we have dug and filled the other side and the front.
Darkness prevents pictures but I am really pleased with the progress.
We have always had issues with drainage in parts of the garden as we have a heavy clay soil so we have positioned new paths in those areas and have dug down and used heavy ballast under a heavy duty weed proof membrane followed by a few inches of decorative black basalt. The recent heavy rain would have previously meant the garden would be really wet but it looks like that issue has been resolved.
The weather forecast is without rain for the next 10 days so I plan to get as much done as possible so I am going to write a list tonight and order the lintels and most of the timber and lintels tomorrow.

I have some questions about lights and work benches to follow unless they should go on a different board?
 
Workshop lights have been a sub topic in several of our Workshop Build threads.

BTW, some of us are really like the LED panel lights available at the moment. I'm about to add two more, one each end of my 'shop, to supplement the four I have over the central area.
 
Thanks Malcolm
Would you mind telling me which LED panels you are using as I would like to go down that route.

Here is a picture of my foundations so far. I did start putting the spoil in the middle of the area I was digging out. We are using the soil to level out our remaining area that was grass I don't think you could call it a lawn :D

2019-01-04_10-01-09 by my0771, on Flickr

I am going to remove the turf to the left of the picture and lay another foundation for a path which will run up the side of the work shop so my finished ground level will be 50 mm above where it is now.

Trying to sort out a shopping list for timber now.
 
Looking good. It is often reckoned that on a build project 1/3 of the effort goes into the ground works and preparation and with the least to see once done. I hope this heavy work is not too onerous after your hand operation and is providing enough but not too much physio for you.

It will quickly turn into a 3D structure and become more rewarding all round.

Bob
 
TrimTheKing":2nauj5cd said:
I got these ones and they are fantastic IMO.

LED Panels from eBay
Mark
Given the rfi problems that Malcolm has had with his led driver modules, I wonder if you could give a qualitative comment about rfi from yours. Can you use domestic stuff live VHF (fm) radio, DAB radio, cordless phone and mobiles in your led lit shop. How close to wiring and panels can you run a radio without interference for instance.i see that your eBay vendor says no rfi but he is possibly being clever in that the panels themselves don't radiate any rfi but I'm sure the drivers do to some extent.
Would be useful feedback to those contemplating fitting panels on new builds and I might even give them a try.
Q2. How many sqm of floor space per panel do you have to get your "operating theatre" lighting levels roughly?

Tia
Bob
 
I got mine from https://www.wholesaleledlights.co.uk

I did have problems with my panels which they sorted out. Michael, if you're passing you're very welcome to pop in and take a look.

TBH, I think that all the LED panel probably come from the same place in China
 
9fingers":hu06ipfu said:
TrimTheKing":hu06ipfu said:
I got these ones and they are fantastic IMO.

LED Panels from eBay
Mark
Given the rfi problems that Malcolm has had with his led driver modules, I wonder if you could give a qualitative comment about rfi from yours. Can you use domestic stuff live VHF (fm) radio, DAB radio, cordless phone and mobiles in your led lit shop. .....
Tia
Bob

No problems with FM....don't have DrAB, or cordless. Mobile works fine. Wi-fi OK.


That's 4.5m from SCMS to the cupboards.. Row of three above. There's another row opposite 5m away.
 
9fingers":2qi61qmx said:
TrimTheKing":2qi61qmx said:
I got these ones and they are fantastic IMO.

LED Panels from eBay
Mark
Given the rfi problems that Malcolm has had with his led driver modules, I wonder if you could give a qualitative comment about rfi from yours. Can you use domestic stuff live VHF (fm) radio, DAB radio, cordless phone and mobiles in your led lit shop. How close to wiring and panels can you run a radio without interference for instance.i see that your eBay vendor says no rfi but he is possibly being clever in that the panels themselves don't radiate any rfi but I'm sure the drivers do to some extent.
Would be useful feedback to those contemplating fitting panels on new builds and I might even give them a try.
Q2. How many sqm of floor space per panel do you have to get your "operating theatre" lighting levels roughly?

Tia
Bob

Q1 . I'll try and pull together all those items and go and do some testing over the weekend if I can get time Bob.

Q2. There are two areas to my shop, the main machines area which is 5mx5m and I have a single row of 4 panels along the centre line of the vaulted ceiling. The smaller handtools/bench area is 4mx3m and has 3 panels on the lower mezzanine ceiling. This may change as/when I start to use it properly but that's how it is at the moment.
 
Thanks Roger and Mark

So that works out about 4-5sqm per panel.

Roger, Am I right in thinking that you are using Homeplug to extend the internet into your workshop? Is that working ok. It was Homeplug that Malcolm was having trouble with from his LED drivers.

Bob
 
9fingers":1vjb2ehj said:
Thanks Roger and Mark

So that works out about 4-5sqm per panel.

Roger, Am I right in thinking that you are using Homeplug to extend the internet into your workshop? Is that working ok. It was Homeplug that Malcolm was having trouble with from his LED drivers.

Bob

I used to use one and had no problem. Currently using a Netgear wifi extender also without any problem. Also the Macbook seems quite happy picking up the main wifi signal from the router through a metre of external stone wall.
 
TrimTheKing":1417jjz5 said:
I got these ones and they are fantastic IMO.

LED Panels from eBay

I think I am going to order two these lights I know my brother in law installed a lot of LED lights in a hospital before he retired I just want to be sure he does not have any "spares" stashed in his garage before I buy them.

My wife and I have spent the last few days transforming the remainder of our garden we have used the spoil from the foundations to level out the rest of the garden which had a 125 mm fall over the 7.2 m width.
The next bag of stone will form the foundation for the path that goes around the work shop.
We worked until the light had gone so pictures tomorrow.

Roger if I am every anywhere near you I will make a detour for a visit. :D

Thanks to everyone for the input I really do appreciate it
 
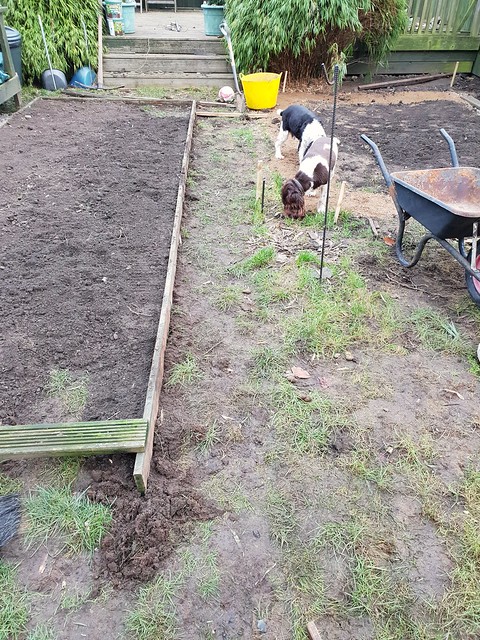
Lunch break, I took a couple of pictures first thing this morning.
Here you can see the clerks of the works checking the progress of their garden.
Anyway please excuse the mess.

2019-01-06_01-12-12 by my0771, on Flickr

2019-01-06_01-12-51 by my0771, on Flickr

The wooden edging is where the lawn ends and the path begins I have removed the grass and my son is helping me to lay the hard core for the paths which will blend into the work shop foundations.
 
With help from my wife and my son this afternoon we managed to remove the grass from the path and dug a little deeper in front of the steps.
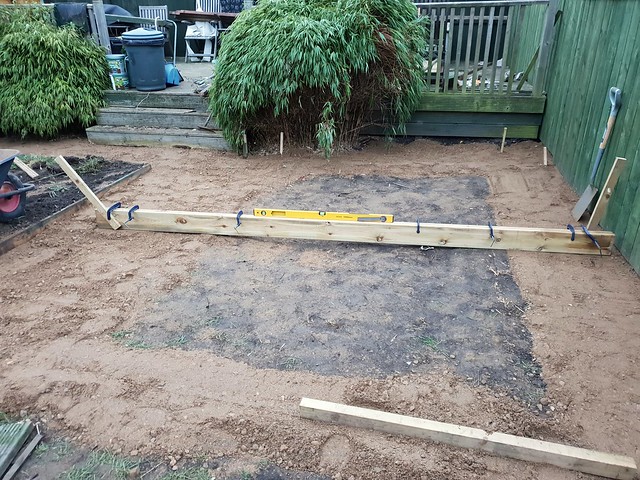
I don't have my 150 x 50 boards as yet so I clamped two decking boards 3.6 m together to make a leveling device.
We have now run out of stone so I will order more tomorrow as well as trying to order the timber and lintels so work can commence.

2019-01-06_04-20-33 by my0771, on Flickr
 
I had trouble sleeping last night about 4 am I realised that the current position of the base for the lintels is about 50 mm below the new ground level.
Is there a simple solution to this problem like a deeper lintel or can I build up the 50 mm with the same stone.
My supplier has some 50 mm polystyrene sheets 8 x 4 that could fill the inside void.
 
MY63":3ecw8jua said:
..
My supplier has some 50 mm polystyrene sheets 8 x 4 that could fill the inside void.

I'm not sure but maybe polystyrene isn't dense enough for any longterm base under your floor ?
 
RogerS":3deliqvo said:
MY63":3deliqvo said:
..
My supplier has some 50 mm polystyrene sheets 8 x 4 that could fill the inside void.

I'm not sure but maybe polystyrene isn't dense enough for any longterm base under your floor ?

Sorry Roger the polystyrene was merely to fill the gap caused by raising the height of the stone without any side support like shuttering. Like I have done for the soil. The weather forecast is dry and mild for the next few days and I was hoping to make progress.
I don’t think I am being very clear my foundations are coming out of the trench and need to be 50 mm higher than currently.
I hope that makes sense.
 
9fingers":3vnglk6w said:
Could you live with 65mm extra height? A dry laid course of bricks. Any old type would do? Even weathered ones skulking around at the builders merchant should be cheap to clear.
Bob

So if I am following you I level the stone and lay the bricks end to end without mortar and then put the lintels on top any construction adhesive required ?
 
MY63":3uj9ba64 said:
9fingers":3uj9ba64 said:
Could you live with 65mm extra height? A dry laid course of bricks. Any old type would do? Even weathered ones skulking around at the builders merchant should be cheap to clear.
Bob

So if I am following you I level the stone and lay the bricks end to end without mortar and then put the lintels on top any construction adhesive required ?

No adhesive needed, gravity will do the job for you.

Bob
 
Make sure that stone is really well compacted though otherwise you’ll end up with the bricks under the lintels sinking into the stone and twisting your building.
 
TrimTheKing":2brtu0kw said:
Make sure that stone is really well compacted though otherwise you’ll end up with the bricks under the lintels sinking into the stone and twisting your building.

I second that. When my builder laid the sub-base for our terrace he used some excellent sub-base and a whacker plate and the base is like cast iron. Trick is to lay the stuff down in small layers, compacting each layer as you go.
 
Thanks Mark
I have been using two 3.6 m lengths of decking clamped together to tamp it down is that sufficient or do I need something heavier ?
 
Personally I'd hire a proper whacker plate. Possibly overkill but better safe than sorry.
 
Back
Top