Looks most excellent mate, well done.

-
Hi all and welcome to TheWoodHaven2 brought into the 21st Century, kicking and screaming! We all have Alasdair to thank for the vast bulk of the heavy lifting to get us here, no more so than me because he's taken away a huge burden of responsibility from my shoulders and brought us to this new shiny home, with all your previous content (hopefully) still intact! Please peruse and feed back. There is still plenty to do, like changing the colour scheme, adding the banner graphic, tweaking the odd setting here and there so I have added a new thread in the 'Technical Issues, Bugs and Feature Requests' forum for you to add any issues you find, any missing settings or just anything you'd like to see added/removed from the feature set that Xenforo offers. We will get to everything over the coming weeks so please be patient, but add anything at all to the thread I mention above and we promise to get to them over the next few days/weeks/months. In the meantime, please enjoy!
You are using an out of date browser. It may not display this or other websites correctly.
You should upgrade or use an alternative browser.
You should upgrade or use an alternative browser.
Small workshop
- Thread starter MY63
- Start date

Yep well done from me too. Surprising how quickly some people can build a workshop. 
Coolhands
New Shoots
From snow to blazing sunshine; you’re nearly there!
MY63
Old Oak
And that was just last weekCoolhands":2z6ocryd said:From snow to blazing sunshine; you’re nearly there!
 today’s temperature was back down to 11 degrees which was much more comfortable.
Thanks to everyone for the kind comments I had other duties today and tomorrow so not much happening.
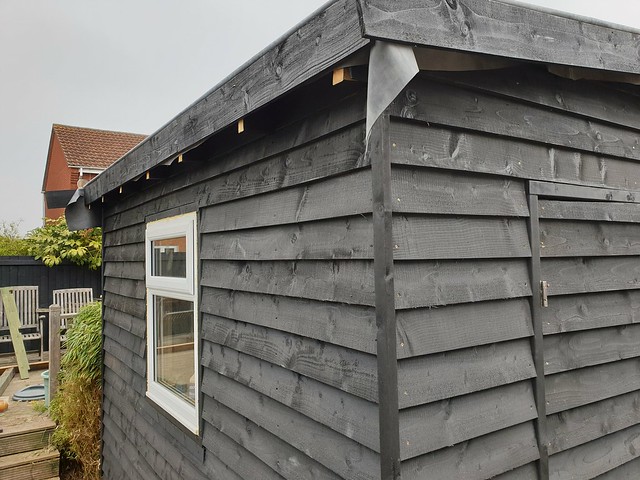
On the sides the rafter ends hang below the wooden edge trim I am thinking of cutting them off level with the edge trim. I am sure I can remember someone saying they were not important other than somewhere to fix the trim to. Am I correct?
MY63
Old Oak
I should have included a picture of the rafter ends so here it is.
 2019-04-24_10-26-21 by my0771, on Flickr
So should I cut them level with the edging or extend the edging trim to cover them.
2019-04-24_10-26-21 by my0771, on FlickrSo should I cut them level with the edging or extend the edging trim to cover them.
MY63
Old Oak
Thanks Roger there is a small gap into the roof insulation from the first level of insulation so I think it has to be filled one way or another.
I tried to do a little bit of work before the rain started. I made four of these.
 2019-04-25_08-57-38 by my0771, on Flickr
For some strange reason I decided to staple the mesh in place and then decided they needed to be painted the mesh made this tricky.
I tried to do a little bit of work before the rain started. I made four of these.
2019-04-25_08-57-38 by my0771, on FlickrFor some strange reason I decided to staple the mesh in place and then decided they needed to be painted the mesh made this tricky.
MY63
Old Oak
Most of todays progress has been fitting the vent type covers under the front panel I added some silicone sealant along the edge where the wood meets the rubber.
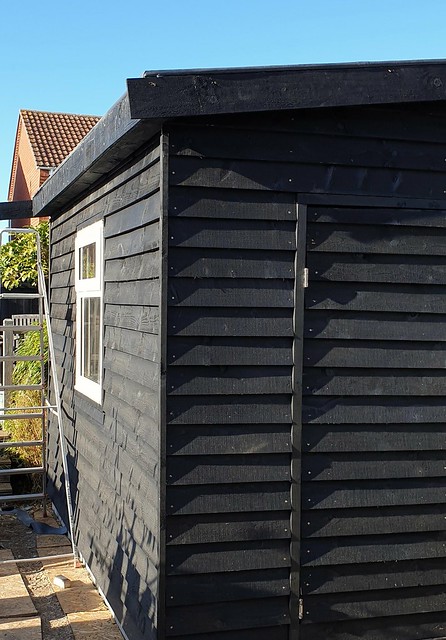
On the window side I have trimmed the ends of the rafters and boxed it in I think it is a neater finish.
 2019-04-27_07-08-51 by my0771, on Flickr
I bought a workzone oscillating saw from Aldi ages ago and finally got to use it trimming the rafter end as it was the only saw I could get in.
On the window side I have trimmed the ends of the rafters and boxed it in I think it is a neater finish.
2019-04-27_07-08-51 by my0771, on FlickrI bought a workzone oscillating saw from Aldi ages ago and finally got to use it trimming the rafter end as it was the only saw I could get in.
Firestarter
Seedling
Tidy job - Those critters will have nowhere to hide! You should be really proud of yourself for what achieved with this build :eusa-clap:
I'd be interested to know what internal height you've got, both at the walls and ridge, with the OSB in place?
Paul
I'd be interested to know what internal height you've got, both at the walls and ridge, with the OSB in place?
Paul
MY63
Old Oak
Firestarter":l4wxua38 said:Tidy job - Those critters will have nowhere to hide! You should be really proud of yourself for what achieved with this build :eusa-clap:
I'd be interested to know what internal height you've got, both at the walls and ridge, with the OSB in place?
Paul
Hi Paul
I took advantage of the land adjacent to the rear of my workshop being higher than the front by 300mm to give me some extra height. The finished internal height is 2.35m my light trunking runs down the centre and takes around 30mm.
I think MikeG's design worked well especially with his support and the back up from everyone else here.
I did not fix my window size until i had the window I went to a local company and told them what I was doing and asked if they had any mis sized windows I got a new window for £50.
I found an insulation company on the same industrial estate and again explained what I was doing and asked if they had any damaged sheets. They allowed me to go throught their scrap pile I got a selection of boards and rolls to do the whole workshop for free, I also got some Hi tec rolls that I plan to use for my next project turning the garage into a utility room.
MY63
Old Oak

The Black Beehive!
You should call your business that, Black Beehive Leatherworks! [emoji6]
You should call your business that, Black Beehive Leatherworks! [emoji6]
I agree but I am left wondering how you open the doors.

- Joined
- Jul 21, 2014
- Messages
- 10,414
- Reaction score
- 165
Andyp":37ptkn3s said:I agree but I am left wondering how you open the doors.
That is what the feather board edges are for! :lol:
Bob
MY63
Old Oak
I hope my neighbours bees don't think it is a giant hive we had two swarms in one day last year I thought it was a helicopter at first our bee keeping neighbour was delighted to have 2 new colonies it was fascinating to watch. I have a video somewhere.
Doors yes there is going to be a handle but I dont want to buy one I want to make it I served my time as a plater / welder but that was a long time ago and dont have any gear I think either wood or a nice piece of leather. I have some nice bolts for the left door although it appears to have a bit of a curve. I think it might have something to do with the top hinge.
I do have a picture but flickr is not playing ball at the moment
we had two swarms in one day last year I thought it was a helicopter at first our bee keeping neighbour was delighted to have 2 new colonies it was fascinating to watch. I have a video somewhere.Doors yes there is going to be a handle but I dont want to buy one I want to make it I served my time as a plater / welder but that was a long time ago and dont have any gear I think either wood or a nice piece of leather. I have some nice bolts for the left door although it appears to have a bit of a curve. I think it might have something to do with the top hinge.
I do have a picture but flickr is not playing ball at the moment
MY63
Old Oak
I mentioned in yesterdays post about an issue with my left hand door. It has never closed properly but I think it has got worse since I added the cladding. The top hinge on this door creaks I think this hinge is the issue but I don't know how to fix it.
 2019-04-30_07-31-55 by my0771, on Flickr
Top hinge
 Top hinge by my0771, on Flickr
Bottom hinge
 Bottom hinge by my0771, on Flickr
2019-04-30_07-31-55 by my0771, on FlickrTop hinge
Top hinge by my0771, on FlickrBottom hinge
Bottom hinge by my0771, on FlickrMY63
Old Oak
Starting to prepare the inside for some paint.
I am pretty sure it will never be this tidy again.
 2019-04-30_07-16-44 by my0771, on Flickr
I am pretty sure it will never be this tidy again.
2019-04-30_07-16-44 by my0771, on FlickrMY63
Old Oak
I decided to go with a simple solution for a door handle shaping the door edge trim to allow a finger hold I also fitted the door bolts to the left hand door.
 2019-05-01_06-42-23 by my0771, on Flickr
I have emptied the workshop ready for painting
 2019-05-01_06-42-41 by my0771, on Flickr
My trial of spray painting has not been successful so I will be going back to a roller.
 2019-05-01_06-42-58 by my0771, on Flickr
The blue is not a final colour it was the tin in the paint cupboard with the most paint in it.
2019-05-01_06-42-23 by my0771, on FlickrI have emptied the workshop ready for painting
2019-05-01_06-42-41 by my0771, on FlickrMy trial of spray painting has not been successful so I will be going back to a roller.
2019-05-01_06-42-58 by my0771, on FlickrThe blue is not a final colour it was the tin in the paint cupboard with the most paint in it.
StevieB
Nordic Pine
Blue? Looks white to me..... Remember that OSB is as pipper to paint and you will need multiple coats. I have never sprayed before but I have rollered/brushed OSB and it takes an age. If you feel your spraying is not successful simply because it has not covered well but you are otherwise happy with it, I would suggest you just spray multiple coats.
MY63
Old Oak
Thanks StevieB the sprayer was spitting out large spots of paint rather than a fine mist as the instructions did not mention water based paints I strained the paint and thinned by 5% it took about 2 hours in total to do the back wall. I started with a roller at 7am and have just stopped to go to the dentist to have a problem tooth removed. OSB does not cover well I wish I had used plywood but the OSB is also a vapour barrier so I guess it is worth it.
I have just found an almost full 5litre tin of Dulux brilliant white so I guess that is next to be used I might add some black and have grey walls.
I have just found an almost full 5litre tin of Dulux brilliant white so I guess that is next to be used I might add some black and have grey walls.

Malc2098
Sequoia
Michael, persevere with the painting. OSB is so textured it takes buckets of paint, whether by sprayer or roller.
I used a Wagner sprayer I bought years ago from a shopping channel, and I found it better than rolling, easier on the arms and shoulders and easier to clean.
Like the lads say, it'll take multiple coats till you don't have any little dark pockets left, but it'll be worth it.
I used a Wagner sprayer I bought years ago from a shopping channel, and I found it better than rolling, easier on the arms and shoulders and easier to clean.
Like the lads say, it'll take multiple coats till you don't have any little dark pockets left, but it'll be worth it.
When I sprayed my walls I found I thinned the paint by as much as 50% to get it to flow properly. At 5% thinned I would almost guarantee that it's miles too thick for the sprayer. Go a LOT thinner, I would start with 2/3 paint 1/3 water in the hopper and go from there and I am certain that will make life easier.
Malc2098
Sequoia
TrimTheKing":26pemhx1 said:When I sprayed my walls I found I thinned the paint by as much as 50% to get it to flow properly. At 5% thinned I would almost guarantee that it's miles too thick for the sprayer. Go a LOT thinner, I would start with 2/3 paint 1/3 water in the hopper and go from there and I am certain that will make life easier.
:text-+1: I forgot to say how thin I made it and then built up lots of coats in all the nooks and crannies of the OSB.
Malc2098":vzdhlhrv said:TrimTheKing":vzdhlhrv said:When I sprayed my walls I found I thinned the paint by as much as 50% to get it to flow properly. At 5% thinned I would almost guarantee that it's miles too thick for the sprayer. Go a LOT thinner, I would start with 2/3 paint 1/3 water in the hopper and go from there and I am certain that will make life easier.
:text-+1: I forgot to say how thin I made it and then built up lots of coats in all the nooks and crannies of the OSB.
Yep exactly what I had to do, thinner and slower, or more coats.
MY63
Old Oak
Thanks I appreciate the advice I am going to give the sprayer another go with thinner paint.my dentist says I need to rest as it was a large tooth with a root close to my sinuses so no painting this afternoon. Just as well as my arms are killing me

Malc2098":36qs037a said:...
I used a Wagner sprayer I bought years ago from a shopping channel, and I found it better than rolling, easier on the arms and shoulders and easier to clean.
..
:text-+1:

will1983
New Shoots
Shame i'm not closer I'd have popped round with my Graco airless.
It'd have your workshop done in no time and would probably only need two heavy coats.
Stick with it though mate, you're making cracking progress!
P.S try warming your tin of paint up in a bucket of hot water before loading the sprayer. Also if it's a turbine type machine allow that to warm up too. This has the same effect as thinning the paint without having to actually thin it.
It'd have your workshop done in no time and would probably only need two heavy coats.
Stick with it though mate, you're making cracking progress!
P.S try warming your tin of paint up in a bucket of hot water before loading the sprayer. Also if it's a turbine type machine allow that to warm up too. This has the same effect as thinning the paint without having to actually thin it.
MY63
Old Oak
This is how far I got with a roller and brush this morning.
 2019-05-01_07-19-48 by my0771, on Flickr
It looks more blue now I think I want a light grey if I cant mix a colour I like myself I will buy some I like the colour of the flooring so that is my aim.
Having thought about it when I was cleaning the nozzle with water the spray pattern was more of what I expected so I believe it is user error.
Considering the information given I am going to start with adding 1 third of water to the paint and see where we go from there.
2019-05-01_07-19-48 by my0771, on Flickr It looks more blue now
I think I want a light grey if I cant mix a colour I like myself I will buy some I like the colour of the flooring so that is my aim.Having thought about it when I was cleaning the nozzle with water the spray pattern was more of what I expected so I believe it is user error.
Considering the information given I am going to start with adding 1 third of water to the paint and see where we go from there.
MY63
Old Oak
I would like to thank everyone for their tips with the spray gun I started at 2.30 this afternoon with 2.5 litres of white emulsion which I diluted by a third with warm water.
Not wanting white I added a touch of black paint.
It worked like a dream.
I had also purchased a JSP force 8 respirator recommended by the young lady at the local Axminister store which worked well with my spectacles.
 2019-05-13_06-17-35 by my0771, on Flickr
The white paint did not last as long as I expected so rather than go for the pink tin I moved to magnolia again I added a shot of black to alter the colour a little.
Purely by chance it has turned what my wife describes as a stone colour I am not so good with colours but I like it.
Not wanting white I added a touch of black paint.
It worked like a dream.
I had also purchased a JSP force 8 respirator recommended by the young lady at the local Axminister store which worked well with my spectacles.
2019-05-13_06-17-35 by my0771, on FlickrThe white paint did not last as long as I expected so rather than go for the pink tin I moved to magnolia again I added a shot of black to alter the colour a little.
Purely by chance it has turned what my wife describes as a stone colour I am not so good with colours but I like it.
Excellent mate! Definitely takes a stupid amount of thinning but looks like it’s done a proper job.
MY63
Old Oak
I think I may have spoken too soon the sprayer would not spray this morning there is a metal clip which has come out of the dial which controls how much the trigger moves.
I don't think this worked yesterday as the trigger moved fully the spray was quite fine yesterday when it started working it is spitting large amounts of paint everywhere.
As the item is no longer available on Amazon they have refunded my money.
I might just finish it with a roller.
I don't think this worked yesterday as the trigger moved fully the spray was quite fine yesterday when it started working it is spitting large amounts of paint everywhere.
As the item is no longer available on Amazon they have refunded my money.
I might just finish it with a roller.
MY63
Old Oak
I am happy with the end result I had started spraying before it stopped working so I went over the whole of the ceiling with the roller.
 2019-05-14_09-54-18 by my0771, on Flickr
It took me longer than I expected but I have a painted interior and I am happy with the result it is a workshop and not a room in the house. I have scrubbed the floor and scraped the remaining glue that was sitting on top of the joints.
As the sun went down I set up my little laser marking points at each corner at 900mm this is going to be my worktop height.
My next step is to fit the wiring into the trunking ready for connecting.
I have to be honest I don't think spraying is for me I think if I had the time I could sort out the issue but I don't.
Amazon don't want it back if anyone would like to have a play with it or has a use for the turbine then it is in its box ready to go as long as you pay the shipping it is yours.
2019-05-14_09-54-18 by my0771, on FlickrIt took me longer than I expected but I have a painted interior and I am happy with the result it is a workshop and not a room in the house. I have scrubbed the floor and scraped the remaining glue that was sitting on top of the joints.
As the sun went down I set up my little laser marking points at each corner at 900mm this is going to be my worktop height.
My next step is to fit the wiring into the trunking ready for connecting.
I have to be honest I don't think spraying is for me I think if I had the time I could sort out the issue but I don't.
Amazon don't want it back if anyone would like to have a play with it or has a use for the turbine then it is in its box ready to go as long as you pay the shipping it is yours.
MY63
Old Oak
Thanks Malcolm you are right it feels different already I think I might add a final coat of paint with the roller. I mixed the paint by eye so it is three or four different shades so I am thinking of investing in a custom mix of grey paint from a local supplier.
I am going to start running wires today I need to work out how I am going to get the wires under the window.
I am going to start running wires today I need to work out how I am going to get the wires under the window.