• Hi all and welcome to TheWoodHaven2 brought into the 21st Century, kicking and screaming! We all have Alasdair to thank for the vast bulk of the heavy lifting to get us here, no more so than me because he's taken away a huge burden of responsibility from my shoulders and brought us to this new shiny home, with all your previous content (hopefully) still intact! Please peruse and feed back. There is still plenty to do, like changing the colour scheme, adding the banner graphic, tweaking the odd setting here and there so I have added a new thread in the 'Technical Issues, Bugs and Feature Requests' forum for you to add any issues you find, any missing settings or just anything you'd like to see added/removed from the feature set that Xenforo offers. We will get to everything over the coming weeks so please be patient, but add anything at all to the thread I mention above and we promise to get to them over the next few days/weeks/months. In the meantime, please enjoy!

Splits in oak

Don McDermott

New Shoots
Joined
Nov 16, 2024
Messages
114
Reaction score
147
Name
Don McDermott
LOCATION
Bourne End
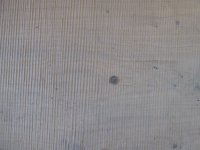
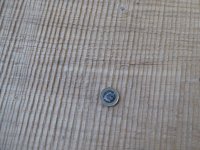
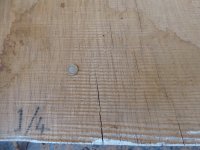
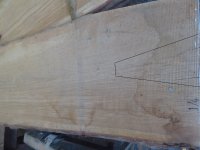
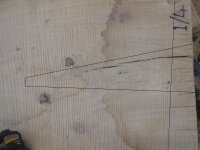
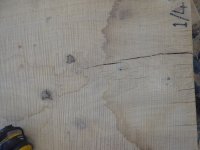
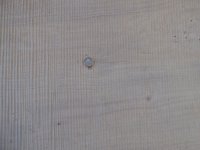
Hello all, I've recently bought a lot (and I mean a lot) of oak planking, cut through-and-through from the round. I've been busily cutting off the bark and most of the sapwood, and removing the cracks around the pith, which has had a fair amount of wet rot in the cracks. I've come to the next plank in the pile, which is fairly far removed from the pith, but I'm uncertain how to proceed. The cracks, as you can see, only extend a short ways on both ends of the plank. The rest is mostly clear along the length, with just a few short, tiny cracks (see photos, pound coin for scale). Now, my initial plan is this. Apply wood preserver on the tiny cracks, just because of my concern with wet rot. For the large cracks either end, make a triangular cut (with a bluntish end) in addition to trimming off the very end (example cut marked in photos). Then apply paint to the ends (I've been using an acrylic paint). Does this sound like a good plan? I've not dealt with timber cut straight from the round before, only with already machined planks from timber yards, so this is a bit of a learning process for me! Thank you all in advance for any suggestions.Other end split.JPGSmall cracks.JPGSmall cracks 2.JPGSmall cracks 3.JPGEnd splits.JPGSample cut other end.JPGSample cut one end.JPG
 
Last edited by a moderator:
Just cut the ends off, Don. That is absolutely standard for oak. I'd love to know how they've been stored if you're getting wet rot in drying shakes, but no matter, it's waste. Cut it off. (Only those shakes which extend to the end of the board. The rest are fine).
 
Just cut the ends off, Don. That is absolutely standard for oak. I'd love to know how they've been stored if you're getting wet rot in drying shakes, but no matter, it's waste. Cut it off. (Only those shakes which extend to the end of the board. The rest are fine).
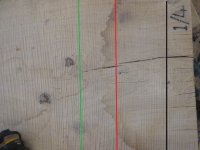
Thanks Mike. I'm trying to keep as much of the oak as possible (I got a good price but it still isn't cheap!) so just to check, which line would you advise cutting to, red, green or black? I know the black leaves the one large shake and I suppose it will keep splitting if I don't get rid of it...

I'm not sure how the wet rot got in. I purchased the timber a few weeks ago from a group in Norfolk. They had bought the log about a year ago, but only cut it open in early December. They put it in stick and covered it completely, I assume they covered it right away but I don't know.Cut ends.jpg
 
Last edited by a moderator:
I wouldn't do anything with it. Leave it until you've got a project in mind. You never know, you may need that extra bit of length and you may be able to work around the splits.
Just let the wet rotted area dry out and it won't go any further without a supply of moisture.
Sawing off the split ends won't stop further splitting.
If it was only milled a few weeks ago it's still got a long way.to go before it's usable. How thick are the planks? Basic rule for seasoning is 1 year per inch of thickness. It needs to stored stickered with a good airflow through the layers. The stack should not be covered apart from something to keep the rain off. Support the stack well above open ground so that air can flow easily underneath.
Brian
 
Last edited:
Thanks Mike. I'm trying to keep as much of the oak as possible (I got a good price but it still isn't cheap!) so just to check, which line would you advise cutting to, red, green or black? I know the black leaves the one large shake and I suppose it will keep splitting if I don't get rid of it...

I'm not sure how the wet rot got in. I purchased the timber a few weeks ago from a group in Norfolk. They had bought the log about a year ago, but only cut it open in early December. They put it in stick and covered it completely, I assume they covered it right away but I don't know.
Ah, right, I assumed it was seasoned.

Well, you're going to have to season it, which means stacking it with sticks between each board, and leaving it uncovered but in the dry, for about a year. There's no great advantage in taking the bark and sap off now, but there's no harm. Paint the ends of the boards if they've not been done.

The bad news, I'm afraid, is that you're going to suffer high wastage. The chances of it drying flat and true are slim. The advantage of buying seasoned timber is that you can select through the stack and only buy the straight boards. To give yourself the best chance, stack it well, properly supported, and put a lot of weight on the top. Paving slabs are ideal. The idea is to force the boards to remain straight. The losses you are likely to sustain will make the odd few inches off the ends that we were talking about look trivial.
 
Last edited:
I never cut the split ends off, only the sap wood. When you come to use the material, you may need a long narrowish piece (say a rail or stile on a door) which can be sawn from the left (or right) of the crack. It all depends on what you're using it for; I always look very carefully at the material and use chalk or a soft pencil to roughly mark out the bits needed. Other folks above ^^ have said the same thing...don't cut it - Rob
 
I wouldn't do anything with it. Leave it until you've got a project in mind. You never know, you may need that extra bit of length and you may be able to work around the splits.
Just let the wet rotted area dry out and it won't go any further without a supply of moisture.
Sawing off the split ends won't stop further splitting.
If it was only milled a few weeks ago it's still got a long way.to go before it's usable. How thick are the planks? Basic rule for seasoning is 1 year per inch of thickness. It needs to stored stickered with a good airflow through the layers. The stack should not be covered apart from something to keep the rain off. Support the stack well above open ground so that air can flow easily underneath.
Brian
All of this is for boat planking for a trading wherry. The timber is currently two inches thick, but the finished plank thickness will be 1.25". By the time I come to start using it, it'll be semi air-dried, which is ideal for wherry planking.

I never cut the split ends off, only the sap wood. When you come to use the material, you may need a long narrowish piece (say a rail or stile on a door) which can be sawn from the left (or right) of the crack. It all depends on what you're using it for; I always look very carefully at the material and use chalk or a soft pencil to roughly mark out the bits needed. Other folks above ^^ have said the same thing...don't cut it - Rob
The boards are three feet wide so there is a lot of good stuff on either side of the large split, which is why I was hoping to save it.
Ah, right, I assumed it was seasoned.

Well, you're going to have to season it, which means stacking it with sticks between each board, and leaving it uncovered but in the dry, for about a year. There's no great advantage in taking the bark and sap off now, but there's no harm. Paint the ends of the boards if they've not been done.

The bad news, I'm afraid, is that you're going to suffer high wastage. The chances of it drying flat and true are slim. The advantage of buying seasoned timber is that you can select through the stack and only buy the straight boards. To give yourself the best chance, stack it well, properly supported, and put a lot of weight on the top. Paving slabs are ideal. The idea is to force the boards to remain straight. The losses you are likely to sustain will make the odd few inches off the ends that we were talking about look trivial.
I've been painting the ends, yes. There will be a lot of waste. As I've said above, the planking is two inches thick but will be machined down to 1.25" finished size so that should eliminate a lot of cupping. Since I'm using this for boat planking, even straight planking would have a lot of waste - however I have vague plans of other things I can do with the many offcuts. Keeping the boards from splitting will be the main thing.
 
Damn, sorry Don. I forgot you were the wherry-guy. I saw the video of you buying the stuff.

It's a funny old thing, the use of seasoned wood for boat-building. Ideally, you want the wood stable to the atmosphere so that you don't get huge amounts of drying happening on the frame whilst you're planking........but when it goes in the water, the hull below the waterline will take-up, and swell back probably to around the width it was before it started seasoning. Managing that process, without ending up like Steve Dennet (Acorn to Arabella) where he could put his fingers through the gaps in his hull planking, is quite a task.

So, yeah, paint the ends, don't cut anything off now, and see if you can get the ends of your long narrow planks to fall either side of the shakes. All the offcuts will end up in the cabin anyway.
 
Yes, I went up there with some specific planks in mind, and ending up buying the lot, it just made sense to get it all! What makes my wherry different from Arabella (and indeed, most boats of a similar size) is that Lady Garnet will be clinker planked, not carvel. So it's the tightness of the overlaps that are most important in prevent leaking, I should think. The most major complaint I hear from folks with clinker dinghies is that they always leak so much when relaunched, because the overlaps open up slightly when dried. But wherries almost never leave the water, apart from when they need to be repainted (or tarred, traditionally speaking) and that would usually be about once every 3 or 4 years (barring any accidents with other boats, quays or bridges). Which is why I'm not too worried about using partially seasoned wood below the waterline, as it will nearly always be wet.
 
So will you be building this the right way up, and using formers? The way small clinker boats are built, with the frames steamed in after the planking is finished?
 
Yes, that's correct, although I won't be steaming the frames as they'll be 4 inch square and that's hard to steam! I'm going to go the traditional route of sawn frames from grown oak crooks/bends.
 
Hi Don. I've been watching your videos recently and enjoying them very much.

I've just been getting components for some chairs out of some large oak boards. I think it's just a case of working around the defects to get as much use as possible out of the wood.

In boat building, would it be normal to choose your plank width, and therefore the number of planks, based on what you can get out of the timber?

Presumably the planks taper fore and aft? That should give a bit more flexibility to work around defects.

Good luck with your epic project!
 
Hi Nick, thanks for the kind words, glad you are enjoying the videos! Within reason, I could adjust the number of planks, and thereby the width, if I felt it necessary. The garboards are the widest planks, on some wherries they are 13 inches wide, and that's along the entire length. The garboards on Lady Garnet will almost certainly be a few inches narrower because of the stock I have. For the rest of the planks, at the widest part they will be 8.5 inches (average), if I go with 12 planks each side as planned, which is not very wide. And as you say, they will be tapered, so that does make it fairly easy to avoid defects. By the time the planks meet the stempost, some of the planks will have tapered down to about 4.5 inches wide.
 
So they're quite wide planks.

Unfortunately, I suspect they don't make trees like they used to!

I can see you're going to spend a lot of time sorting through the timber to work this all out. As you said in one of the videos, the planks are very visible on a clinker built boat so the effort in getting it right will be time well spent.

In the meantime, as others have said, I think you just need to get the boards neatly stacked "in stick" somewhere out of the worst of the weather, but where they can still get some air through them.
 
Hello Don, this is nothing to do with the oak part of your endeavour but there's a slim chance of a contact to do with traditional Wherry's.
A few years ago as I drove into the Staith at Barton Turf I passed a workshop with an elderly gentleman working outside.
After parking up I nonchalantly walked past and struck up a rather delightful conversation with Mr Yaxley who, if I remember correctly, worked on Wherry's and his father before him.
I have no idea if he is still with us but maybe worthy of a bit of investigation?
Cheers, Andy
 
Hello all, I've recently bought a lot (and I mean a lot) of oak planking, cut through-and-through from the round. I've been busily cutting off the bark and most of the sapwood, and removing the cracks around the pith, which has had a fair amount of wet rot in the cracks. I've come to the next plank in the pile, which is fairly far removed from the pith, but I'm uncertain how to proceed. The cracks, as you can see, only extend a short ways on both ends of the plank. The rest is mostly clear along the length, with just a few short, tiny cracks (see photos, pound coin for scale). Now, my initial plan is this. Apply wood preserver on the tiny cracks, just because of my concern with wet rot. For the large cracks either end, make a triangular cut (with a bluntish end) in addition to trimming off the very end (example cut marked in photos). Then apply paint to the ends (I've been using an acrylic paint). Does this sound like a good plan? I've not dealt with timber cut straight from the round before, only with already machined planks from timber yards, so this is a bit of a learning process for me! Thank you all in advance for any suggestions.
I'm arriving late to this thread, a result of not being the most attentive or frequent user nor the most prolific poster here.

Still my advice largely reflects much of what has already been said. You should sticker the boards up (stickers carefully aligned vertically) with the stack set some 10 - 15" off the ground to prevent stagnant moist air leading to the possibility of mould: the height also reduces the likelihood of rain splash in outside locations. Ideally set the stack under a roofed space on a level concrete floor with both ends of the shed open or all sides open. If possible treat the cut ends of each board with End Seal, oil based paint, or perhaps PVA to reduce the speed of moisture exchange at board ends thus helping to limit end shakes. In truth many wood yards don't bother with end sealing and accept the greater loss of usable wood and income set against cost of end sealing - end users doing their own drying tend to be more concerned about end sealing.

In such a situation you should be able to air dry oak up to about 2-1/2" thick to somewhere in the region of 16 - 20% MC in maybe about 7 - 12 months per 1" of thickness here in the UK even though oak is a refractory species. Air dried thick oak 4"+ thick may, in some circumstances, never air dry to as low as 20% MC in this country. I suspect for a boat 16 - 20% MC is more than dry enough, maybe too dry really for exterior planking.

As to the existing end shakes I suggest leave them be whilst you're drying the wood which I understand has only been boarded up for a couple of months. When you come to use the boards the general guide for dealing with end shakes is to cut the ends off roughly 2" beyond the end of the shake. Removing the bark and sapwood is optional for the most part because over the decades I've seen many a stickered pile of air drying oak in boules where those parts are intact and only removed at the time of use. Your choice on the bark/sapwood removal I'd say. Slainte.
 
As I don't think Don has plugged it himself, he is building a trading wherry (a large sailing barge-like boat).

Don is documenting the project on YouTube here. If you like wooden boat building, I'd encourage you to have a look which will support Don's project.
Cheers Nick! :) I should probably start a thread in the WIP forum.
Hello Don, this is nothing to do with the oak part of your endeavour but there's a slim chance of a contact to do with traditional Wherry's.
A few years ago as I drove into the Staith at Barton Turf I passed a workshop with an elderly gentleman working outside.
After parking up I nonchalantly walked past and struck up a rather delightful conversation with Mr Yaxley who, if I remember correctly, worked on Wherry's and his father before him.
I have no idea if he is still with us but maybe worthy of a bit of investigation?
Cheers, Andy
Thanks for this, folks with true connections to wherry building are rare these days, so I will definitely look Mr Yaxley up and see if he is still around.
I'm arriving late to this thread, a result of not being the most attentive or frequent user nor the most prolific poster here.

Still my advice largely reflects much of what has already been said. You should sticker the boards up (stickers carefully aligned vertically) with the stack set some 10 - 15" off the ground to prevent stagnant moist air leading to the possibility of mould: the height also reduces the likelihood of rain splash in outside locations. Ideally set the stack under a roofed space on a level concrete floor with both ends of the shed open or all sides open. If possible treat the cut ends of each board with End Seal, oil based paint, or perhaps PVA to reduce the speed of moisture exchange at board ends thus helping to limit end shakes. In truth many wood yards don't bother with end sealing and accept the greater loss of usable wood and income set against cost of end sealing - end users doing their own drying tend to be more concerned about end sealing.

In such a situation you should be able to air dry oak up to about 2-1/2" thick to somewhere in the region of 16 - 20% MC in maybe about 7 - 12 months per 1" of thickness here in the UK even though oak is a refractory species. Air dried thick oak 4"+ thick may, in some circumstances, never air dry to as low as 20% MC in this country. I suspect for a boat 16 - 20% MC is more than dry enough, maybe too dry really for exterior planking.

As to the existing end shakes I suggest leave them be whilst you're drying the wood which I understand has only been boarded up for a couple of months. When you come to use the boards the general guide for dealing with end shakes is to cut the ends off roughly 2" beyond the end of the shake. Removing the bark and sapwood is optional for the most part because over the decades I've seen many a stickered pile of air drying oak in boules where those parts are intact and only removed at the time of use. Your choice on the bark/sapwood removal I'd say. Slainte.
Thank you Richard, you all have been most helpful! This site, I have to say, is great.
 
Back
Top