• Hi all and welcome to TheWoodHaven2 brought into the 21st Century, kicking and screaming! We all have Alasdair to thank for the vast bulk of the heavy lifting to get us here, no more so than me because he's taken away a huge burden of responsibility from my shoulders and brought us to this new shiny home, with all your previous content (hopefully) still intact! Please peruse and feed back. There is still plenty to do, like changing the colour scheme, adding the banner graphic, tweaking the odd setting here and there so I have added a new thread in the 'Technical Issues, Bugs and Feature Requests' forum for you to add any issues you find, any missing settings or just anything you'd like to see added/removed from the feature set that Xenforo offers. We will get to everything over the coming weeks so please be patient, but add anything at all to the thread I mention above and we promise to get to them over the next few days/weeks/months. In the meantime, please enjoy!

Sticking wood glazing bars

meccarroll

Nordic Pine
Joined
May 12, 2016
Messages
815
Reaction score
180
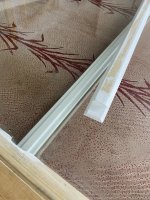
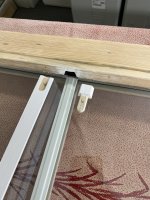
Hi all just wonder what people use to stick on the glazing bars of a sash window?

I have never made a double glazed sash or window that has needed glazing bars stuck on before just a few modern windows & sashes with deep 57mm sections with glazing bars around the perimeter that I could nail.

The reason for asking is it looks like I might have some sliding sashes to make as an upgrade renovation to double glazed ones. Some have intermittent glazing beads which will have to be stuck to the glass.

Years ago I often saw glazing tape used to stick on the glazing bars and quite often it failed even before the job was finished, now I see on utube that some people seem to use an adhesive putty?

Any advice as to what's best to use or the good bad points of adhesive putty v adhesive tape?

Thanks' for looking Mark
 
I used Reddiseals tape, Mark. Never had a problem.

I would have thought with adhesive putty you'd be spending ages cleaning of any suqeeze-out. I've never heard of anyone using putty for glazing bars. For securing the glass, yes, but bars? Never.
 
I used Reddiseals tape, Mark. Never had a problem.

I would have thought with adhesive putty you'd be spending ages cleaning of any suqeeze-out. I've never heard of anyone using putty for glazing bars. For securing the glass, yes, but bars? Never.
You could have a point Roger, I may have misinterpreted the video (https://www.bing.com/videos/riverview/relatedvideo?q=How+to+make+Sliding+sash+windoes?&qs=n&sp=-1&lq=0&pq=how+to+make+sliding+sash+windoes?&sc=12-33&sk=&cvid=FA9FDBC2C828472E9FD4164825434427&ghsh=0&ghacc=0&ghpl=&ru=/search?q=How+to+make+Sliding+sash+windoes%3F&qs=n&form=QBRE&sp=-1&lq=0&pq=how+to+make+sliding+sash+windoes%3F&sc=12-33&sk=&cvid=FA9FDBC2C828472E9FD4164825434427&ghsh=0&ghacc=0&ghpl=&mmscn=vwrc&mid=B4E0C0960B76BDFB78FEB4E0C0960B76BDFB78FE&FORM=WRVORC ). I would add that I have used an adhesive to bond an aluminium channel which bridged a join between two sections in my caravan roof...modern adhesives seem more useful and are actually more able to do the job than ever before.

Looking over other videos the glazing bars do seem to be taped on, thank you.

It's great to be able to ask for and receive help, cheers Roger.
 
Last edited:
Used a lot of different tapes for the job, including all the glazing bar-specific tapes that all the ironmongery merchants sell and it's always been hit and miss whether the tape doesn't fail in time. It's absolutely critical that you do not cut the bars too tight in length to the glazing beads otherwise you may not get a very good adhesion on the tape as it can bind on the beads and not adhere properly at each end but adhere in the middle and over time it falls off, with the tape stuck fast to the glass but not to the bar. The best practice is to actually leave a fair gap between the end cut of the glazing bar and the bead and caulk it or back-fill it with an acrylic sealant.

I've since moved away from "glazing" tapes and have been using 3M VHB tape for affixing the glazing bars to the glass, not had a problem since. It's not cheap stuff but neither is having to go back to a job to stick a bar back on, particularly on anything above the ground floor, plus it doesn't reflect well upon yourself when they do fall off.

In other words, get the expensive tape.
 
Used a lot of different tapes for the job, including all the glazing bar-specific tapes that all the ironmongery merchants sell and it's always been hit and miss whether the tape doesn't fail in time. It's absolutely critical that you do not cut the bars too tight in length to the glazing beads otherwise you may not get a very good adhesion on the tape as it can bind on the beads and not adhere properly at each end but adhere in the middle and over time it falls off, with the tape stuck fast to the glass but not to the bar. The best practice is to actually leave a fair gap between the end cut of the glazing bar and the bead and caulk it or back-fill it with an acrylic sealant.

I've since moved away from "glazing" tapes and have been using 3M VHB tape for affixing the glazing bars to the glass, not had a problem since. It's not cheap stuff but neither is having to go back to a job to stick a bar back on, particularly on anything above the ground floor, plus it doesn't reflect well upon yourself when they do fall off.

In other words, get the expensive tape.
Thank you for what you have said and your time in doing so, it is really helpful. I, like you, have started to come to the conclusion that allowing a very slight gap at the scribes so the tape can lay flat and so adheres fully is perhaps the best way to go and then lightly filling the small margin with a good sealant... Good advice thank you. As above I really appreciate the help I receive on here, Thank you Trevanion. Mark
 
The best practice is to actually leave a fair gap between the end cut of the glazing bar and the bead and caulk it or back-fill it with an acrylic sealant.

I did that when repairing one that kept coming away. I thought I was cheating so good to know it’s best practice!
 
I did that when repairing one that kept coming away. I thought I was cheating so good to know it’s best practice!
At first it does sound like you might be cheating but it actually seems to be very good advice. Nice to have your view on the subject also.
 
Does non-one recommend glazing silicone? I've not done many windows, but when I've used that, nothing comes off.
S

I have seen where people have been having trouble keeping the bars stuck to the glass they run a bead of silicone along each side of the tape before sticking the bar down onto it, it can be messy thought.
 
Does non-one recommend glazing silicone? I've not done many windows, but when I've used that, nothing comes off.
S
I have installed double glazed units in wood windows before (many times) but not installed stuck on beads hence the question. For the units I installed I used a butyl tape and vented the unit so no water got trapped. Low modulus neutral cure Silicone with fully filled rebates is another option for sealed units.

There is a British standard for glazing sealed units but you have to pay for it, I did manage to get hold of some of their literature a few years back and if using the butyl method with drained rebates you are supposed to cap the area around the bead and glass with silicone.

You have to be careful which type of silicone you use on sealed units, screw-fix sell glazing silicone but it is not suitable for double glazed sealed units, it's for sheet glass.

Some glazing silicones have a detrimental effect on the joint compound of the sealed unit, they break it down then the unit fails, you have to use one that is made specifically for sealed units.

The spec is: low modulus neutral cure silicone


Screenshot 2025-01-14 075701.png


Costal have a system that uses tape and an outside gasket which fits into a groove in the beads. It looks interesting but I don't see many windows sporting the method at present.

Video of the system being installed:
https://www.bing.com/videos/rivervi...id=9E8A44B972064CC08B37FB890F513AA1&FORM=VIRE

Video of the system and items used explained:

 
There is a British standard for glazing sealed units but you have to pay for it, I did manage to get hold of some of their literature a few years back and if using the butyl method with drained rebates you are supposed to cap the area around the bead and glass with silicone.
i know that in Scotland if you join the National Library of Scotland you membership affords access to BSOL (British Standards On Line) where you can browse, read and screen shot any relevant standard. Only thing you can't do is download the Standard unless you purchase it but if all you are looking for is the information this is an easy way of viewing them. I would assume this access is available in other part of the UK through the library network.

Good luck
 
i know that in Scotland if you join the National Library of Scotland you membership affords access to BSOL (British Standards On Line) where you can browse, read and screen shot any relevant standard. Only thing you can't do is download the Standard unless you purchase it but if all you are looking for is the information this is an easy way of viewing them. I would assume this access is available in other part of the UK through the library network.

Good luck
Just joined and tried it out, I took a look at BS 8000 Glazing but could not read it online it says only available to view on library premises. Still a good resource, thank you.
 
I have been refurbishing some windows and this has involved cutting out and replacing the middle and bottom glazing beads as they have deteriorated somewhat - but most particularly the glazing sealant has deteriorated and become unsightly. The sealant was a butyl tape (I think Arboseal) and is awful stuff - it never sets and oozes out in strong sunlight.

So I have been fitting the replacement beading with foam tape 1mm and then sealing this with a capping of hybrid glazing sealant. I have been following the method Oliver Bradshaw uses in this video that I have found most helpful. (The sealant I have been using is Timbaglaze, but there are plenty of other similar products.).

Incidentally, the middle beading was tenoned into the side beads and I assume that originally the whole beading frame was inserted as a single assembled unit. To replace, I made a matching tenon one end and a slightly complicated sort of loose tenon the other end so I could retrofit the new beading.

Cheers
 
I have been refurbishing some windows and this has involved cutting out and replacing the middle and bottom glazing beads as they have deteriorated somewhat - but most particularly the glazing sealant has deteriorated and become unsightly. The sealant was a butyl tape (I think Arboseal) and is awful stuff - it never sets and oozes out in strong sunlight.

So I have been fitting the replacement beading with foam tape 1mm and then sealing this with a capping of hybrid glazing sealant. I have been following the method Oliver Bradshaw uses in this video that I have found most helpful. (The sealant I have been using is Timbaglaze, but there are plenty of other similar products.).

Incidentally, the middle beading was tenoned into the side beads and I assume that originally the whole beading frame was inserted as a single assembled unit. To replace, I made a matching tenon one end and a slightly complicated sort of loose tenon the other end so I could retrofit the new beading.

Cheers
Bradshaw makes some very good videos the system he shows in this video is a dry glazing system which needs to be vented with drain holes (which he has done). Bradshaw applies the beads on the internal side of the sash rather than the more traditional method of fixing external beads. I don't quite get why he uses a groove in the top sash and not in the bottom sash maybe someone on here knows?

Costal show a glazing system (video above) using a gasket, they use tape to hold the D/G Unit in place (As Bradshaw does) then seal around the edges of double glazed unit between the frame and unit edge with silicone to fully seal between both frame and unit so no water can hold in the rebate along the units edges, they do this before adding the external beads and Deventor Sv2 gasket.

Two different methods of applying glazing beads but I think the method of using a gasket could be quicker and just as affective. Would be interesting to here what others have to say/think.
 
Last edited:
Bradshaw makes some very good videos the system he shows in this video is a dry glazing system which needs to be vented with drain holes (which he has done). Bradshaw applies the beads on the internal side of the sash rather than the more traditional method of fixing external beads. I don't quite get why he uses a groove in the top sash and not in the bottom sash maybe someone on here knows?

Costal show a glazing system (video above) using a gasket, they use tape to hold the D/G Unit in place (As Bradshaw does) then seal around the edges of double glazed unit between the frame and unit edge with silicone to fully seal between both frame and unit so no water can hold in the rebate along the units edges, they do this before adding the external beads and Deventor Sv2 gasket.

Two different methods of applying glazing beads but I think the method of using a gasket could be quicker and just as affective. Would be interesting to here what others have to say/think.
I suppose with the capping sealant, it is really a sort of hybrid glazing system that Ollie shows. The ones I have been refurbishing have the old butyl tape seal between glass and beading (inside and out) and the void between the edge of the unit and the frame is filled with a set mastic (I don’t know what was used originally).

Ollie shows him designing in a drainage groove in the drawing video below (approx 18:20) - this is in the bottom rail, but is not actually vented. BTW he explains why the groove is in the top sash rather than the bottom at approx 13:30.

The windows I am refurbishing are more modern stormproof style and the central beading is horizontal - elsewhere I have other older sash windows (relatively modern replacements) that have stuck on external middle beads but these are vertical. With the experience of working on the refurb, if you are fitting horizontal stick-on beading, even though it is an added faff, I would certainly joint both ends into the side beads. I have found a couple of photos that show my retrofit (the original beading frame was all pinned together before insertion, but I haven't pinned in the replacements.


IMG_6158.jpeg
IMG_6155.jpeg

Cheers
 
I suppose with the capping sealant, it is really a sort of hybrid glazing system that Ollie shows. The ones I have been refurbishing have the old butyl tape seal between glass and beading (inside and out) and the void between the edge of the unit and the frame is filled with a set mastic (I don’t know what was used originally).

Ollie shows him designing in a drainage groove in the drawing video below (approx 18:20) - this is in the bottom rail, but is not actually vented. BTW he explains why the groove is in the top sash rather than the bottom at approx 13:30.

The windows I am refurbishing are more modern stormproof style and the central beading is horizontal - elsewhere I have other older sash windows (relatively modern replacements) that have stuck on external middle beads but these are vertical. With the experience of working on the refurb, if you are fitting horizontal stick-on beading, even though it is an added faff, I would certainly joint both ends into the side beads. I have found a couple of photos that show my retrofit (the original beading frame was all pinned together before insertion, but I haven't pinned in the replacements.


View attachment 31454
View attachment 31455

Cheers
It looks like you take great care over your work and thank you for the input and advice. Very much appreciated, Mark
 
I

Ollie shows him designing in a drainage groove in the drawing video below (approx 18:20) - this is in the bottom rail, but is not actually vented. BTW he explains why the groove is in the top sash rather than the bottom at approx 13:30.

Cheers
Bradshaw says he does vent both top and bottom sashes on the bottom rails through the sash via the groove he makes, he talks about the water draining out at 18:51.

Bradshaw states the half round drain cut just below the D/G unit is there to collect any water that penetrates the sash. Bradshaw says this somehow also vents the sash and lets the water escape. I'm not sure how he achieves this without drilling holes in the edge or bottom of the sash but he does say it happens with his construction method.

If I make storm proof sashes/windows I normally make the bottom bead protrude past the frame and router the bottom of the bead to let any water out.


Wide bottom bead that ovehangs the bottom rail of a sash or frame.
PICT3545.JPG

Sections cut out with a router or spindle moulder to allow water to escape.
PICT3544.JPG
The bead overhangs enough to allow the water to escape from the cut out sections.

Some people drill a hole in the bottom of the sash to allow water to run straight down and out.

You only need to vent if you are not fully filling the rebates with silicone etc. British Standards did explaine which method to use when installing D/G units on site as they did not recommend both for site installation but said bothwere ok if done in a workshop. Things have probably changed over the years so it's worth checking.
 
Yes, sorry , he does say that the groove runs out through the M&T joint - I had not picked that up somehow, but explains what i found a bit puzzling.

Your explanation of the British Standard (I couldn’t find this) makes sense to me.

Incidentally, I like the look of a projecting bottom bead, but it would not have looked right on mine as the beading has a rebate all around the edge of the beading where it meets the frame (reinstating those rebates where the original beading had been badly fitted has been a whole other story). I am not fond of stormproof windows but this is what we have in this case - the rebate is a noticeable part of the design so I wanted to get it right.

Cheers
 
Yes, sorry , he does say that the groove runs out through the M&T joint - I had not picked that up somehow, but explains what i found a bit puzzling.

Your explanation of the British Standard (I couldn’t find this) makes sense to me.

Incidentally, I like the look of a projecting bottom bead, but it would not have looked right on mine as the beading has a rebate all around the edge of the beading where it meets the frame (reinstating those rebates where the original beading had been badly fitted has been a whole other story). I am not fond of stormproof windows but this is what we have in this case - the rebate is a noticeable part of the design so I wanted to get it right.

Cheers

Yes I could not quite see how the water woud run out either but it could through the top of the mortice.

I looked at an explanation of the standard many years ago (about 15-20 years ago) and it is likly to have changed somewhat now. When I was younger I used to do more joinery having made several storm proof windows and sliding sash windows but the sliding sash windows were all single glazed and the majority of the storm proof ones single glazed too, none had glazing bars stuck on they were all traditionally morticed in.

The bottom bead is the only one that I would project beyond the rebate and that is so I can vent at the beads another way to vent is to drill a hole in the bottom of the bottom sash to allow water to escape from the rebate. I would understand if people did not like either but it's just a necesity when you dry glaze because if you get any trapped water in the rebate it can cause the seals of the units to fail over time.
 
Your explanation of the British Standard (I couldn’t find this) makes sense to me.

I have taken a look at some old literature I have saved on windows and the below standard came to light:
You have to pay to view the standard!

https://knowledge.bsigroup.com/prod...code-of-practice-for-glazing?version=standard

Below is an extract from a window manufacturer quoting NHBC Standards regarding glazing. It is old literature now so may not be applicable but still worth considering.

Standards do change some are driven by large companies seeking profit from the sale of their products... At one stage window vent were compulsary by Building Regulations then later taken out but the ventilator manufacturers complained so the regulation was re-introduced.

PICT3581.JPG
 
Last edited:
I've since moved away from "glazing" tapes and have been using 3M VHB tape for affixing the glazing bars to the glass, not had a problem since. It's not cheap stuff but neither is having to go back to a job to stick a bar back on, particularly on anything above the ground floor, plus it doesn't reflect well upon yourself when they do fall off.
I have been mulling over a lot of online information regarding bedding in sealed units also fitting glazing bars on sliding sash windows.

The 3M VHB tape you suggest seems a good one. I have done a quick check online and there are lots of variations of 3M VHB's tape so just wondered which one you use Trevanion?
 
Back
Top