• Hi all and welcome to TheWoodHaven2 brought into the 21st Century, kicking and screaming! We all have Alasdair to thank for the vast bulk of the heavy lifting to get us here, no more so than me because he's taken away a huge burden of responsibility from my shoulders and brought us to this new shiny home, with all your previous content (hopefully) still intact! Please peruse and feed back. There is still plenty to do, like changing the colour scheme, adding the banner graphic, tweaking the odd setting here and there so I have added a new thread in the 'Technical Issues, Bugs and Feature Requests' forum for you to add any issues you find, any missing settings or just anything you'd like to see added/removed from the feature set that Xenforo offers. We will get to everything over the coming weeks so please be patient, but add anything at all to the thread I mention above and we promise to get to them over the next few days/weeks/months. In the meantime, please enjoy!

Stopped chamfers

Tiresias

Nordic Pine
Joined
Sep 3, 2020
Messages
618
Reaction score
99
I’m trying to do some stopped chamfers on an oxford frame. It is oak. Half lap joints, so far so good., all done. But the detailing…

I have been practicing on some fairly woeful pine. I want a c. 6mm chamfer with 45 degree ends.
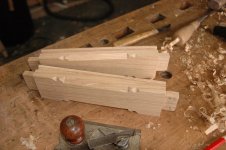
My first go. Not satisfactory. Ok when you are with the grain but, when you are against the grain (lh end), in the words of Blaine, ‘you are in a world of hurt’.
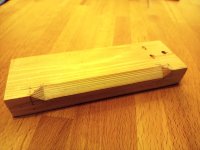
stopped chamfer.jpg

I just used a chisel. I have seen chamfer planes, both manufactured and home made, and don’t mind making one. But I can’t see that would help on a short moulding. And would it stop the tear out against the grain?

Is there a better way to do it?

Not an electric router. I have one, but I am terrified of it and only use it for kitchen worktops.
 
I think you are doing it right. It will be easier to cut and will look better when you try it on oak.

With the pine I think you need to take very close note of how the grain rises and falls while you take the first few shavings so that when you take the last cut you can reverse direction if necessary to get a smooth surface throughout. I think a chamfer plane wouldn't help.
 
P1010412 - Copy.JPG

In my experience - other may disagree - chamfer planes are fine for straight-through chamfers without stops. but they are limited for short intermediate sections between the stops and I found that a chamfer shave was a lot quicker for this. It is a lot more manageable and you can work quickly in both directions if you have an awkward grain.

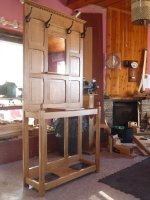
Some years ago I made a couple of Hall stands with the backs and the frame consisting of Oak panels within frames with stopped chamfers.
Here it is finished, but before going out the door. All surrounded by stopped Cs. on the rails, all-up there must have been over 40 stopped Chamfers in each one. Here's a picture of it and somewhere I should have some pictures of making the stops, because I wrote a blog about it..... I'll see if I can find them.

In the meanwhile, what I did was to mark each chamfer and its stop. At this point you can decide on the angle of the stop end and if you want any decoration, Lamb's Tongues etc.
For the number I was doing, all repeat work, I made a marking template to put the stops at equal distances from the ends.

The process was:

1-Mark it all out onto the rails and stiles with the tenons prepared and cut. I used all this to locate the template.

2-Cut vertical stops down to just above the chamfer line with a saw about 1/8 inch in front of each of the stops into the waste, leaving a little waste on the end to do the decorative business later..

3-Cut and pare back about 2 inches on a line above the finish lines of the chamfer with a chisel. This allows you to draw the shave the full length and work in both directions into this bit of waste.

4-Cut the chamfer in between each with a chamfer-shave. Lock the guides tight for the duration of the job to avoid variance on the chamfer lines. (You could use a plane for this, but the length of the plane works against you - it won't work on short sections).

5-Cut and refine the angles on the stops.

6-Pare back the 2 inch pared-back sections to marry with the chamfer lines and to meet the base of the stop.

repeat......again..... and again..... it was a functional production process. The stand was well received and I got an order for another....

I'll see if I can locate the old photos which will explain better than all this.
 
For me, stopped chamfers look much better if the ends are curved, not flat. In other words, there's no distinct 'join' 'twixt the two surfaces. Not too difficult to achieve with a very sharp in-cannel gouge(s) but don't even think about trying it on pine; oak is good, walnut (or similar) is much better.

The best 'stopped' variation IMO is the 'waggon' bevel, most easily done with spokeshave - Rob
 
Well Rob, it's unusual ( maybe this is a first?) but I don't agree with you there. Chamfers that finish in a curve are what you get if you use an electric router and drop it on/lift it off at the ends of the chamfer. So for me, they look like a quick imitation of hand work. (Unless you are talking about some other style and I've misunderstood.

I do quite like the stops where there's a curve, then a little step down, then the long flat.
 
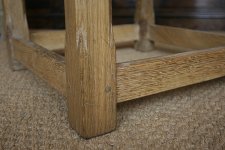
DSC_0009 - Copy.JPG

I mentioned that I had to find some photos.
Would this qualify?

I think that the OP was intending to do it all by hand. These were some of the shortest sections in the coat stands and were done as I described using a Stanley Chamfer shave, refining the flat section with paring chisels, and a sharp float. The longer sections were in the order of 10 or 12 inches between the stops.
The lambs tongues were carved by hand.

I agree that pine will introduce more issues than it will solve, but a decent piece of Oak will cut well, even if the grain is wavy - a well-sharpened shave will work it in both directions.
 
AndyT":3hcc5s6x said:
Well Rob, it's unusual ( maybe this is a first?) but I don't agree with you there. Chamfers that finish in a curve are what you get if you use an electric router and drop it on/lift it off at the ends of the chamfer. So for me, they look like a quick imitation of hand work. (Unless you are talking about some other style and I've misunderstood.

Agreed, doing them with a router is much easier, but.....it's almost 100% guaranteed that at the end of the bevel, the cutter will burn unless you're über-swift in lifting it off. Sanding out the burn mark is a nightmare :D

'Waggon bevels' as I understand them, were made on 'orse drawn waggons to reduce weight, but I reckon they look quite 'helegant' and aren't too difficult to achieve with a nice sharp spokeshave - Rob
 
Woodbloke":2sb5oqkh said:
Agreed, doing them with a router is much easier, but.....it's almost 100% guaranteed that at the end of the bevel, the cutter will burn unless you're über-swift in lifting it off. Sanding out the burn mark is a nightmare :D

It is very difficult to prevent burning in the corners when doing stopped chamfers with a router, you can reduce the spindle speed to help but that's not always a be-all-end-all solution. I'm not sure if you still can but you used to be able to buy "Stellite" tipped router bits from specialist suppliers which were perfect for this application as they didn't have the tendency to burn timber at high speed as carbide does, the science of which I cannot explain.

Dropping on and off with a chamfer bit has its cons though, on the face of the object that the bearing of the cutter is pushed against will have a 45-degree angle (the profile of the bit) on each end of the cut, whereas the face that the router is sitting on (or the side that is resting on a router table) will actually have a curved cut to it, a lot of people actually overlook this detail and I'll be the first to admit I also did for years. By routing on both faces, you will achieve a curve on each side.

The way Mike did the stopped chamfers on his stair spindles is one way to get a true curve, by having the work set at a 45-degree angle relative to a straight bit; As seen here.
 
I don't follow the problem you're having, Tiresias. Is it with the chamfer itself, or with the stop detail?

I've made thousands of stopped chamfers, and there are lots of ways to do them. I guess my favourite is with a draw knife, then spokeshave, then chisel. I never get a saw involved. The most difficult part of the job is completing the chamfer up to the stop, which is a question of paring with a chisel, and, then, in my experience, scraping. I tend to do the scraping using the chisel, because that way you are doing almost the whole job with just one or two tools. It's a real pain if there is a knot involved!

I couldn't find a good photo:

FOGKLk9.png

Those straight stops of yours are a missed opportunity. Have a little play with a mallet and chisel and see if you can make a nice curved one. They're actually dead easy.
 
I don't go right down to the chamfer. I put a little step (2 or 3 mm). If you rounded that step over, it would be called a Lamb's tongue, which is one of the traditional chamfer stops. My problem with going down flush with the chamfer is that it looks somewhat similar to a routed stop, which I really dislike. It's my one big beef with Leo's Tally Ho project: he's doing machined chamfer stops, and they look awful.
 
I like those shouldered chamfers. I must admit I am quite lazy, so I tend to cut chamfers using a router (electric) but stop it short and cut the stops in by hand with a chisel. If you really want people to know your chamfers are hand cut, then dart stops are quite fun to do:

dart.jpg
 
Thanks all, especially Argus.

My difficulty, Mike, is that I don't like the result I'm getting. It could be because I'm using pine (the frame I'll be applying this to is oak, but I don't have enough to experiment too much) or it could be my incompetence. If what I'm doing is the best way - and that is what I was trying to establish - then obviously I need to practice some more.

I'll look at a chamfer shave. And experiment with other stop treatments. A curve with a step sounds doable.

Thanks again.
 
AJB Temple":3vq159jc said:
I like those shouldered chamfers. I must admit I am quite lazy, so I tend to cut chamfers using a router (electric) but stop it short and cut the stops in by hand with a chisel. If you really want people to know your chamfers are hand cut, then dart stops are quite fun to do:

View attachment 1

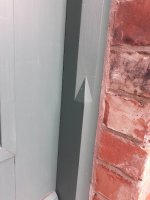
I live in an old Victorian Gothic place which had this detail on all the old door frames so I reproduced it on all the new frames. Never knew it was called a dart stop, thank you for that :eusa-clap:

Dart Chamfer.jpg
 
Tiresias":25368dr1 said:
Thanks all, especially Argus.

My difficulty, Mike, is that I don't like the result I'm getting. It could be because I'm using pine (the frame I'll be applying this to is oak, but I don't have enough to experiment too much) or it could be my incompetence. If what I'm doing is the best way - and that is what I was trying to establish - then obviously I need to practice some more.

I'll look at a chamfer shave. And experiment with other stop treatments. A curve with a step sounds doable.

Thanks again.

Pine can be a pig. You'll get very much better results in oak.
 
Tiresias":3folskcf said:
I just used a chisel. I have seen chamfer planes, both manufactured and home made, and don’t mind making one. But I can’t see that would help on a short moulding. And would it stop the tear out against the grain?

Isn't this the point of the stop chamfer plane - making erm, stopped chamfers ? The sole part is only about 30-40mm long, so you can do a fairly short chamfer. it may not like the grain of pine much though.

I too find routers scary, since noticing mine was cutting progressively deeper grooves as the bit was working itself out of a (fairly well tightened) collet. What would happen if I hadn't noticed ? It would have a lot of energy when it left the chuck.
 
Sheffield Tony":29nk61bl said:
I too find routers scary, since noticing mine was cutting progressively deeper grooves as the bit was working itself out of a (fairly well tightened) collet. What would happen if I hadn't noticed ? It would have a lot of energy when it left the chuck.

I’ve had that happen, but foolish teenage me hadn’t tightened the collet nut properly so the bit (funnily enough, a chamfer bit) came out and span around on the workbench like a spinning top :lol:

I would suggest if the bit is moving in your collet and you’ve tightened it well there may be something afoot. You have to be very careful not to use 6mm shank router bits with a 1/4” (6.35mm) collet, and likewise 12mm bits in a 1/2” (12.7mm) collet.
 
You have to be very careful not to use 6mm shank router bits with a 1/4” (6.35mm) collet, and likewise 12mm bits in a 1/2” (12.7mm) collet.

Dan, surely that is a huge "No, no!!!" :eusa-naughty: :eusa-naughty: ? I have a ½" shank, 2" wide x 1" 'tall' bottoming/tenoning bit that I would categorically NOT use were it to be a 12mm shank/½" collet combo. The thought of the gravitas (mass) that thing has spinning out of a collet at 12,000 rpm is the very real 'stuff of nightmares'. Even in a mighty 3½h.p. router with soft start, this beast of a bit lets you know it's 'got attitude' upon switching on, hand-held.

For that very reason, I have a 'multi-moulding' type 12mm shank bit of similar mass that I picked up for a song, but not used yet as I haven't yet found a supplier for 12mm Makita collets (just laziness - I know they're out there).
 
SamQ aka Ah! Q!":2jvhq47d said:
You have to be very careful not to use 6mm shank router bits with a 1/4” (6.35mm) collet, and likewise 12mm bits in a 1/2” (12.7mm) collet.

Dan, surely that is a huge "No, no!!!" :eusa-naughty: :eusa-naughty: ? I have a ½" shank, 2" wide x 1" 'tall' bottoming/tenoning bit that I would categorically NOT use were it to be a 12mm shank/½" collet combo. The thought of the gravitas (mass) that thing has spinning out of a collet at 12,000 rpm is the very real 'stuff of nightmares'. Even in a mighty 3½h.p. router with soft start, this beast of a bit lets you know it's 'got attitude' upon switching on, hand-held.

For that very reason, I have a 'multi-moulding' type 12mm shank bit of similar mass that I picked up for a song, but not used yet as I haven't yet found a supplier for 12mm Makita collets (just laziness - I know they're out there).

I said “very careful not to use”, Sam :lol:
 
Back
Top