• Hi all and welcome to TheWoodHaven2 brought into the 21st Century, kicking and screaming! We all have Alasdair to thank for the vast bulk of the heavy lifting to get us here, no more so than me because he's taken away a huge burden of responsibility from my shoulders and brought us to this new shiny home, with all your previous content (hopefully) still intact! Please peruse and feed back. There is still plenty to do, like changing the colour scheme, adding the banner graphic, tweaking the odd setting here and there so I have added a new thread in the 'Technical Issues, Bugs and Feature Requests' forum for you to add any issues you find, any missing settings or just anything you'd like to see added/removed from the feature set that Xenforo offers. We will get to everything over the coming weeks so please be patient, but add anything at all to the thread I mention above and we promise to get to them over the next few days/weeks/months. In the meantime, please enjoy!

Tiling substrate question

RogerS

Moderator
Staff member
Joined
Jul 21, 2014
Messages
15,651
Reaction score
1,342
Location
Somerset
In the kitchen, part of the floor are these t&g floorboards. We are tiling the kitchen floor. I was going to pull up these floorboards for possible salvage and re-use elsewhere. A lot of work as they are nailed in with 2" wire nails through the tongues !

But then I thought, why bother? Why not tile straight on top but on inspection I see that the joists are floating on a white polystyrene slab.
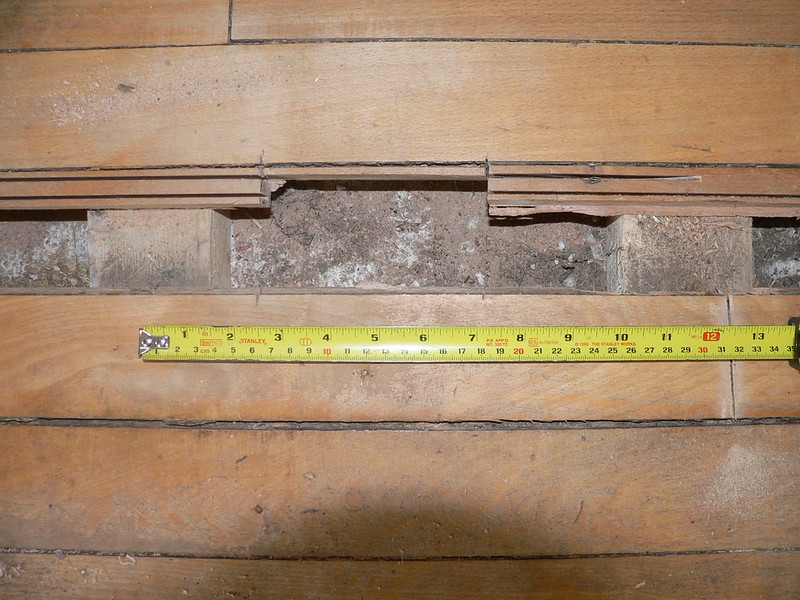


My concern is flexing of this substrate causing cracking at the joins between the tiles in the grout. It's very hard to feel if there is any flexion. The floorboards are 20mm thick.

I see three options :-

1) take up the floorboards as planned and replace with 18mm ply then tile

2) tile directly over the top of the floorboards

3) take up floorboards and joists and replace with ...what ? kingspan insulation ? but that will flex as well.
 
Are they joists under the floorboards Rog? the sub soil appears to be up the sides of the joists that'll want clearing out till there's 6"of clear space below the joist.

If they are joists I'd insulate between them with 4" ridged insulation that's what I did at home, I then PU glued & screwed 22mm flooring chipboard to the joists & after priming tiled straight onto that.

I did about 35squar metres of tiling like that at home & it still looks great, unfortunately I don't believe Bal make two part polymer based adhesive now so if I was doing it again I would probably line the chipboard before tiling there are a few products on the market for doing that
 
Yes, those are the joists but it's not earth but a very dirty slab of polystyrene insulation sitting on top of a concrete base. The thickness of the polystyrene is about 20mm and the joists are 45mm Having gone and had another look I'm now not that convinced that those joists actually are compressing the polystyrene as I can't see any deformation. So I may be worrying unnecessarily in which case I'm tempted to go for option 1 and just tile over the floorboards.

Mind you they are going to need to come up in some areas to get the plumbing and electrics into the right areas.
 
Take them out.

18mm marine ply.

Flexible adhesive.

There's way too much scope for movement and different levels tiling onto for boards.
 
That poly board takes a hell of a jump on it just to make a dent in it with your heels, so with the weight being spread across numerous joists I reckon there's as close to zero movement in that as you will get…

Cheers
Mark
 
I agree with greeno, there is too much scope for movement with the boards. replace with ply or put a layer of ply on top.
 
Not quite the same situation but our bathroom and en suite upstairs are on T&G floorboards, the tiler covered them in ply then tiled on top. No sign of movement in several years.


Rod
 
I stopped using ply and use tile backer board. I like the cement based on (nomoreply), you can fix it down with pu adhesive and screws over the substrate and can tank it as well. The other one is a cement faced foam sheet, they come in different thickneses and are also really good. They are screwed to the substrate with washers. Most of the tilers I know wouldn't use ply anymore and on the jobs I did and also subcontracted on we only ever used the backer boards.
 
MJ80":2jaeg1ks said:
I stopped using ply and use tile backer board. I like the cement based on (nomoreply), you can fix it down with pu adhesive and screws over the substrate and can tank it as well. The other one is a cement faced foam sheet, they come in different thickneses and are also really good. They are screwed to the substrate with washers. Most of the tilers I know wouldn't use ply anymore and on the jobs I did and also subcontracted on we only ever used the backer boards.

Not for floors, surely?
 
They are laid over the existing flooring. I have fitted them over chipboard, victorian floorboards, they are great. Go ask in a tiling supply shop. It is standard way of doing it nowadays. Not had any callbacks and the tilers prefer it. It's what the fancy bathroom firm I worked with always used and what I always specified on my jobs as well.

I couldn't imagine your floor being any more bouncy than an upstairs bathroom.
 
Decision made. The joists are coming up, removing the polystyrene, then relaying the joists. How do you ensure the joists are level given that the underlying concrete will be uneven? Plastic packer pieces ?

And how do you fix them down? Drilling concrete and plugging seems like a lot of hard work.
 
6 foot level
Top the joists so any hump in the timber is on the top edge and keep that for the top side
Get the first joist (1) in level then go over however many spaces you can span with your level put in another joist (2) and get that levelled off the first joist.
Put the missing joists inbetween and lay the level over the each end on the first two joists (1 & 2) and pack the others up to suit.
Then go from the second joist(2) and span over as far as you can with the level and put in another joist (3) that is levelled off (2), fill in the middle section as before
Use sliding wedges to pack them up. There are some really good plastic ones available, if you are using timber wedges put a bit of dpc under them.
Noggins between the joists
Chipboard flooring - glue on the joints
6mm backerboard
tiles
 
Many thanks, MJ.
"Top the joist"

Not sure I understand that.
 
If you look down the length of the joist as it would be fitted, narrow section at the top and bottom. One side will more than likely have a bow. Put the bowed face to the top when you install them. Hence topping the joist (at least that is what it was called where I did my time). It acts like an arch.
 
Turn your level end for end on each section you put in to account for any discrepancy.
 
Back
Top