• Hi all and welcome to TheWoodHaven2 brought into the 21st Century, kicking and screaming! We all have Alasdair to thank for the vast bulk of the heavy lifting to get us here, no more so than me because he's taken away a huge burden of responsibility from my shoulders and brought us to this new shiny home, with all your previous content (hopefully) still intact! Please peruse and feed back. There is still plenty to do, like changing the colour scheme, adding the banner graphic, tweaking the odd setting here and there so I have added a new thread in the 'Technical Issues, Bugs and Feature Requests' forum for you to add any issues you find, any missing settings or just anything you'd like to see added/removed from the feature set that Xenforo offers. We will get to everything over the coming weeks so please be patient, but add anything at all to the thread I mention above and we promise to get to them over the next few days/weeks/months. In the meantime, please enjoy!

Wadkin RT Lathe restoration

Morning Wallace

The picks are gone or watermarked because they both wanted money to host them


Bob wrote about posting pictures some while ago when Photobucket started charging ...

viewtopic.php?f=20&t=2850

Cheers

Dave
 
Hi Wallace,

Thanks for the tips re spares.

My project is progressing. I have not managed to disassemble the motor to access and inspect the bearings. The nut at the rear end of the shaft has been modified by someone (I guess to lock it in place) and I can’t shift it.

Also there is a capacitor bolted to the bed that is connected to terminals C and LA2 on the main switch. Can you help me with the purpose of this component? Does it matter Whitchurch way round this is connected? I’m fairly certain I can recall from my pictures and notes but not 100%.

Advice and suggestions is much appreciated
 
Wozajazzer, can you put up some pictures please, and maybe give an indication of what parts you think you need.

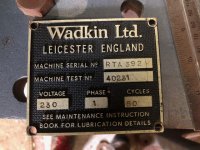
Also a picture of the Wadkin tag would be appreciated.

Cheers, Vann (fellow RT owner - RTA 380 of 1951)
 
I would hazard a guess that the capacitor is the one that gives the motor a jolt to start it spinning, Recommend you don’t touch the terminals or you might be the one that gets a jolt! Ian
 
Cabinetman":126tbng8 said:
I would hazard a guess that the capacitor is the one that gives the motor a jolt to start it spinning, Recommend you don’t touch the terminals or you might be the one that gets a jolt! Ian

Always worth being cautious but in the standard circuit for a single phase motor starter, the capacitor is discharged as soon as the motor slows down.
Following up on the earlier question, capacitors used in ac circuits are non polarised. In UK the mains voltage flips polarity 100 times per second so capacitors can be connected either way round.

Bob
 
Vann":1frrfyhv said:
Wozajazzer, can you put up some pictures please, and maybe give an indication of what parts you think you need.

Also a picture of the Wadkin tag would be appreciated.

Cheers, Vann (fellow RT owner - RTA 380 of 1951)

Hi Vann

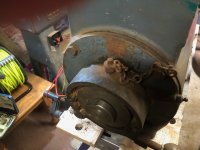
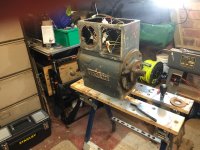
Here’s a couple of photos to begin with. Not been able to release the nut on the rear of the spindle shown in Headstock1 photo, so can’t inspect the state of the bearings but seem pretty reasonable.

Thanks for your interest.
 

Attachments

  • IMG_0660.jpeg
    IMG_0660.jpeg
    132.3 KB · Views: 5,864
  • IMG_0670.jpeg
    IMG_0670.jpeg
    180.6 KB · Views: 5,864
  • IMG_0659.jpeg
    IMG_0659.jpeg
    142.5 KB · Views: 5,864
Wozajazzer":q4uskyqb said:
Hi Vann

Here’s a couple of photos to begin with. Not been able to release the nut on the rear of the spindle shown in Headstock1 photo, so can’t inspect the state of the bearings but seem pretty reasonable.

Thanks for your interest.
Thanks for the tag photo. I see yours is just 12 RTs after mine, and also made in 1951.

I don't think that nut has been modified. Wadkin used nuts like that on many machines (there's one on the end of the spindle on my Wadkin RB 6" surface planer).
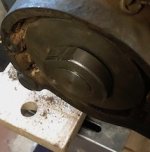
Round, with two flats - a saw cut down one side and a CSK machine screw to tighten the saw cut so the threads are clamped and locked.

RT nut.jpg
I didn't inspect the bearing at that end of mine - I have too many machines in parts and so decided not to go too far with the woodlathe. Before making that decision I had opened up the other end of the spindle. The bearing seemed okay, but looked a little starved for grease. When I checked the grease passage from the nipple to the bearing compartment it seemed fine to the outer race, but then no obvious passage to between the races :eusa-think: I'd be keen to hear your thoughts.

As for getting that nut off - I think you're nearly there. The biggest danger is shearing off the spindle locking pin. If that happens you'll have to grip the spindle on the inboard end - without munting the thread :shock: . Check that the thread isn't left hand (I should remember, but can't). Then gently heat the nut to expand it just slightly, and it should undo. Don't overheat (don't want to cook the grease!). A hot air gun should do it.

HTH.

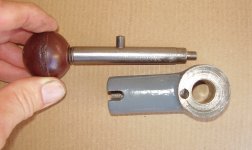
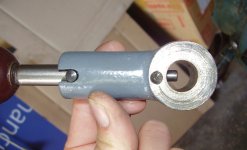
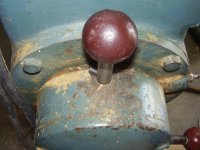
Incidently, your spindle lock is different to mine. Mine uses the speed selector handle to lock the spindle (an insurance to prevent starting the machine while the spindle is locked??).

RT pin2.jpgRT pin1.jpgRT pin3.jpg
Cheers, Vann.
 
Back
Top