• Hi all and welcome to TheWoodHaven2 brought into the 21st Century, kicking and screaming! We all have Alasdair to thank for the vast bulk of the heavy lifting to get us here, no more so than me because he's taken away a huge burden of responsibility from my shoulders and brought us to this new shiny home, with all your previous content (hopefully) still intact! Please peruse and feed back. There is still plenty to do, like changing the colour scheme, adding the banner graphic, tweaking the odd setting here and there so I have added a new thread in the 'Technical Issues, Bugs and Feature Requests' forum for you to add any issues you find, any missing settings or just anything you'd like to see added/removed from the feature set that Xenforo offers. We will get to everything over the coming weeks so please be patient, but add anything at all to the thread I mention above and we promise to get to them over the next few days/weeks/months. In the meantime, please enjoy!

Wedding gift table

GaryR

Nordic Pine
Joined
Jan 22, 2024
Messages
674
Reaction score
1,211
Location
Bloomington, Indiana, USA
Name
Gary
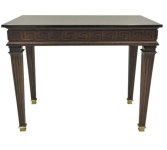
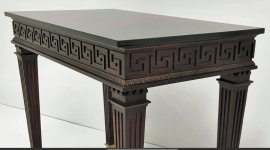
A nephew is getting married in April. I promised the couple a piece of furniture and they have chosen a smallish table with what I have learned are Louis the 16th features. They sent me this picture of the sort of thing they like, in particular the Greek meandros pattern on the skirt/apron, carved mouldings, a stone top, and fluted legs. (The pic is a piece made in the 1950's, not from the period).
8893239C-40E4-4366-88C1-0A61067453C9.jpeg


I am not familiar with this style and it seems a surprise choice (to me) for a 30-something couple, but I'm up for giving it a go and they are letting me modify the design to fit my skills, time, and budget.

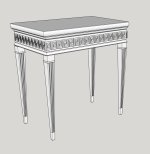
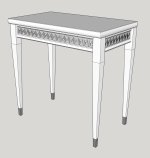
They have OK'd this slimmed down conception, still in the rough sketching stage. I tried to keep the features they wanted most. Dimensions will be about 32"wide, 32" tall, and 15" deep to fit a space they have in mind. Those will be adjusted as I play with the design.
BDB0DD21-B705-4A9B-BC2E-560A72D0E046_1_201_a.jpeg

As I'm still designing I'd be happy to get your suggestions. I already know the meandros carving will get more open space than shown in the sketch, the feet need attention, haven't chosen a moulding profile or pattern yet, etc.
 
That looks like fun!

I'm a much less experienced woodworker than you, but I have made a grand total of two legs of square section but decorated a little bit like your picture shows. They were on a copy of a Victorian chair which unfolds into a set of library steps.

IMG_0845.JPG

IMG_0843.JPG

The one thing I realised is that it's a whole lot easier if your leg design has two full sized square sections to reference against when you are cutting down into all the original surfaces to define locations of mouldings or ends of tapers. In my case, both those square sections stayed in the final legs, but in your case you might need to leave extra bits on the foot ends that you saw off as late as possible.

Of course that's not so relevant if you only want plain legs, but I'll leave it there as friendly encouragement...
 
Gary if you want to see more of that style of furniture research the Italian company Versace.
I'm 100% sure that the furniture you produce will be far better quality than Versace
 
I think the fluted legs help a lot. This design could be made a lot more delicate without much extra work and become an heirloom piece. Nice project.
 
Here is a sketch for fluted leg version (the flutes would be on all four faces of a leg.) I can imagine a router sled to do them. I can also imagine fluting some round legs, but I'm not very confident of my turning skills for something like this.

9ED74876-1AE9-48D8-BE64-E5B73356C99C_1_201_a.jpeg
 
A nephew is getting married in April. I promised the couple a piece of furniture and they have chosen a smallish table with what I have learned are Louis the 16th features. They sent me this picture of the sort of thing they like, in particular the Greek meandros pattern on the skirt/apron, carved mouldings, a stone top, and fluted legs. (The pic is a piece made in the 1950's, not from the period).

View attachment 37584


I am not familiar with this style and it seems a surprise choice (to me) for a 30-something couple, but I'm up for giving it a go and they are letting me modify the design to fit my skills, time, and budget.

They have OK'd this slimmed down conception, still in the rough sketching stage. I tried to keep the features they wanted most. Dimensions will be about 32"wide, 32" tall, and 15" deep to fit a space they have in mind. Those will be adjusted as I play with the design.

View attachment 37585

As I'm still designing I'd be happy to get your suggestions. I already know the meandros carving will get more open space than shown in the sketch, the feet need attention, haven't chosen a moulding profile or pattern yet, etc.
Oooh, that's tiny! The first image makes it looks like a big kitchen table, or hall table. Is it going up against a wall? (If so, you could save yourself some carving!).

The only comment I've got is that it looks like the legs are tapered on all 4 faces, which I think is fairly unsual.
 
Yes, going against a wall. Here is a front elevation of the example piece. It is hard to tell from this picture but I believe all four faces of the legs taper to better accommodate the symmetrical fluting. The one pictured is 41" wide, 32" high, 24" deep.923E2757-BA0B-49BB-80CB-541D2A14D4BB_1_201_a.jpeg
 
Somewhere in the past I have joined in a conversation about how fluting like that would have been done in the past. Things I remember:
- Antique examples show flutes which get narrower along their length, as you have drawn them. This is actually easier to achieve by carving than with a powered router.
- You will need some sort of guiding box to surround the leg, to make the top surface horizontal. The leg can be simply pivoted at each end, with the pivot for the thin end higher than the other.
- It's easier if all four faces are tapered and fluted the same, symmetrically

When I did my much simpler legs, the transverse convex mouldings were surprisingly straightforward to do. I defined the boundaries by sawcuts and used chisels to pare across the grain, finishing off with a gouge of the right curvature.
 
- Antique examples show flutes which get narrower along their length, as you have drawn them. This is actually easier to achieve by carving than with a powered router.
- You will need some sort of guiding box to surround the leg, to make the top surface horizontal. The leg can be simply pivoted at each end, with the pivot for the thin end higher than the other.
- It's easier if all four faces are tapered and fluted the same, symmetrically
That is pretty much the process I had in mind. I believe the flutes need to become shallower as they taper, too.
 
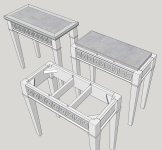
Here's the latest iteration of the table design. My nephew/his fiance said they would like to have a limestone top since I can get that locally. I've checked with some fabricators and they say they would be happy to make one but the minimum thickness they will cut is 2"/50 mm since limestone is too brittle to cut thinner than that. That looks too thick sitting on top of a table this small, and would be quite heavy (about 100 pounds/45 kg. So I'm making the stone smaller and recessing it inside the frame, then surrounding it with a mitred wood frame.

6B68685C-B2CE-45FB-B5B1-3A5DD3E69FF6_1_201_a.jpeg
 
Yes that’s what I would have done, might be worth checking local garden centres for thinner stone slabs that could be cut down? Black slate?
Bit concerning though if the table should get knocked over and land on a child or toes! That’s quite a heavy top.
 
To make it look thinner the stone mason could cut a shadow gap on the bottom so the top appears thinner
 
To make it look thinner the stone mason could cut a shadow gap on the bottom so the top appears thinner
Yes, thought about that but doing so adds considerably to the price and doesn't substantially reduce the weight. Insetting the stone as I've described lowers the weight about 30%.

I've warned the couple about the weight and they say they plan to attach it to a wall in the space they have in mind.
 
That looks like fun!

I'm a much less experienced woodworker than you, but I have made a grand total of two legs of square section but decorated a little bit like your picture shows. They were on a copy of a Victorian chair which unfolds into a set of library steps.

View attachment 37586

View attachment 37587

The one thing I realised is that it's a whole lot easier if your leg design has two full sized square sections to reference against when you are cutting down into all the original surfaces to define locations of mouldings or ends of tapers. In my case, both those square sections stayed in the final legs, but in your case you might need to leave extra bits on the foot ends that you saw off as late as possible.

Of course that's not so relevant if you only want plain legs, but I'll leave it there as friendly encouragement...
Andy, how did you go about shaping that leg? It looks from here like they are sculpted by removing the wood between the mouldings. If so, how did you excavate between the projected surfaces? Or did you apply the mouldings after?
 
All done with chisels and gouges, across the grain. I think probably a little bullnose rebate plane for the flats.
I was using some really cooperative wood, reclaimed from old furniture, which might have been sweet gum or satinwood. Walnut would be a good choice. I'll see if I can find more photos.
 
Ok, I've been down in the archives and found some evidence. This was all back in 2012.

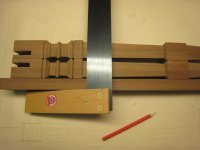
I first prepared a full size drawing, following the original Victorian design. (The book shows the legs as turned, but my turning skills were not up to the task and I'd seen a photo of an antique example with square legs, which I preferred.) Because this was all new to me, I had a dummy run first, in an offcut of softwood. The photos are a mixture of the trial run and the real things. I laid the wood on the drawing and marked off edges and transitions.
IMG_0220.jpg
Top
I then sawed down carefully, to define the depth at each point.

IMG_0223.jpg
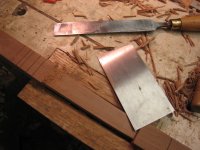
I bandsawed off the large areas, which I then took down to depth with chisels, plane and a cabinet scraper.

IMG_0225.jpg

IMG_0226.jpg

IMG_0233.jpg

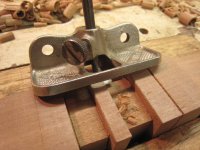
For the areas either side of the bead moulding, I excavated to depth with chisels and finished with a small router.

IMG_0234.jpg

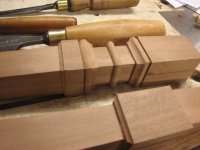
The mouldings themselves were made with a selection of sharp chisels and gouges, cutting horizontally in small steps. No action shots I'm afraid, but here's the result, before final sanding and finishing.

IMG_0266.jpg

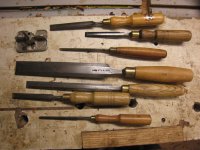
and a group shot of most of the tools

IMG_0268.jpg

Over all, it was more fun than work!

I hope this helps.
 
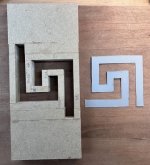
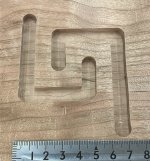
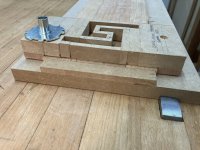
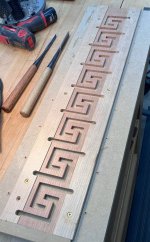
I'm waiting for the stone to be fabricated. Meanwhile I'm working out some jiggery for routing the meandros/Greek key. After many false starts and blind alleys I have this out of MDF. The tricky part has been juggling the width of the unit as an integral fraction of the space I have available and the width of the router bit plus bushing, and the thickness of the Greek key members. I think this will work but I have not tried it yet. I still need to make the rest of the jig that will let me index this jig for even spaces along the skirt/aprons. For scale, the unit is 80 mm x 70 mm, the routed space is a 9.3 mm (3/8") and the wood is whatever remains.


728A6429-33AB-49EF-95CD-023F0751B2F3_4_5005_c.jpeg
 
Last edited:
Will you be making the side rails out of single lengths of thickish wood, routing out to partial depth, or will you cut the shapes out of thin pieces which you then glue onto other thin pieces?

I ask because was just wondering how this would have been done on antique furniture, and thinking that I read somewhere that some Chippendale tables have shallow decorative sides built up in layers. Mind you, I expect that fretsawing that lot would be quite a meditative sort of task...
 
Good question. I'm concerned that routing directly into the apron will make the background too rough and be too tedious to smooth out. But routing a thin overlay has its own potential difficulties including manipulating a thin fragile piece with lots of short grain, and cleaning up glue squeeze out. I'm going to try it both ways for practice before committing myself.
 
Looking closely at your photo of the 1950s piece, I think it was done with a thin overlay and shows another snag - the join is coming away a bit in the corner!
 
Yes, that is another potential problem with gluing on an overlay. No glue lasts forever. On mine the ends of any overlay will be recessed between the legs, though, rather than exposed.
 
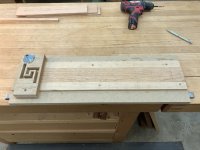
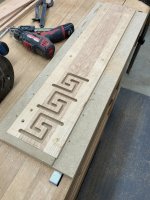
I made up the rest of jig to hold the thin (~7 mm) practice moulding blank and provide rails for the template to ride on horizontally while the vertical dimension is fixed.

D1C5C2E8-D911-47F1-9E2D-FD8B71BEC359_1_105_c.jpeg
0BF77E72-CAB4-4810-B6B1-A1E7E7804624_1_105_c.jpeg

I struck lines on the jig for registering the template horizontally. The rails limit its position vertically. Once the template was registered I screwed it in place and gave it a go. It seems to work fine although I need to make the template wider since the router is a bit tippy in that direction. 93EB5F0F-AAA0-4BA2-A536-3A9C84A3DC98_1_201_a.jpeg

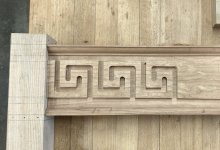
And then for fun assembled an apron, the Greek key moulding, the ovolo mouldings (that will later get carved with an egg and dart motif) and a leg. I didn't bother to square the inside corners of the key moulding since this is just practice. But I wanted to see the proportions of the different elements. So far so good, I think.

A5138ED1-9C39-4595-8505-6C0E9F7767F8_1_201_a.jpeg
 
Wow! Is the thin, routed piece cut from the same board as the solid rail behind it? The grain pattern seems to line up very nicely.
 
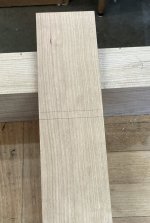
No, not the same board although I did select it to match for color. Then I changed my mind. I'm going to use this straight grained piece for the moulding instead, to better match the legs. B6F548AF-9A84-47A1-BFEF-1CCCFCB37D14_1_201_a.jpeg
 
That looks great.

Presumably you'll square the inside ends of the moulding before gluing it onto the rails to avoid chiselling into the rail?

Picking up Andy's point, I guess you could, if the thickness of your timber allows it, resaw the moulding from the front of the rails so that the grain matches perfectly. You'd never know the moulding was a separate piece.

Gluing it all up will require some care because it will be very hard to clean up any squeeze out in the routed channels.
 
Yes, to all. I probably won't resaw new moulding blanks, though. I wish I had thought of that before I bought the wood and now I would have to buy more and thicker stock. Unfortunately I'm already into this project for about twice as much money as what I originally planned. I like my nephew, but not that much.
 
Yes, to all. I probably won't resaw new moulding blanks, though. I wish I had thought of that before I bought the wood and now I would have to buy more and thicker stock. Unfortunately I'm already into this project for about twice as much money as what I originally planned. I like my nephew, but not that much.
It wouldn't have occurred to me unless Andy mentioned it.

In any case, 99% of the time it won't be viewed straight on (you'd need to crouch or kneel to get that view) so, visually, the grain on the faces of the moulding and the background won't line up anyway.

It will look amazing!
 
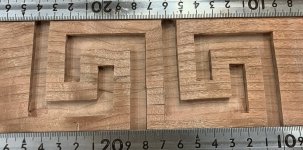
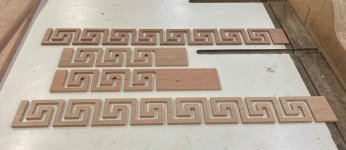
Front and back mouldings and two side mouldings. The side moulding still need to be squared up. They also have a unit width 3 mm less than the front and back mouldings to fit their space evenly so I had to make a separate template.
2DADC63A-9432-4F3C-A338-F6FAC3A393B4_1_201_a.jpeg

On one attempt I didn't have the blank held down firmly enough. Very exciting when it blew up.BD7C2900-33EB-4DD3-A9A5-59BE46AC15DE_4_5005_c.jpeg
 
Front and back mouldings and two side mouldings. The side moulding still need to be squared up. They also have a unit width 3 mm less than the front and back mouldings to fit their space evenly so I had to make a separate template.
View attachment 39483

On one attempt I didn't have the blank held down firmly enough. Very exciting when it blew up.View attachment 39484
Haha, exciting, or even scary. Just a thought, it might be that the cutouts now that the inside of the board is exposed to the air, might start to move which would mess up your careful design. Probably best to get them stuck down pronto.
Ian
 
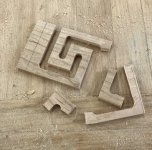
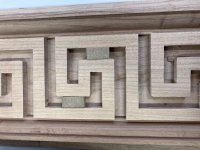
I can say that after a couple of days they haven't moved at all. The inside portions of the pattern can/do flex a bit with gentle side pressure. A friend has cautioned me that they may skate around when clamped and lubricated by the wet glue. To stop that he suggested a bit of double sided tape on the clamping caul to fix the pattern. I had another idea to drop in some spacers, which seems to make the pattern quite rigid. I'll also clamp on some temporary rails above and below the pattern to keep the whole from sliding.

50B2C65B-C4B1-4DBD-B7CB-7070AC068668_1_105_c.jpeg
 
Back
Top