• Hi all and welcome to TheWoodHaven2 brought into the 21st Century, kicking and screaming! We all have Alasdair to thank for the vast bulk of the heavy lifting to get us here, no more so than me because he's taken away a huge burden of responsibility from my shoulders and brought us to this new shiny home, with all your previous content (hopefully) still intact! Please peruse and feed back. There is still plenty to do, like changing the colour scheme, adding the banner graphic, tweaking the odd setting here and there so I have added a new thread in the 'Technical Issues, Bugs and Feature Requests' forum for you to add any issues you find, any missing settings or just anything you'd like to see added/removed from the feature set that Xenforo offers. We will get to everything over the coming weeks so please be patient, but add anything at all to the thread I mention above and we promise to get to them over the next few days/weeks/months. In the meantime, please enjoy!

Wooden Router Plane

rxh

Sapling
Joined
Nov 29, 2020
Messages
267
Reaction score
367
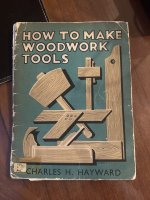
This illustration of a “Wood Router or the Old Woman’s Tooth” is taken from How to Make Woodworking Tools by Charles H Hayward, a book presumably dating from WW2 as it states that it is in complete conformity with the Book Production War Economy Standards. I decided to make something similar for the use of the local community shed, metal router planes being rather expensive to buy. Because it will be likely to be used by inexperienced woodworkers I modified the design to replace the cutting iron retaining wedge with a screw, which should make adjustment much easier.
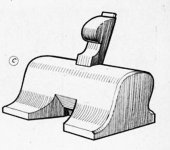
Wooden Router Plane.jpg

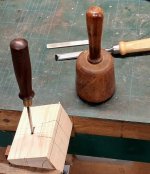
I cut and prepared a block of ash, then chopped a through mortice using a 1/8” chisel, working from both ends (this required some patience!).
20260112_095238.jpg

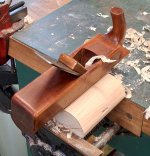
I removed as much waste as I could using a bandsaw then completed the shaping with moulding planes.
20260112_141607.jpg

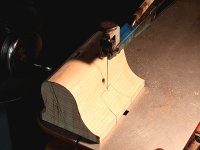
The cut-out was made by tenon saw and powered fretsaw, followed by a chisel.
20260112_165442.jpg

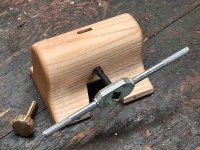
The block was drilled and tapped M8 coarse thread to accept the screw.
20260115_124542.jpg

The completed plane. Unfortunately, I found a couple of small shakes in the block so I reinforced it by drilling and inserting a couple of nails.
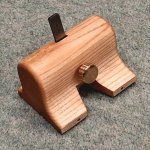
20260115_090541.jpg
20260115_090614.jpg

The plane in use. More of a scraping than a cutting action but it works.
20260115_090419.jpg
20260115_090436.jpg
 
That looks great......but does that knob obscure your view of the blade? (Might it be better on the back?) What is the bed ange of the blade, because it looks a bit steeper than the usual 45 degrees?
 
  • Like
Reactions: rxh
That looks great......but does that knob obscure your view of the blade? (Might it be better on the back?) What is the bed ange of the blade, because it looks a bit steeper than the usual 45 degrees?
Thanks - the tip of the cutter can be seen OK so the knob position is not really a problem. The bed angle is 70 degrees.
 
Exemplary work as ever, following an excellent source of designs. And one for the to-do list for anyone without a choice of different routers with different cutting angles.
 
  • Like
Reactions: rxh
Love handmade tools. There's something extra special about making something using equipment you've made yourself.
 
  • Like
Reactions: rxh
INteresting. Does it work well?
It seems fine for finishing a housing or recess to depth after removing most of the waste by chisel. To quote Charles H Hayward: ".... there is very little tendency to tear out the grain because it has more of a scraping action ..... It makes the working rather harder, but, as the majority of the waste has already been chopped away, this does not matter a great deal. Then, if the cutter does strike against the side it will do little damage because it is set at so high an angle. ..... Yet another advantage is the fact that it will work in a considerably smaller space than the metal type."
 
This illustration of a “Wood Router or the Old Woman’s Tooth” is taken from How to Make Woodworking Tools by Charles H Hayward, a book presumably dating from WW2 as it states that it is in complete conformity with the Book Production War Economy Standards. I decided to make something similar for the use of the local community shed, metal router planes being rather expensive to buy. Because it will be likely to be used by inexperienced woodworkers I modified the design to replace the cutting iron retaining wedge with a screw, which should make adjustment much easier.
View attachment 38471

I cut and prepared a block of ash, then chopped a through mortice using a 1/8” chisel, working from both ends (this required some patience!).
View attachment 38472

I removed as much waste as I could using a bandsaw then completed the shaping with moulding planes.
View attachment 38473

The cut-out was made by tenon saw and powered fretsaw, followed by a chisel.
View attachment 38475

The block was drilled and tapped M8 coarse thread to accept the screw.
View attachment 38476

The completed plane. Unfortunately, I found a couple of small shakes in the block so I reinforced it by drilling and inserting a couple of nails.
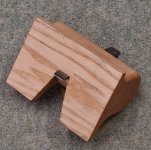
View attachment 38477
View attachment 38478

The plane in use. More of a scraping than a cutting action but it works.
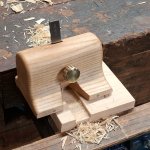
View attachment 38479
View attachment 38480

You mean this one?...

IMG_6249.jpeg

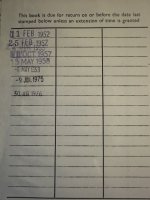
I was exactly three weeks old when this was first stamped:

IMG_6250.jpeg

...and I took it out of the college library on 30th June 1976, but forgot to take it back. Ooops :ROFLMAO: - Rob
 
This illustration of a “Wood Router or the Old Woman’s Tooth” is taken from How to Make Woodworking Tools by Charles H Hayward, a book presumably dating from WW2 as it states that it is in complete conformity with the Book Production War Economy Standards. I decided to make something similar for the use of the local community shed, metal router planes being rather expensive to buy. Because it will be likely to be used by inexperienced woodworkers I modified the design to replace the cutting iron retaining wedge with a screw, which should make adjustment much easier.
View attachment 38471

I cut and prepared a block of ash, then chopped a through mortice using a 1/8” chisel, working from both ends (this required some patience!).
View attachment 38472

I removed as much waste as I could using a bandsaw then completed the shaping with moulding planes.
View attachment 38473

The cut-out was made by tenon saw and powered fretsaw, followed by a chisel.
View attachment 38475

The block was drilled and tapped M8 coarse thread to accept the screw.
View attachment 38476

The completed plane. Unfortunately, I found a couple of small shakes in the block so I reinforced it by drilling and inserting a couple of nails.
View attachment 38477
View attachment 38478

The plane in use. More of a scraping than a cutting action but it works.
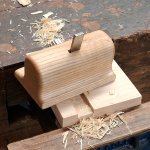
View attachment 38479
View attachment 38480
I like the large area to place your hands, very helpful for us with large hands, nice and effective.
 
  • Like
Reactions: rxh
You mean this one?...

View attachment 38481

I was exactly three weeks old when this was first stamped:

View attachment 38482

...and I took it out of the college library on 30th June 1976, but forgot to take it back. Ooops :ROFLMAO: - Rob

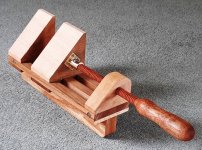
Yes, that's the one. This is another design I followed from that book, except I made it half scale - it is very useful for picture frame making.20210917_104025A.jpg
 
Back
Top