• Hi all and welcome to TheWoodHaven2 brought into the 21st Century, kicking and screaming! We all have Alasdair to thank for the vast bulk of the heavy lifting to get us here, no more so than me because he's taken away a huge burden of responsibility from my shoulders and brought us to this new shiny home, with all your previous content (hopefully) still intact! Please peruse and feed back. There is still plenty to do, like changing the colour scheme, adding the banner graphic, tweaking the odd setting here and there so I have added a new thread in the 'Technical Issues, Bugs and Feature Requests' forum for you to add any issues you find, any missing settings or just anything you'd like to see added/removed from the feature set that Xenforo offers. We will get to everything over the coming weeks so please be patient, but add anything at all to the thread I mention above and we promise to get to them over the next few days/weeks/months. In the meantime, please enjoy!

Sliding Dovetail proportions

9fingers

Moderator
Staff member
Joined
Jul 21, 2014
Messages
10,414
Reaction score
164
Location
Romsey Hampshire between Southampton and the New F
If I said I have a project on the drawing board then that would imply great maturity than that which exists partway in my head and the backs of a couple of envelopes.

Im considering an item of dining room furniture a bit like the top half of a traditional dresser to be wall hung. Around 8' wide and 4' high with about 4 shelves mainly for display purposes as we have enough storage in the understairs slide out cupboard I built a while back.

https://www.thewoodhaven2.co.uk/threads/veneer-balancing.6304/#post-108820 from post 27 on

I feel the right joints to attach the shelves to the side cheeks would be sliding dovetails - although the difficulty of cutting them accurately might make me regret this choice.

My question is about the proportions of tail to the timber thickness. I'll possibly use 7/8" - 22mm. my gut feel - and that is all it is to cut the groove 50% into the side cheek and cut no more than 50% of the shelf end away as shown in the sketch.
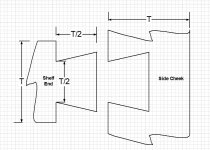
sliding dovetails 1.jpg

I'm very open to comments on the proportions and any rules of thumb from them wot knows about these things. The timber will be white oak and the joints will be blind so the visual appearance has no input to the design.

Nearly all my dovetail cutters are 8 degree as used in my Leigh Jig but I did find one reference to using a steeper angle and found an odd cutter in the rack that was 13 degrees as near I could measure and that is the angle used in the diagram.

TIA

Bob
 
Last edited:
I’m thinking that you will need a central vertical divider or two, 8ft is long.
You could get away with square cut housings or even square on one face and angled on the other, but as you are using a router it’s all immaterial really, the angle doesn’t matter within reason so go with what you have imo.
Ian
 
I did wonder about shelf stiffness. The back will be quite substantial and add stiffness and i could even thicken up the front edge of each shelf.
Its only going to have photos and knickknacks on it. Main idea is to break up a large bare wall with something in a similar panelled style to the opposite under stairs storage.
 
The main force on the shelves is going to be at right angles to the joint, not pulling out, so you shouldn't need too large a tail in there. I'd probably go for a third of the side thickness, or thereabouts, to keep the sides stronger. So far I've always done these with the widest part of the tail being the full thickness - or close to it - of the shelf board.

Depending on the width of your shelves it might be worth thinking about tapering the dovetails - it makes assembly a lot easier.
 
  • Like
Reactions: CHJ
I feel the right joints to attach the shelves to the side cheeks would be sliding dovetails - although the difficulty of cutting them accurately might make me regret this choice.

Having just cut a load of sliding dovetails for my shelf unit project, they really weren't that difficult with a bit of practice. If I can do it, anyone can!
 
I'd second the suggestion of tapering in the length. If you make the joints straight you risk not being able to dismantle a trial assembly, or else not being able to get it fully home. It would be normal to use a hand tool of some sort to finesse the fit, but I guess it could be an electric router or sander if it had to be.

Also, you don't need a dovetail on both top and bottom of the shelves. Having one side straight might simplify things. But I can't remember if you should have the straight side on the bottom or the top!
 
I'd second the suggestion of tapering in the length. ......

Also, you don't need a dovetail on both top and bottom of the shelves. Having one side straight might simplify things. But I can't remember if you should have the straight side on the bottom or the top!
I like cutting tapered sliding dovetails. At first they took a lot of fettling to get them to tighten up at the correct place, but, like anything, that gets easier with practise. It is worth experimenting a bit with how much taper to use. It can be surprising how little it needs, and I find a slight taper is easier to get right. One way you can sometimes cheat is to make the shelf longer than needed, fit the dovetail so both ends overhang, then trim the length to suit.

I did some shelves with one straight edge and one dovetailed edge. I put the straight edge on the bottom because it is the load-bearing side and also it seemed the easiest to get the position accurate - in my piece the inter-shelf space had to be very accurate so positioning was important. Comparing this to a French cleat I am not sure if my approach is the strongest but it has been strong enough for my application.
 
I'd certainly taper them, and I'd make them around or over half depth. Their structural role isn't so much holding the weight of the shelves, but holding the side walls of the unit, preventing twist or cupping. Parallel sided sliding dovetails I limit to joints say 2" long, and would be an utter nightmare with shelf-width joints for the reasons Andy gives. I am sure you can make a jig to create the taper. The other point I'd make is that the depth of the female side of the joint should be more than the length of the male. The end-grain of the male part of the joint makes no contribution, and additional friction from mating surfaces could cause quite a lot of fitting issues.
 
Last edited:
Thanks for all your suggestions. They are very much appreciated.
Some test joints would help me decide on the detail of the design.
This is very much at the thinking stage but I will write it up when I get round to cutting wood.
Currently, the aftermath of health issues have left me with very low motivation and make it all to easy to give up when problems arise. I’m determined to overcome this and get back to my hobbies and regain my old problem solving can-do philosophy.
I see my consultant in a week or so and will push as hard as I can for hormone treatment to give me the kick up the 4rse that my body needs.
 
Just watched this
and triggered an idea in my head.
I'll post later as visitors are about to turn up and I've had a chance to think/draw it.

Ingenious, but it does seem to need rather a lot of machines!

We've been here before too

 
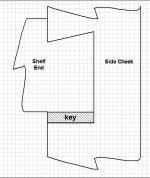
Based on the video I watched, I'm considering using a parallel sided key.

sliding dovetails 2.jpg

Would still be a stopped joint so the end grain of the key is only visible from the back

Certainly unorthodox but you should know what to expect of me!!

@AndyT And the problem with too many machines is? :ROFLMAO: :ROFLMAO: Sounds about right to me!
 
I would agree with Ian, an eight foot span is too wide even for a very lightly loaded shelf.
I think a small return on the vertical edges looks better than having the 22mm front edge showing, sliding dovetails seem to be a lot of work for little reward.
Have you considered the advantages of using book case strip? They make the shelf heights very flexible.
The photo is of a 2metre high bookcase with loose shelves which has proved flexible in use.in spite of being overloaded as you can see.
 

Attachments

  • IMG_1481.jpeg
    IMG_1481.jpeg
    238.3 KB · Views: 6
  • IMG_1480.jpeg
    IMG_1480.jpeg
    170.8 KB · Views: 6
I plan to have the rear edge of each shelf held rigidly along its length. I expect the shelves to be no deeper than 8" and possibly to beef up the front edge. I think these two measures will combat sag of what will be lightly loaded shelves. The dead weight of each shelve should be around 4lb per foot.
 
Careful though Bob. It's not just the physical load, but the aesthetics, which should determine shelf length. If the shelves all look long and unsupported then even if they don't sag they will look uncomfortably like they are about to sag. If you draw your proposal to scale I'm sure you'll soon see the desirabilty of intermediate supports. You might find it more interesting to have 3 un-evenly lengthed section......say 2', 4' and 2', rather than just 4' + 4'........but I really think you ought to consider very carefully before you put multiple 8' long unsupported shelves in a unit on the wall.
 
Back
Top